All posts by Chelle

What I Bought This Month – November 2013 Haul

Brace yourselves, this is a big one. I’ll include reviews for some of the products if I’ve used them long enough to form an opinion.

MAC Blacktrack Fluidline – $19 CAD

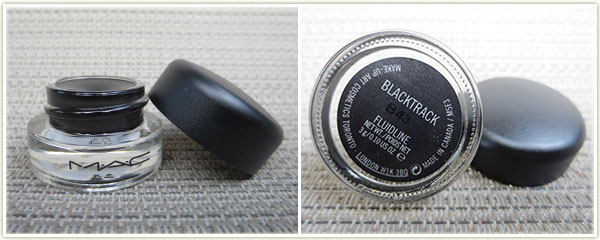
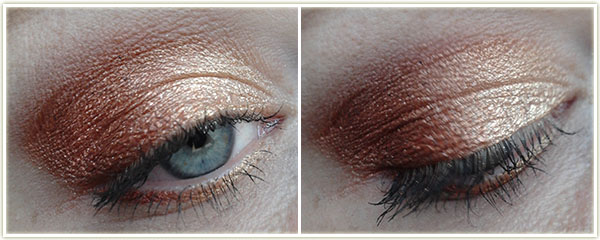
Out of sheer frustration with my Maybelline gel liner, I picked up MAC‘s fluidline inBlacktrack. I had used up an entire tub of it before, but had decided to try the cheaperMaybelline one to see if I preferred it. What a mistake. The Maybelline one had a nasty habit of smearing near the outer corners of my eyes, a problem I’ve never encountered with MAC‘s gel liner. The Maybelline one was also significantly stiffer and less fluid to apply. I certainly don’t intend to stray from this MAC product again!

Fantasy Makers Glitter Palette in Fairy Flight ($4.99 CAD)

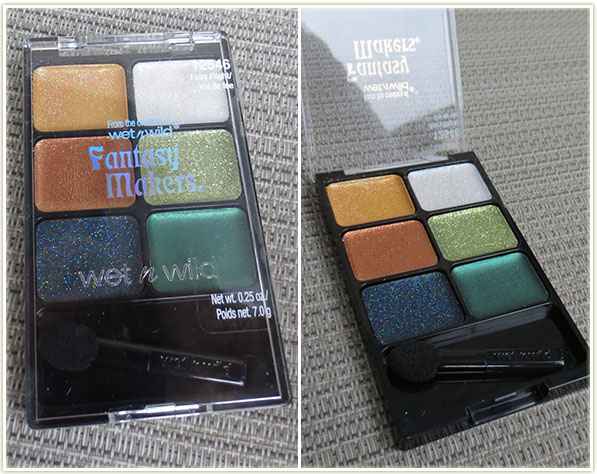
This product absolutely enrages me. I love Wet n Wild (although I’ve never used any of their cream products) and Fantasy Makers is a derivative of that company. I picked up this glitter palette in Fairy Flight shortly after Halloween (as it was a leftover from their Halloween display at the drug store) thinking that I could use the glitters for something fun.

Wrong. So wrong.

These aren’t even GLITTERY! There’s an overspray of glitter, but it certainly doesn’t go any deeper into the product. That gorgeous dark blue with shimmer on it? It’s just black underneath. The first swipe removes all of the glitter and you’re left with nothing but a black base. The same is true of all the colours – any of the glitter that you see is just an overspray. So frustrating.

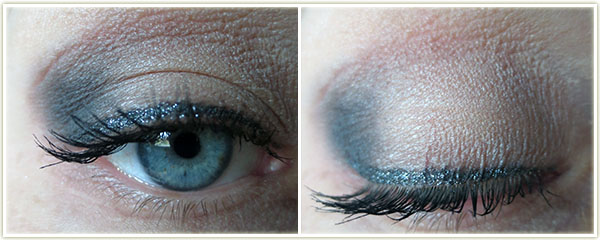
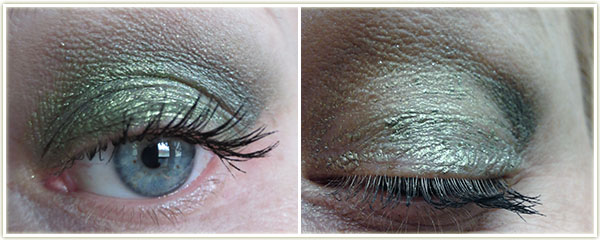
Not to be deterred, I thought I’d at least give the products a shot. I decided to use them as a base for eyeshadows (over top of my usual primer from Urban Decay). I tried out the pale green and the darker green, but within four hours of application my makeup was almost completely disintegrated. It got SO BAD that I actually took my eye makeup off at work. Which is something I don’t think I’ve ever done.

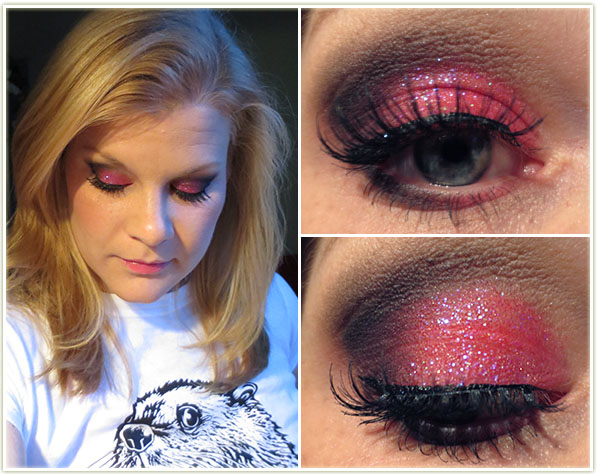
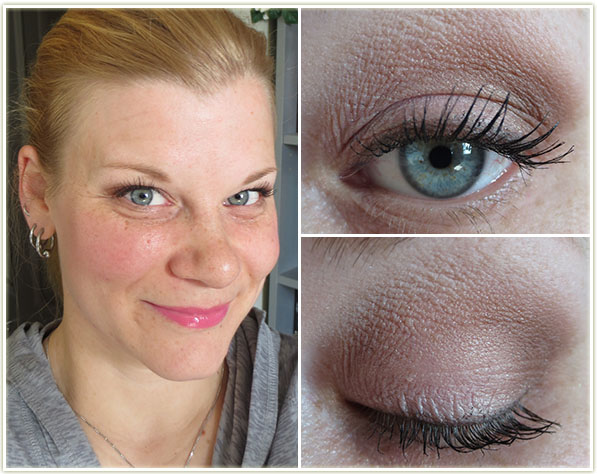
Here’s a look at it. The shot on the left was before I left for work, and the one on the right was taken around noon (so about four hours into wearing the makeup).

I haven’t tried them again on my eye, but just for laughs, I thought I’d swatch them on my hand as I’m typing this to see if maybe I could use them as face paint later on. But ten minutes later, they’re still wet, and smudgy, which makes them pretty much unusable for anything at all. Straight into the bin with this one! What a waste.

MUA Matte Foundation in Shade 1 Soft Sand – £1.00 GBP

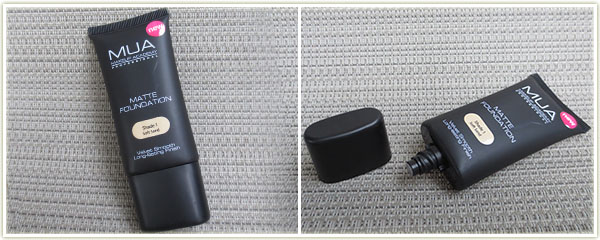
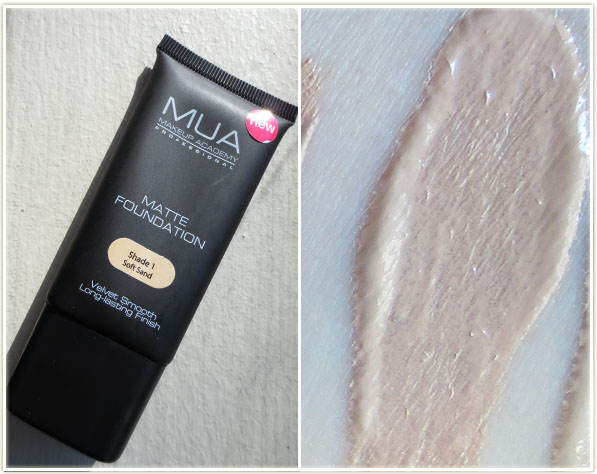
MUA is a company I’ve always looked at whenever I visited the UK, but not one I ever purchased products from. They were recently having free international shipping so I took advantage. I picked up their matte foundation in Shade 1 Soft Sand. I do especially like that even though it doesn’t come with a pump, it is at least a squeeze tube with a nozzle which makes it very easy for dispensing product.

MUA BB Cream in Light – £4.00 GBP

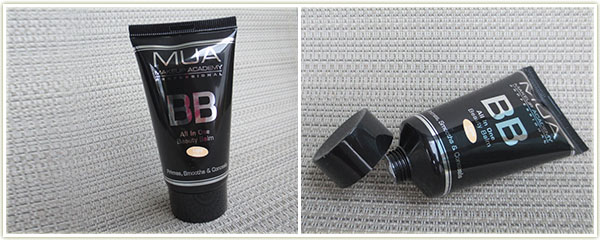
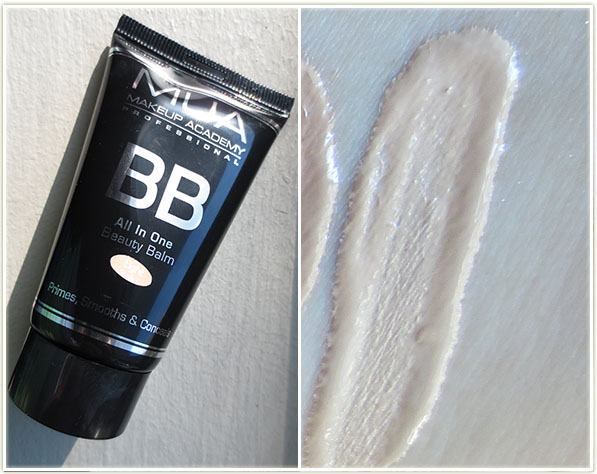
At £4, this was one of the most expensive items I picked up from MUA. Having never tried a BB cream before (I know, shock, horror), I decided the best idea would be to pick up a cheap one. (There’s some sarcasm in that statement!) At the moment, MUA‘s BB Cream inLight is just way too light for my skin. I’ll need to wait for the dead of winter before trying this one out again. Again with the nozzle – love it.

MUA Matte Lipsticks – £1.00 GBP each

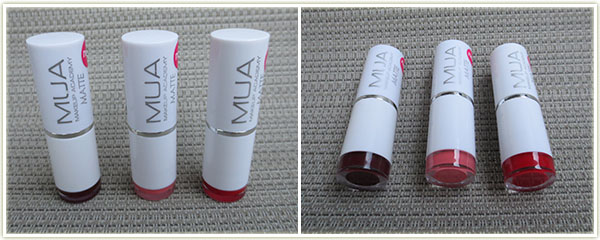
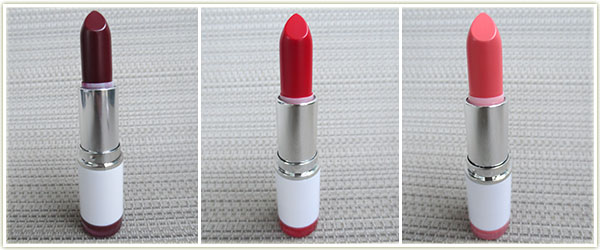
I picked up a few of MUA‘s matte lipsticks since they’ve received quite good reviews in the beauty blogging world. They swatch semi decently (and I only say that because Wild Berrywas particularly awful to swatch, but the others were not). At a pound each, they’re quite easy on your wallet. So far I’ve only worn Scarlet Siren and I loved the colour of it on my lips.

MUA Matte Lipsticks – Wild Berry, Scarlet Siren, Peachy Keen
MUA Pearl Eyeshadows in 9, 1, 26 – £1.00 GBP each

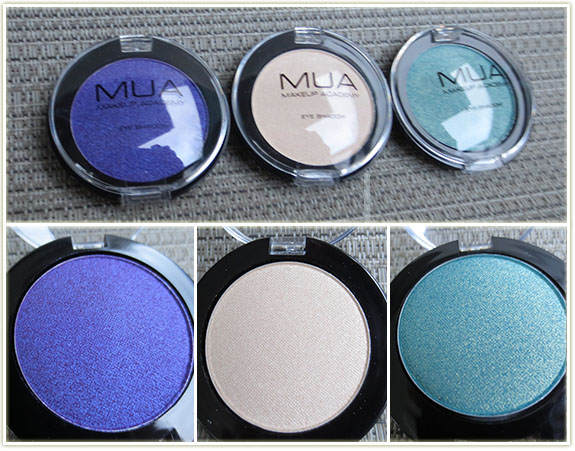
These eyeshadows by MUA are absolutely insane. They’re a single pound each and they wear like a dream. The colour payoff is unbelievable and the dimension to the shades is absolutely unheard of in a product that is just so cheap! These are definitely worth purchasing from MUA.

MUA Pretty Pastels Palette – £4.00 GBP

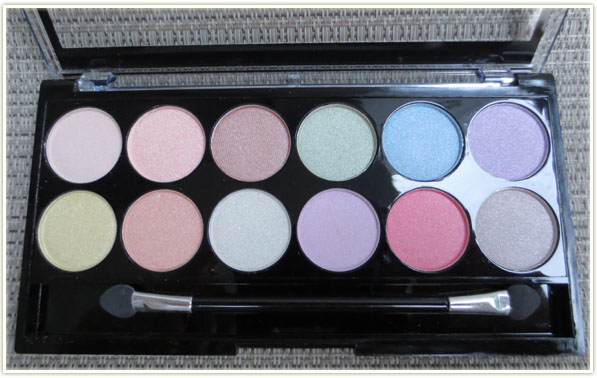
The other “expensive” product from MUA was their 12 pan eyeshadow palette in Pretty Pastels. While going through their palettes on their web site, this one struck me because it was unlike most colours I have in my eyeshadow collection. This palette has a lot of soft colours that will mix well with a lot of my brighter shades. The colour payoff is what you’d expect with pastels – very pale, sometimes sheer. As a total surprise though… that innocuous looking light shade in the top left corner? It looks boring as hell, but it has a beautiful pink duochrome to it. Very lovely colour.

MAC Prep + Prime Lip – $19 CAD

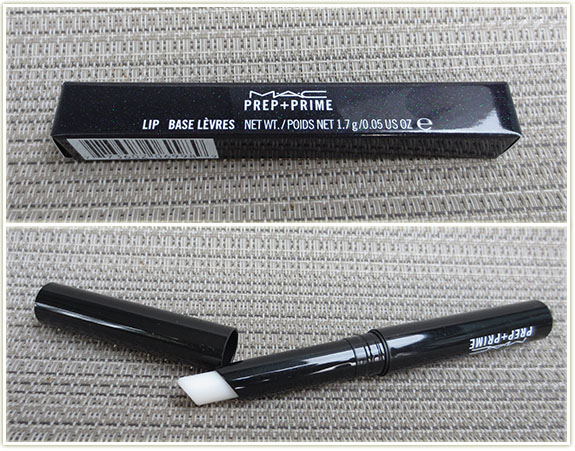
MAC‘s Prep + Prime for Lips is something that I can no longer be without. If I’m wearing a lipstick, I have to have this underneath as a base layer for my lips. I discussed it at length in my recent empties blog post, but, in short, this prevents bleeding, feathering and makes my lipstick stay on for hours. You need this in your life.

Real Techniques – Expert Face Brush ($6.74 USD) and Blush Brush ($8.98 USD)

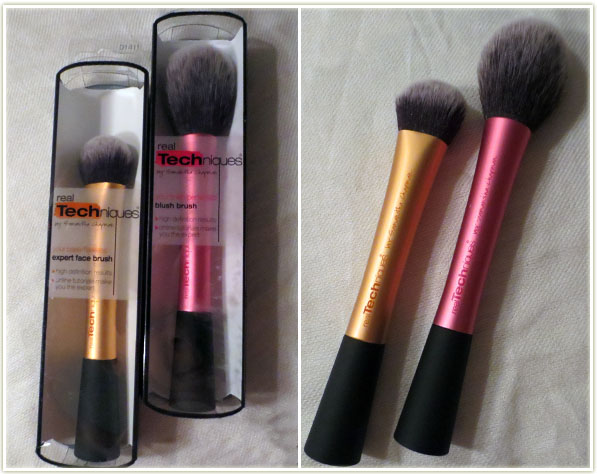
I had a credit for amazon.com and decided to pick up some products that are not regularly available in Canada. The Real Techniques kits are sold at Walmart here, but the individual brushes are not. I don’t have enough face brushes, so I picked up the Expert Face Brush(which has been much raved about in the beauty community) and the Blush Brush. I’ve never actually owned a “proper” blush brush and have been using my MAC 130 dual fiber brush for blush. I’m loving the soft fluffiness of the Blush Brush and have used it to apply my blush every day since I got it (it does work better for softer products though. I find it struggles to pick up product with “harder” blushes). I do like the Expert Face Brush as well although it does feel rather small for applying foundation.

Maybelline Vivids lipstick in Neon Red ($4.97 USD)

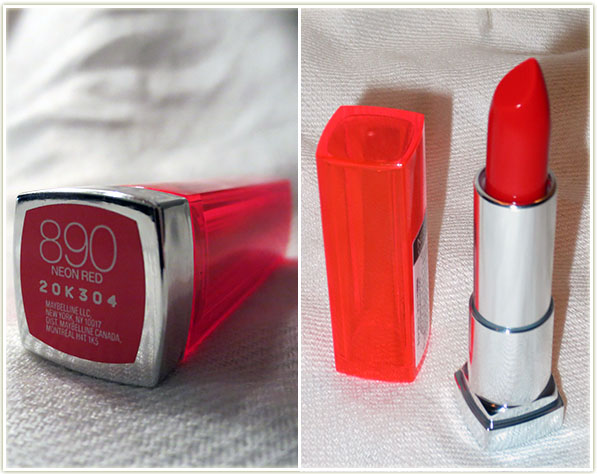
Oddly enough, Maybelline‘s Vivids line in Canada does not include Neon Red. Why we get some shades, but not all of them (this goes for various makeup brands), I’ll never know. I love the entirety of the Vivids line and this is no exception. The shade does lean rather orange.

Revlon Super Lustrous Lipstick in Cherries in the Snow (Creme) – $6.92 USD

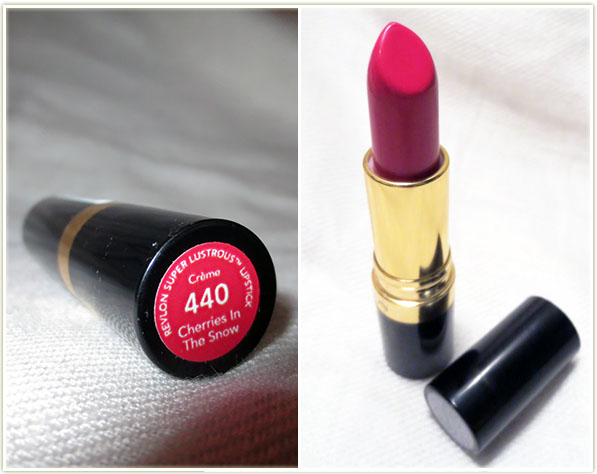
As one of Revlon‘s longest standing lipstick  shades (from the 1950s), I’m really curious as to why Cherries in the Snow is not available in Canada. I searched many a drugstore for this one and was never able to find it. As I was making my amazon.com order, I made sure to include this shade. While I see a lot of pink to this shade, almost everyone who commented on this lipstick while I was wearing it referred to it as red. /shrugs All I know is that I love it!

Tarte Off The Cuff palette – $50 CAD

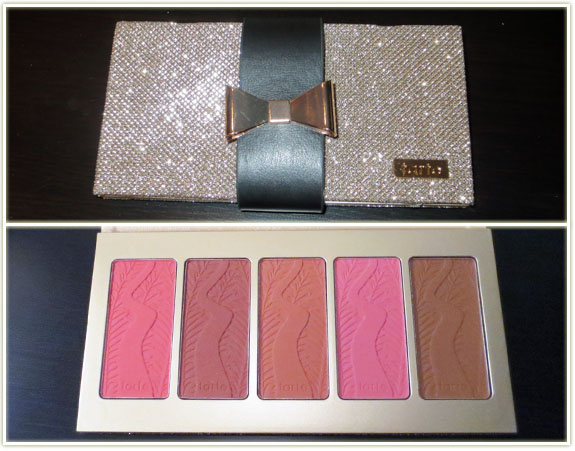
Be still my heart. This is a thing of beauty. With Sephora’s VIB sale fast approaching, I knew I wanted to pick up Tarte‘s Off The Cuff palette since I had missed out on their holiday blush set the previous year by waiting too long. Of course, the first day of the VIB sale I discovered I wasn’t ACTUALLY a VIB member of Sephora and couldn’t get this with the 20% discount. At this point it didn’t matter, I just wanted to get my hands on it. Tarte‘s Blissful was the first blush I ever owned and they remain my favourite blushes to this day. I don’t have a lot of them as they are quite expensive individually, so this was a perfect opportunity to get more bang for my buck.

The palette comes with four blush shades (Crave, Dazzled, Darling and Dollface) and their infamous Park Avenue Princess bronzer. The texture of the blushes is consistent with Tarte‘s standards and I’m really happy I picked this one up while I did because that very same day they sold out online and in stores. Phew!

Laura Mercier Artist Palette – $48 CAD (regularly $60 CAD)

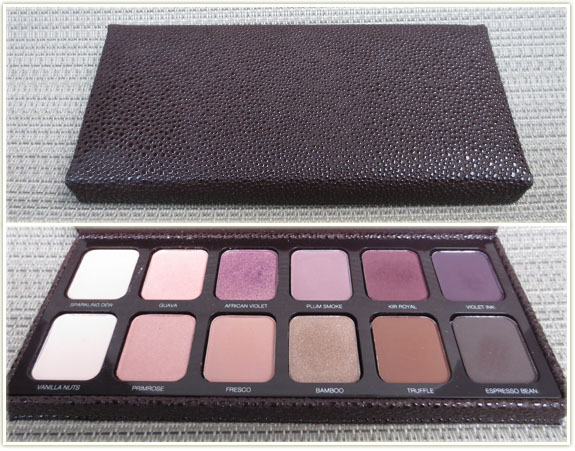
This Artist palette is my first introduction to Laura Mercier products. This is another one I waited for Sephora’s VIB sale to pick up. However, despite not actually being VIB status, the woman at the cash sold it to me at the discounted price anyway, which I didn’t even notice until after I’d paid!  I had to make a mad dash between Sephora stores as the one near my office sold out before I got there (and this also sold out online as well). I’ve used it several times since I picked it up and I love the feel of these eyeshadows – they blend beautifully and the pigmentation is fantastic. (The matte shades remind me a lot of MAC‘s Matte2 formula.) The shimmery purple with gold in it, African Violet, is a particular favourite of mine.

NYX Butter Glosses – ~$4 USD each

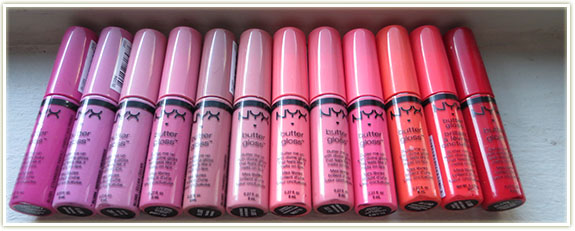
Oh man, I’m not even going to pretend like I have a reasonable explanation for this one. A lovely friend of mine in the US sent me two of NYX‘s butter glosses after I lamented about how I couldn’t find them anywhere in Toronto. Being the wonderful person that she is, she sent me two as a surprise (Creme Brulee and Maple Blondie). I received them, freaked out, applied them, freaked out again, logged online and ordered the whole damn set from a vendor on Ebay. It was like instantaneous loss of willpower. I BOUGHT THE WHOLE SET AND I’M NOT (completely) ASHAMED! These smell like vanilla, cream and candy.

Since the numbering/colouring system of these glosses seems to be totally out of whack, I decided to put them in some kind of colour gradient order. Which certainly isn’t helping me now that I want to name them. Ugh. Well done Chelle. Anyway, as per the above picture, the colours are (left to right): Strawberry Parfait, Merengue, Eclair, Vanilla Cream Pie, Tiramisu, Creme Brulee, Apple Strudel, Maple Blondie, Peaches and Cream, Cherry Cheese Cake, Peach Cobbler, Cherry Pie. And that’s it. I’m so done with glosses. I don’t need ANY more.

Garnier Moisture Rescue Cleansing Cloths – $5.99 CAD

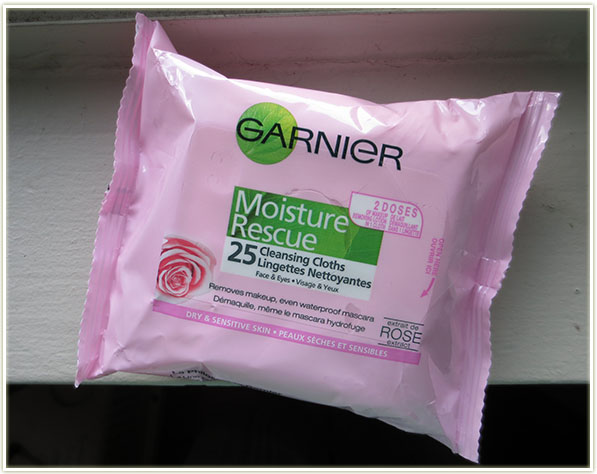
Garnier Cleansing Cloths were on sale for $5.99 (regular price is somewhere around the eleven dollar mark). I’ve never tried them before, but as I’ve said in the past, if it says it removes waterproof makeup, it’s worth a shot!

The Body Shop’s Body butters in Satsuma and Shea Butter – $10 CAD each

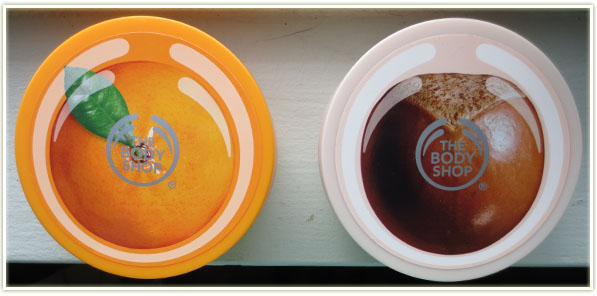
The Body Shop was having another sale on selected types of Body Butters. I already ownSatsuma, but I’ve been doing quite the number on it (and the smell is just absolutely amazing) so I picked up another one and grabbed a Shea Butter one at the same. Now,  I’m not sure what Shea Butter actually smells like, but I thought it would be slightly nutty. I don’t smell any nuts in the Shea scented one. If anything, it smells slightly like a mens cologne! Lovely scent though.

Revlon Parfumerie nail polish in Autumn Spice – $6.99 CAD

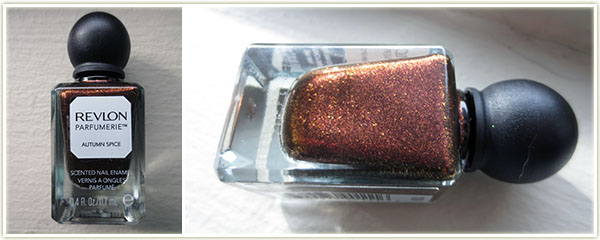
I came across Revlon‘s Parfumerie stand in a Rexall by accident. Although they had been popping up all over US drug stores, I hadn’t expected to see them in Canada so soon (we normally get drugstore makeup releases very late in comparison with the US. And sometimes we don’t even get them at all!). The Parfumerie collection appears to be a permanent addition to Revlon’s range, so don’t feel you need to pick up all of the colours immediately!

I’d heard mixed reviews as to the potency of the scent, but I loved the look of Autumn Spiceso I wanted to give it a try. I had thought that this shade/scent was more reddish, but on the nails it’s definitely brown with sparkle. There may be some red to it, but there isn’t a whole lot that’s apparent. In the bottle, you’ll only be able to smell nail polish, but once you get it on the nails and it dries down, it definitely smells of spices. So much so that while I was sleeping at night, I had to change the position of my hands as they were far too close to my face and I was just constantly inhaling spices. I had several people sniff my nails over the next few days (and yes, asking them to do that is as awkward as it sounds!) and all of them said my nails smelled like cinnamon. I didn’t use a top coat to ensure that the smell would be as potent as possible. However, after this scent trial, I will definitely be applying top coat from now on as the polish was chipping within a few days.

And that’s my beauty and makeup shopping done for the month of November!

What’s On My Face – Vol. 5

20131127pinkglitter

Wore this one out to a concert (Phildel was playing at the Drake  Hotel in Toronto – check her out). I’ve been hoarding this pink cosmetic glitter for what feels like eons now (seriously, a friend gave me some of this about ten years ago) and never really thought to wear it because I didn’t used to wear a lot of pink (I still don’t really). For whatever reason, it sprung into my head as I was getting ready for the show so I decided to give it a shot.

Eyes: I used Urban Decay Primer Potion in Original to prime the lid. I then applied SleekPout all over the lid (take a while to pack this on) and then used Urban Decay Blackout in the outer corner and into the crease. To blend out the black, I used Urban Decay Buck at the top of the crease to help blend it into my brow highlight which was MAC Brule. I also lined the lower lid with Pout (inner half) and Blackout (outer half).

To add the glitter, I first applied Too Faced Glitter Glue wherever the pink eyeshadow was, then dabbed the glitter over top. I wish I knew what the glitter was, but I don’t as it’s been decanted into an unlabeled bottle. It’s a very transparent pink glitter with a slight blue iridescence.

I then lined the upper lash line with Physicians Formula Ultra Black liquid liner and applied Ardell Demi lashes with some Duo adhesive. To finish off the look I appliedL’Oreal Voluminous Carbon Black mascara (waterproof).

Face: Bourjois Healthy Mix Foundation in 52 Vanilla with Revlon Bronzed & Chic as my bronzer.

Lips: NYX Butter Gloss in Strawberry Parfait

Cheeks: Tarte Blissful


20131127udnaked

Just a very plain, neutral look.

Eyeshadows: Urban Decay Primer Potion in Original all over the lid and up to the brow. Maybelline Color Tattoo in Bad to the Bronze layered on top of the primer (all over the lid, barely into the crease). I then applied Urban Decay Sidecar (be careful with this one, the glitter gets EVERYWHERE) to the inner two-thirds of the lid with Urban DecayHustle in the outer corner and slightly blended into the crease. MAC Brule was used to highlight the brow and blend Hustle in slightly.

Liner: Maybelline Gel Liner in Blackest Black

Lashes: Well, according to my notes on this look, I have single lashes glued in, so they would be by Ardell. Good thing I wrote it down, because I wouldn’t have picked up on them from these shots. I used CoverGirl Clump Crusher in Very Black as my mascara.


20131127lmartist2

Playing around with my Laura Mercier Artist palette.

Primer:  Urban Decay Primer Potion in Original

Eyeshadows: I used the light lavender shade from the MUA Pretty Pastels palette all over the lid with Laura Mercier Ink on the outer third of the lid. Laura Mercier Vanilla Nuts was used to highlight the brow.

Liner: Physicians Formula Eye Booster in Ultra Black

Mascara: L’Oreal Voluminous Carbon Black (waterproof)

Rest of the Face:

  • Cheeks – Tarte Dollface
  • Lips – NYX Butter Gloss in Maple Blondie
  • No foundation or bronzer

20131127minty

Just an easy one I did while getting ready for work in the morning.

Primer:  Urban Decay Primer Potion in Original

Eyeshadows: Inglot AMC Shine 24 over the entire lid with Urban Decay Gunmetal in the outer corner and blended into the crease. MAC Brule as my brow highlight.

Mascara: L’Oreal Voluminous Carbon Black (waterproof)


20131127lmartist

Jeez, this one just looks boring looking at in pictures! Although I’m sure there’s some neutral lovers out there that will prefer this to my more colourful looks.

Eyeshadows: UDPP in Original all over the lid. (All Laura Mercier) Guava all over the entire lid, Truffle blended into the outer corner and through the crease with Vanilla Nuts as a brow highlight. I then pressed Espresso into the lashline to create a  soft liner.

Mascara: L’Oreal Voluminous Carbon Black (waterproof)

Rest of the Face:

  • Cheeks – Tarte Dollface
  • Lips – NYX Butter Gloss in Peaches and Cream
  • No foundation or bronzer

Drugstore Foundation Roundup

20131118_foundation_roundup

I’ll start this off by saying I still feel like I’m an extreme rookie when it comes to foundation. I often feel I have no concept as to what colour actually matches my  skin tone. A lot of what I say is going to be based on what professionals at MAC, Sephora or Boots have said to me. At MAC, depending on who I speak to, I’ve been told I’m either NC20 or NW20 (I do get pointed towards NW20 more often though). My veins appear blue, which means I have a cool undertone. One of the most important thing to note in the following swatches are that these are all done on the underside of my arm which is pretty darn pale. The underside of my arm does not match my face, nor does it even match tops of my arms, so keep that in mind as you’re comparing the colours to my skin. I tried swatching on my jaw line but it just made for incredibly awkward pictures.

Things to note about my skin:

  • At MAC I’m in the NW20/NC20 colour range.
  • My skin is not overly oily, however I do get occasional shiny patches. If I do get oily patches, I don’t generally try to powder it down as I don’t find them particularly blinding!
  • My veins appear blue, which means I have a cool undertone.
  • I don’t wear foundation every day as I don’t have anything to really cover up. A few occasional red patches where I pick at my skin, but I don’t need to cover acne or anything of the like. For me, foundation evens out skin tone.

On with the swatches! Prices are marked with the appropriate currency to the country in which I bought the foundation.

Bourjois Healthy Mix Serum in 51 Light Vanilla (~€14)

While in Ireland in May, I picked up the Bourjois Healthy Mix + Serum foundation in shades51 (Light Vanilla) and 52 (Vanilla). I’d heard many a good thing about this foundation and wanted to give it a try. The first thing that has to be said about this foundation is that it smells amazing. Putting this on your face is an absolute pleasure – it smells refreshingly like berries! The consistency is rather thin, although it does have somewhat of a gel-like texture which I suppose is the “serum” effect they refer to in the name. Shade 51 is too light for my complexion at the moment (even though in the swatch above it looks damn near perfect), so I’m hoping my skin pales out enough throughout the winter to be able to use it pure. If not, I’ll mix it with a darker foundation to get a better colour match.

Also worth noting is that this comes with a pump. I can’t tell you how invaluable pumps are for foundation. Nothing is worse than a bottle with an open end (I’m looking at youRevlon Colorstay!). I do find this gets patchy/wears away pretty quickly so the lasting power isn’t amazing.

Bourjois Healthy Mix Serum in 52 Vanilla (~€14)

Right now this shade (52 Vanilla) seems perfect for my skin. It blends in smoothly and evenly. As with the shade I mentioned above, this is a really liquid consistency that feels really refreshing on the skin despite not having a very long wear time. It’s perfect for those who don’t like the feeling of overly thick foundations.

No7 instant Radiance Foundation in Cool Vanilla (~€16)
No7 Instant Radiance Foundation in Cool Vanilla (~€16)

No7 Instant Radiance foundation in Cool Vanilla is the foundation I feel the most comfortable wearing, which probably has to do with it being the foundation shade I was colour matched to in Boots. I’m never QUITE sure if a foundation matches me, so having a laser gun tell me my perfect shade eases a lot of my worry. I was colour matched in Ireland in May, so I had a partial tan at the time as it had already been quite warm in Canada by that point. This is the ONLY foundation I’ve worn where someone has commented on how amazing my skin looked. I will admit that it looks dark in the bottle, but it certainly doesn’t appear that intense on my face.

This also comes with a pump – therefore I love it. There is a faint “cosmetic” scent to the product, but it’s not offensive. Lasting power is quite good as it will endure an entire work day without issue.

Revlon Colorstay Foundation in 220 Natural Beige (Combination/Oily) (~$20 CAD)

I had a bit of a love hate relationship with this foundation. Revlon Colorstay was the first liquid foundation I ever bought after hearing it recommended over and over again for being one of the best drugstore foundations ever. I took a leap of faith with the shade (220 Natural Beige) and it worked out decently well, though I do find this shade tends to run quite pink. This isn’t a shade I can wear during the dead of winter – it’s more an early summer and early fall shade (as my tan is both coming in and going out).

The first time I wore it I wasn’t loving it – it has a rather offensive paint-like scent (although you cannot smell it once it’s on your skin) and it dried down incredibly quickly, which wasn’t something I was used to. I gave up  on this foundation for a while then went back to it to force myself to finish the bottle… only to find that I suddenly LOVED the stuff. The coverage is intense – it will block out almost anything on your face and give you a flawless surface. It can appear quite artificial if you pack it on, so go lightly and build up a second layer if you really need it (I didn’t). It can feel rather tight if you’re not used to wearing foundation. Since the coverage is so heavy, it can look slightly artificial at times, which is why I tend to prefer how it looks after an hour or two of wear time once it’s had a chance to settle into your skin

I only wish this had a pump. I’ve read that some countries do have Colorstay in a pump, but I have yet to see that here in Canada!

Revlon Colorstay Foundation in 150 Buff (Combination/Oily) (~$20 CAD)

Just a paler shade of Revlon Colorstay that I anticipate wearing in the winter. This shade (150 Buff) shade leans more yellow than 220 Natural Beige and is also significantly lighter.

Revlon Colorstay Whipped Creme Foundation in 220 Nude (~$11 USD)

Ugh. This Revlon Colorstay Whipped Creme foundation (in 220 Nude) vexes me. First off, the number is the same as the Natural Beige shade in the normal liquid version and yet the shades have completely different names and are not similar at all. I bought this hoping it would be slightly paler than the liquid 220 Natural Beige shade – it’s definitely not, it’s darker!

I wore this throughout the summer as it was the darkest foundation I had and while it matched well enough, it was just never, ever comfortable to wear. Maybe it’s just because it was a cream foundation in the middle of a warm summer, but it just never felt like it completely settled into my skin. It really just felt like it sat on top of my skin. I forced myself to finish it, but I won’t purchase this one again. (And honestly, it has turned me off all cream foundations altogether now.) Also annoying is that despite it being in a rather cute tub, it was frustrating getting the product out. I resorted to using a cotton bud to remove the foundation, placed it one the back of my hand, and then dabbed my brush onto the back of my hand to pick up product.

Covergirl & Olay Tone Rehab 2 in 1 Foundation – CC Cream in 110 Classic Ivory (~$20 CAD)

Covergirl‘s attempt at a CC Cream is a bit of a laugh. The actual tube doesn’t say anywhere on it that it’s a CC Cream… except for the sticker at the top which looks like it was added as an afterthought once the CC Cream craze started up in the beauty world. As far as I can see, it doesn’t actually have any CC Cream properties: there’s no colour correction properties to it and there’s no SPF. So let’s just forget it’s even labeled a CC Cream and move on. I’ve been wearing 110 Classic Ivory more lately to get a feel for it and I will say that it is an incredibly matte foundation. The colour match is quite good for me as we’re headed into the winter, but it does tend to feel a bit drying as I progressed throughout the day. I would recommend wearing a decent moisturizer underneath this foundation. And thumbs up for the pump!

MUA BB Cream in Light (~£4 GBP)

MUA‘s BB Cream was cheap as chips and it doesn’t disappoint. It does feel rather thick, so go easy when you squeeze it out. The first time I applied it I definitely used too much and with the shade being too pale for me at the moment (man, I feel like I keep saying that!) it made me look rather ghostly. The dry down on this product is nice – you’ve got plenty of time to blend it into your skin and it just looks *nice*. To the touch it’s even rather soft. Love the squeezy tube and the nozzle end.

MUA Matte Foundation in Shade 1 Soft Sand (~£2 GBP)

MUA‘s Matte foundation is actually rather impressive. Not only is it incredibly cheap but it also has a nozzle end – a feature which I find to be an incredibly smart alternative to a pump. As a whole, the packaging on this one is rather awesome: It contains an ounce of foundation (typical for foundations) but it’s a flexible, soft tube with a nozzle. It’s compact and perfect for travelling, which makes it pretty ideal. I don’t find it holds up throughout the day as well as Revlon Colorstay, for example, but the cost of this foundation offsets just about every downside to that.

Here are all the foundations swatched side by side on the underside of my arm in indirect sunlight. As mentioned at the top of this post, my face has been colour matched to NW20 at MAC which is darker than my arm.

20131118_foundation_swatches_numbered

  1. Bourjois Healthy Mix Serum in 51 Light Vanilla
  2. Bourjois Healthy Mix Serum in 52 Vanilla
  3. No7 instant Radiance Foundation in Cool Vanilla
  4. Revlon Colorstay Foundation in 220 Natural Beige (Combination/Oily)
  5. Revlon Colorstay Foundation in 150 Buff (Combination/Oily)
  6. Revlon Colorstay Whipped Creme Foundation in 220 Nude
  7. Covergirl & Olay Tone Rehab 2 in 1 Foundation – CC Cream in 110 Classic Ivory
  8. MUA Matte Foundation in Shade 1 Soft Sand
  9. MUA BB Cream in Light

Those are all my foundations! I hoped the colours and swatches help you out if you were looking information and comparisons. Is there a foundation out there that you think I’d like? I’ll admit to never having owned a high end foundation so I’m sure that’s something I’ll be looking into at some point!

Fitness Friday – Where I Started Out

So let’s take a quick break from the makeup, and start with a visual.

196-149

Over the past few years  I’ve lost 47 pounds. At my heaviest recorded weight, I was 196 pounds and as of writing this I’m 149. My current “ultimate” goal weight is 140 pounds before I re-assess what I want to look like, or what kind of condition I want my body to be in. (For reference, I’m 5″3″.)

For me, it wasn’t looking at pictures that did me in. It was standing on the scale one Christmas break at my parents’ place when I read 196 pounds on the screen. I couldn’t believe it. I had an inkling I was “heavier” but since I hadn’t weighed myself in probably 5 years, I had no real concept as to what “heavier” was. I’ve never been small by anyone’s definition: I have football player shoulders and I usually have a decent combination of fat and muscle on my body. Throughout high school I was “thick”. Not fat, not slender, but just… thick. At the time, I was figure skating about 4-5 days a week, 3 hours each session. I also played soccer on my high school and competitive city teams. As a result, I could eat pretty much whatever I wanted, whenever I wanted. At a guess, I was around 140-150 pounds at this stage in my life.

This became a problem when I quit figure skating at age 17. Suddenly I was no longer able to absorb the calories I was downing, and yet my appetite was still voracious. I was still playing soccer, but since that was seasonal (April till November), it wasn’t enough of a calorie sink. By the time I started university at 19, I was about 165 pounds. I promptly gained the “Freshman Fifteen” by eating cafeteria food day in and day out as a result of living on campus with a meal card. I returned home after my first year of university weighing 175 pounds. I lost about 10 pounds that summer, but put it all right back on during my next year of school.

By the time I finished university, to right before I got married, I somehow managed to pack on another 20 pounds or so. I was still playing soccer, but over time I was becoming less and less active as I was playing more and more World of Warcraft. It was at this point that I decided weight loss was a requirement since I didn’t want to see 200+ pounds on the scale.

175
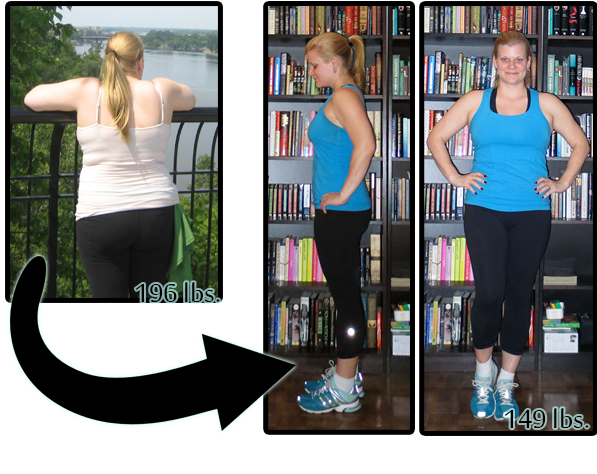
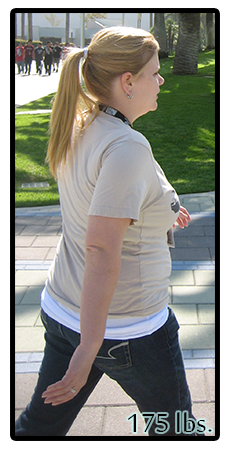
Since I was still somewhat active, it became a matter of watching what I ate. The first 20 or so pounds came off predominantly from cutting down portions (No, I didn’t need that second burrito!), however I also picked up running during this time. The best thing I ever did was pick up a Nike+ foot pod and sensor for my iPod. Tracking and monitoring my runs was hugely motivational. It also showed me that I couldn’t run nearly as long or as far as I thought I could and so that became even more incentive. We started out running 1 or 2 kilometers and eventually built it up. Finally hitting 5k was a relief as that’s what I felt I should’ve been doing all along.

I’d say it took about 10 months or so to lose 20 pounds. That doesn’t sound like a very fast loss rate, but I was happy with it and it was sustained loss too. I would occasionally vary up and down 5 pounds if I wasn’t careful with what I ate but never any more than that.

About a year into my exercise and weightloss routine, I stumbled across My Fitness Pal. Previously, my wonderful husband had been keeping track of all my calories, but it was time consuming and a bit of a hassle. My Fitness Pal was life changing. I’ve been logging calories on that bad boy for about two years now and it never gets old – heck, it’s even kind of fun! Feel free to add me on MFP – my user name is Nikachelle.

Over the last year or so I’ve dropped another 25 pounds, and am pretty pleased with how I’m doing. I never actually thought hitting 150 pounds was a reasonable goal, and now I’m shooting for an even lower weight! As I continue towards my goal weight (140 lbs.), I’ve been keeping up with my running and have added gymnastics and weight training to the mix while continuing to play soccer. I’ll have regular updates on my exercise plans and my progress as it happens. Thanks for reading!

Weekly Makeup Looks

More looks for you to peruse! I need to find a better title for this series. Maybe numbering them as I go? Hmmm….

20131113wavesofwhite

A night out look using my favourite glitter, Reflects: Transparent Teal!

Base: Urban Decay Primer Potion in Original

Eyeshadows: I applied the Maybelline Color Tattoo in Waves of White to the entire lid (do this in thin layers or the product can end up looking a bit bizarre). I then used MAC Contrast in the outer corner and blended it slightly into the crease, taking it about halfway across my lid. MAC Brule was used to highlight the brow.

And now for the fun part! I applied a thin layer of Too Faced Glitter Glue over the lid colour, waited for it to go tacky (keep your eyes shut while you do this or you’ll transfer the glue everywhere!), and then patted MAC Reflects: Transparent Teal onto the glue. A word of warning: Use this glue in thin layers otherwise the glitter is likely to crease.

I also smudged the Color Tattoo along the lower lashline with a hint of Contrast at the outer edge.

Liner: MAC Midnight Blues fluidline

Mascara: CoverGirl Clump Crusher in Very Black (water resistant) on the upper and lower lashes.

Lashes: Ardell 102 Demis

Eyebrows: MAC Omega 

Lips: Nothing!

Cheeks: Tarte Amazonian Clay Blush in Blissful

Bronzer: Hard Candy Hula Hula

Foundation: Revlon Colorstay in 220 Natural Beige


20131113maybellinecopy

Have to give credit where credit’s due on this one and the lovely Emily Noel of Beauty Broadcast is responsible for this gorgeous combination. This look involves the limited edition Maybelline quad in “Smokey Cinnamon” from their Fall 2012 collection. I have worn this look many times since I first saw her video and will continue to do so.

Base: Urban Decay Primer Potion in Original as the bottom layer. Maybelline Color Tattoos in Barely Beige (inner half of the lid) and Mossy Green (outer half of the lid). You don’t need to worry about blending the Color Tattoos as the eyeshadows will cover them up. I smudged Mossy Green under the lower lashline.

Eyeshadows: Using Maybelline‘s Smokey Cinnamon quad, I applied the very lightest beige shade to the inner third of the lid, the pale green to the center of the lid, and then finally the dark green to the outer corner. The light green will do a good job of blending together the Color Tattoos underneath.

Finally, I applied the brown colour in the palette into the crease to blend all the shadows together and create a nice fade to the brow. I think used MAC‘s Brule as a brow highlight.

Liner: MAC Blacktrack fluidline

Mascara:  CoverGirl Clump Crusher in Very Black (water resistant) on the upper and lower lashes.

Lips: Nothing!

Cheeks: Tarte Amazonian Clay Blush in Darling (from the Off the Cuff palette)

Bronzer: Revlon Photoready in Bronzed & Chic

Eyebrows: MAC Omega 

Foundation: Bourjois Healthy Mix Serum Gel Foundation in 52 Vanilla


20131113kikoliner

The point of this look was to test out a new KIKO eyeliner I had and to create a dark outer corner without bringing the shadow in too close to the center of the lid.

Base: Urban Decay Primer Potion in Original

Eyeshadows: (All MACI first applied Shroom all over the lid, right up to the brow. Using a little bit of Print, I smudged the shadow into the outer corner of the lid. Unfortunately, it looked a little bit too stark, so I swept Haux into the crease to give my hooded eyes some definition.

Liner: The star of the show! I used KIKO Twinkle Eye Pencil in 06 to line my upper lashline with a very slight wing at the outer edge.

I cannot say enough good things about this eye pencil! It didn’t budge and the sparkles within the liner never fell onto my cheeks throughout the entire work day. If anyone remembers the original Hard Candy line (not the one currently in Walmart, even though it has the same name they are definitely NOT the same products) this pencil is near identical to the glitter liner they used to have in Cyber. I loved that pencil so much when I was in my teens, but with Hard Candy being completely redone as a company, that pencil is no longer in production. The other bonus is thatCyber had very definite fallout whereas the KIKO product does not!

Mascara: CoverGirl Clump Crusher in Very Black (water resistant) on the upper lashes.


20131113infallibles

L’Oreal‘s Infallible eyeshadow in Golden Mahogany is a shade that I cannot even express how much the colour astonishes me. It’s a bit of a shame that the colour doesn’t pick up on camera quite as well as I see it with my eyes, but it’s a vibrant ruddy, rustic browned-red colour. It’s one of those shades that I actually gasped when I first swatched it. It seems that Golden Mahogany was a Canadian exclusive shade.

Base: Urban Decay Primer Potion in Original

Eyeshadows: I patted L’Oreal Infallible Eyeshadow in Golden Mahogany over the entire lid and then blended it with another brush through the crease. I then applied another L’Oreal Infallible in Burning Black (that’s Smoldering Plum for those of you in the US) into the outer corner but did not carry it into the crease. MAC Shroom was used to highlight the brow. I also used Golden Mahogany on the outer half of the lower lashline.

Liner: MAC Blacktrack fluidline

Mascara: CoverGirl Clump Crusher in Very Black (water resistant) on the upper lashes.


20131113heatelement

Hands down this is my favourite MAC mineralize eyeshadow (duo) ever.

Base: Urban Decay Primer Potion in Original

Eyeshadows: (All MAC) This is a super easy one. Spritz Fix+ (or water!) on a brush, then apply the lighter shade in the mineralize eyeshadow duo in Heat Element to the inner half of the lid and the copper (darker) shade to the outer half of the lid. I repeated this on the lower lashline with a smaller brush. Brule was used as a brow highlight and to blend out the upper crease.

Mascara: CoverGirl Clump Crusher in Very Black (water resistant) on the upper and lower lashes.


And that’s my latest roundup of looks I’ve been sporting!