Category Archives: Makeup

Urban Decay Afterglow Blush in Bittersweet (Review, Swatches & Look)

Urban Decay Afterglow Blush in Bittersweet

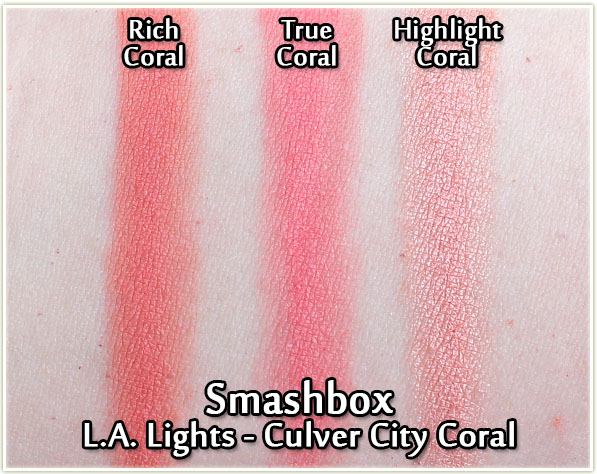
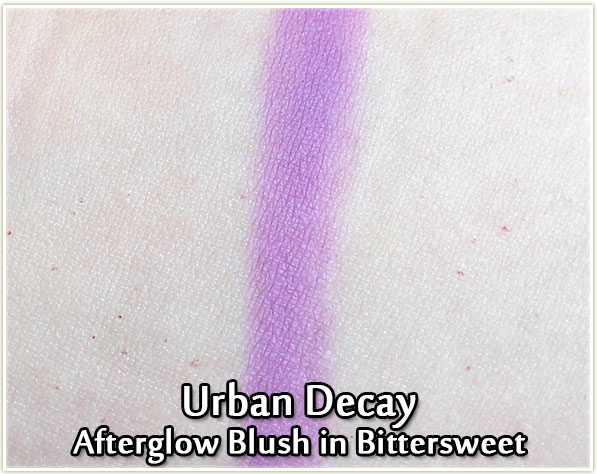
I’m having one hell of a moment with blush lately! First there was the Laura Geller Vivid Swirl blush in Guava, then there was the Blush Tag, quickly followed by me professing my undying lover for the Smashbox Culver City Coral trio and now… this Urban Decay Afterglow blush in Bittersweet.

Urban Decay Afterglow Blush in Bittersweet

In my April haul post, I pointed out that I didn’t really have a purple blush in my collection (not that many people do) and I had been eyeballing the one Natalie had reviewed several months back over on Ivory Avenue. I waited until the recent 15% off sale at Sephora and then snatched it right up.

Urban Decay Afterglow Blush in Bittersweet

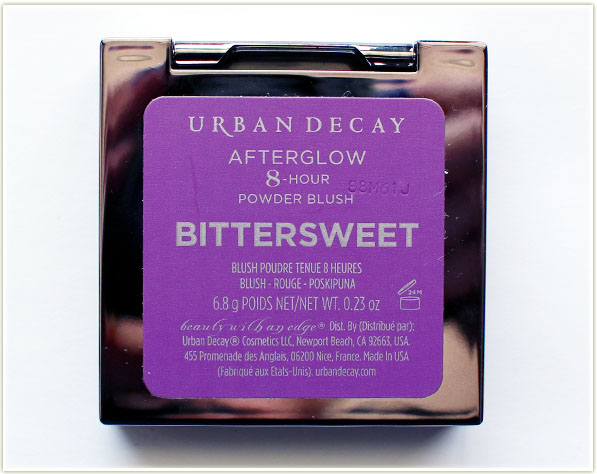
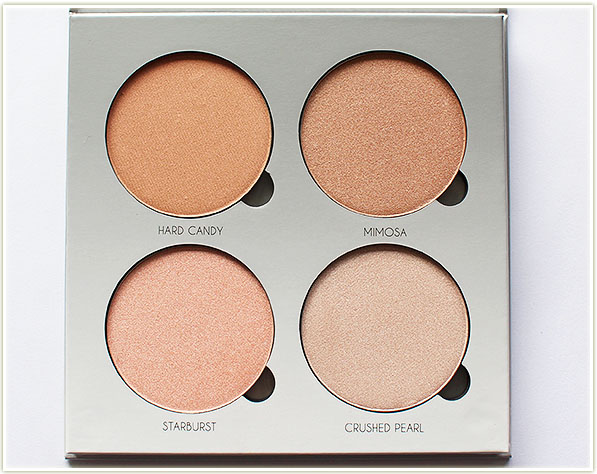
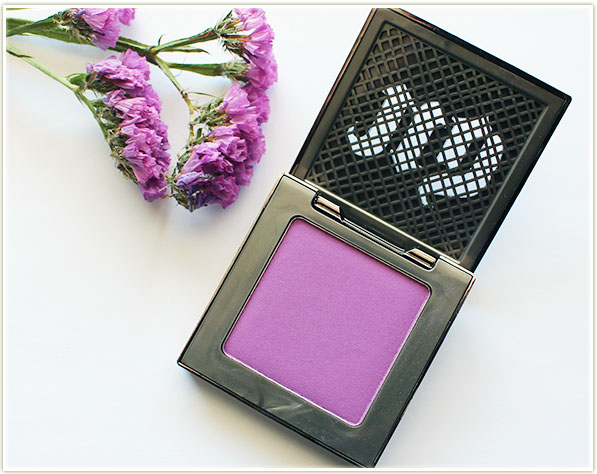
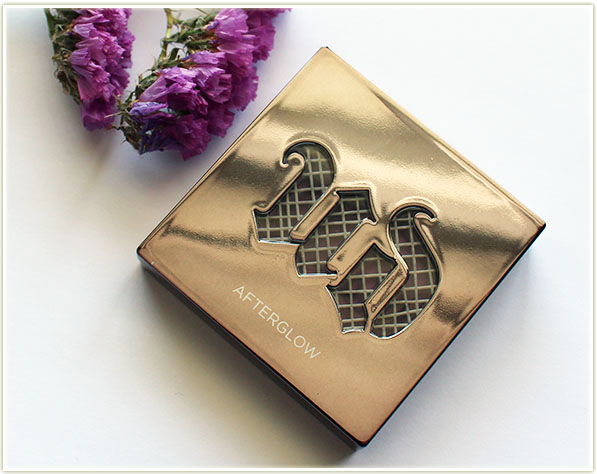
I’ve heard a few back and forth comments on the packaging for these blushes, but personally I’m a fan. I think it’s quite sleek and I like the gunmetal colour of it. The lid could really do with a mirror in it, but hey, you can’t win ’em all! I think the colour of the blush is supposed to show through the meshing in the lid, but it doesn’t really work in practice since you can’t really see much of the colour coming through. What DOES work though is how each sticker on the bottom is colour coded to match the blush. It may not be easy for large blush collections, but it does help makes the colours stand out a bit more when you’re trying to rifle through your collection.

Urban Decay Afterglow Blush in Bittersweet

Bear with me here – I’ve got a few thoughts tumbling around in my brain that I want to get out and it’s kind of amusing that it’s the result of this blush.

I’ve got a lot of products in my collection (makeup collection video here!) – from items I’ve bought myself and from items I’ve been sent as a result of having a blog and having some kind of an influential voice on the internet. As my collection has grown as a result of all of this, I’ve started to become more and more selective of the items I purchase. There’s always something new and exciting out there (and my god do I ever fall prey to the hype as much as anyone else), but often the products that are being put out there are a reformulation of the same shades of pink we’ve been seeing for years. Or shades of coral. Or rosy taupe. And those are all wonderful shades, but like any devout beauty addict, I’ve ended up with an awful lot of near identical colours in my blush collection.

So THAT’s why I wanted this blush because, for once, I own nothing like it and I can actually say that without it being a tongue in cheek comment. (I still want every shade of coral ever created though… just saying.)

Urban Decay Afterglow Blush in Bittersweet - swatch
Urban Decay Afterglow Blush in Bittersweet – swatch

The other thought I had after buying this blush was “Am I even a person that WEARS purple blush?”, quickly followed by a fearful one: “Is this the one product that I finally decide that *I* can’t wear???”

Wearing Bittersweet
Wearing Bittersweet

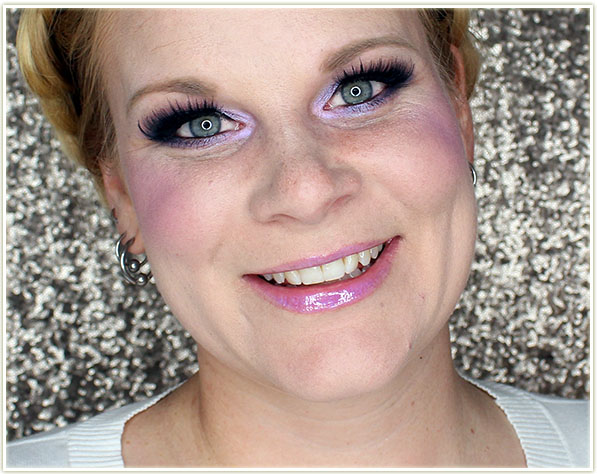
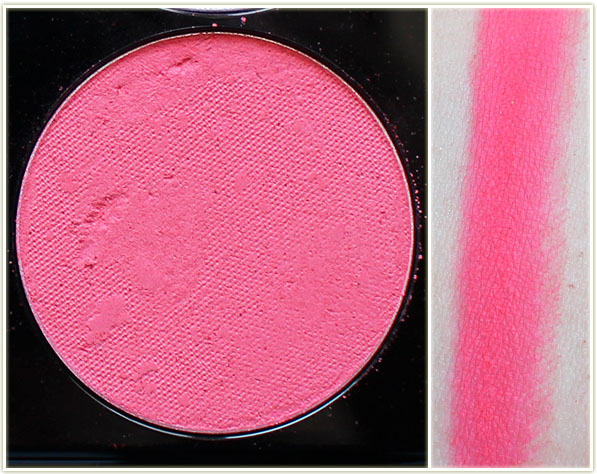
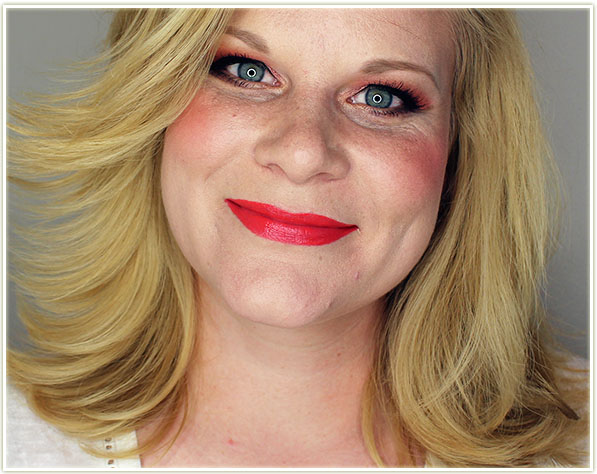
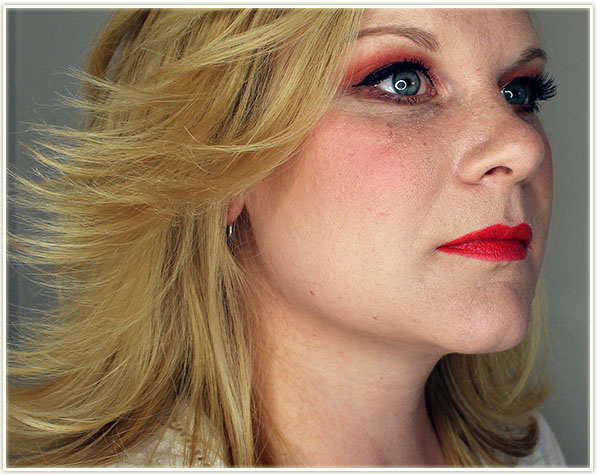
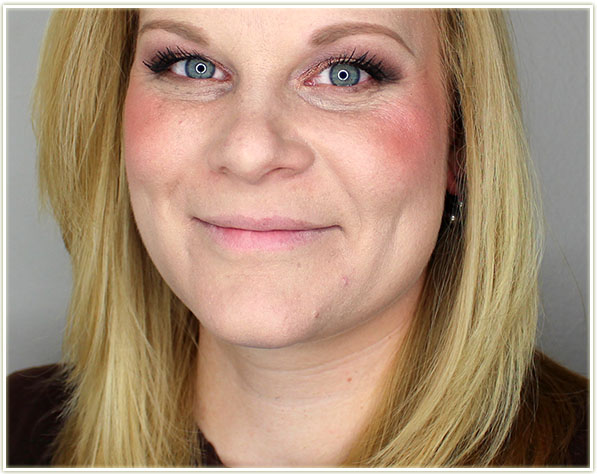
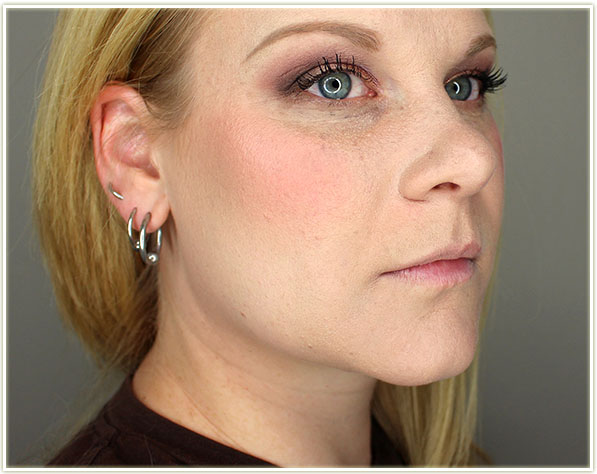
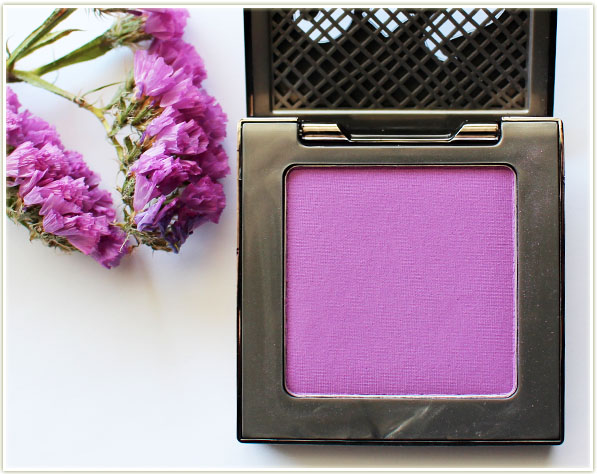
But hell no it’s not! I LOVE THIS FREAKING BLUSH! When I first applied it my eyeballs kind of popped out of their sockets because it was just SO MUCH PURPLE on my cheeks. I blended it out with my foundation sponge to decrease the intensity, but I quickly found myself applying more and more. In these shots, it actually ended up looking quite pink on my cheeks in comparison to my eyeshadow, but rest assured – it is PURPLE.

Wearing Bittersweet
Wearing Bittersweet

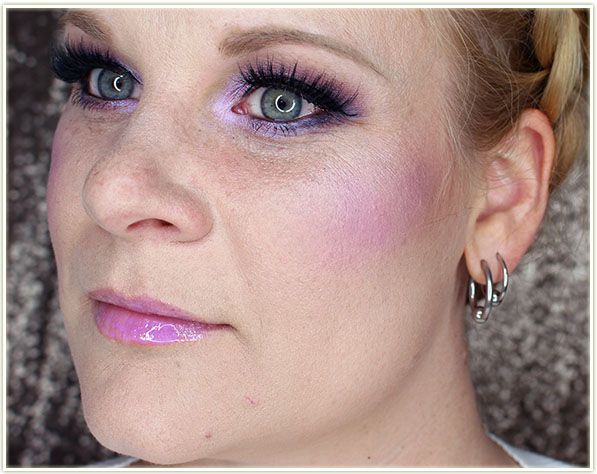
Bittersweet shocked me because there’s some sort of weirdass ethereal quality going on with it. It looks totally otherworldly/corpse-like (I’m sure that’ll turn a LOT of people on… haha) to me in person but maybe that’s just because I’m not used to seeing myself wear purple blush?

Final Thoughts

I suppose there are some of you out there that want a real review out of this post! So here’s the run down: Urban Decay‘s Bittersweet blush is only billed as an 8 hour blush (weird time frame – that barely even covers a day at the office!), but it lasts far closer to 10-12 hours on me. It may last even longer, but I haven’t put it to the test. It is relatively easy to blend although not the easiest. That may possibly be due to the colour being rather incongruous to my skin colour when compared with pink or coral. On me, I find Bittersweet oddly flattering. It doesn’t look natural at all because obviously no one flushes purple, but I think that’s what makes it unique. It’s *oddly* flattering on my skin tone and honestly? It makes me smile. And any makeup product that makes you smile when you’re wearing it is well worth the money.

I’m curious to hear your thoughts on this particular shade of blush. Is this a shade you would wear or want to try? Do you like the idea of it being slightly odd looking? Or is that too much of a turnoff for you? Let me know!

Urban Decay‘s Bittersweet blush (along with other shades!) can be purchased on sephora.ca for $32 CAD or on sephora.com for $26 USD.

Swatch Sunday: Mehron Fire

Mehron Fire

This palette by Mehron was practically screaming my name at IMATS New York!

Mehron Fire
Mehron Fire

The Mehron Fire palette comes encased in a sleek black plastic package and has an ENORMOUS mirror in the lid.

Mehron Fire palette
Mehron Fire palette

They are marked as “pressed pigments” however, so I’m not entirely positive if they’re considered eye safe. (I’d use them on my eyes regardless though.) One thing I thought was odd was that even though this is the Mehron FIRE palette, there isn’t a red shadow in there! And even more bizarrely, when Jen and I saw this palette at IMATS, we were both convinced the pink was a red. Something weird was going on with the lightning at the Mehron booth!

Mehron Fire Swatches

Mehron - Ignite
Mehron – Ignite
Mehron - Purple Heat
Mehron – Purple Heat
Mehron - Fire Island
Mehron – Fire Island
Mehron - Electric Green
Mehron – Electric Green
Mehron - Pure Lightning
Mehron – Pure Lightning
Mehron - Hot Pink
Mehron – Hot Pink
Mehron - Inferno
Mehron – Inferno
Mehron - Yellow Spark
Mehron – Yellow Spark

Smashbox L.A. Lights in Culver City Coral (Review, Swatches & Look)

Smashbox L.A. Lights in Culver City Coral

If there’s one colour in blush that makes me swoon harder than anything else… it would have to be coral. So when Smashbox threw together a blush and highlight compact centered around coral… well… 

Smashbox L.A. Lights in Culver City Coral

Available as of April 2016, Smashbox has released the L.A. Lights Blush & Highlight palette in three different shades: Pacific Coast Pink and Culver City Coral (available at Sephora and Beauty Boutique) and Malibu Berry (available at Beauty Boutique). These palettes feature two blushes alongsidea perfectly matched highlighter centered around the palette’s colour theme (pink, coral and berry).

Smashbox L.A. Lights in Culver City Coral

The pans are encased in an incredibly slim and sleek compact with a mirror that encompasses the entire lid (thank you! So appreciated!). Each individual pan nets you 2.9 grams of product.

Smashbox L.A. Lights in Culver City Coral

The pans are appropriately sized so that I can get even my largest blush brush in there, so you needn’t worry about these being small! There is no dust kick up even when I rub my brush into the pan which is a really nice since I hate when blush powder goes flying everywhere. That being said, these aren’t hardpacked blushes either (you know, when you have to practically scrape at the product to get colour payoff?). The consistency is what I want in ALL of my blushes – no dust kick up, excellent pigmentation and not hardpacked.

Smashbox L.A. Lights in Culver City Coral - swatches
Smashbox L.A. Lights in Culver City Coral – swatches

Each palette features a “Rich”, “True” and “Highlight” shade. Pigmentation was incredible across the board on all shades, although I will point out that the Highlight shade works more on me as a blush since it does have a decent amount of pigmentation and isn’t just a sheer wash highlighter.

Here’s how the shades look on my face:

Wearing True Coral

Wearing Rich Coral on cheeks

Rich Coral is definitely the darkest shade in the palette, but it’s the one I had the most fun with. You can go for a super pigmented look like I’ve gone for, or tone it down my applying a little bit less. (I’m not wearing any highlighter in these shots.)

Wearing Rich Coral on cheeks

From the side, of Rich Coral looks a bit less pigmented in my eyes, but still as stunning as ever. You can see it in action as I’m wearing it in my April Favourites video (and pssst, there’s a giveaway in that video!).

Wearing True Coral & Highlight Coral

Wearing True Coral & Highlight Coral

In these shots I’m wearing True Coral on my cheeks and Highlight Coral on my cheekbones.

Wearing True Coral & Highlight Coral

Highlight Coral is very low in sheen compared to some of the other highlighters I have, but still beautiful.

Final Thoughts

I can’t say enough good things about this Smashbox Culver City Coral trio! Seriously. This compact is incredible! The blush shades are *exactly* what I’m looking for: pigmentation and colour are second to none! The highlight isn’t exactly what I personally go for since I look for a bit more reflective qualities but that’s my personal take on it. In general, it’s an excellent soft focus highlighter that complements the blush shades very well. I know tons of people are going to appreciate the fact that the guesswork is taken out matching your blush and highlighter because this palette does it for you. The pigment on all of the shades were holding strong after a full workday for me and never looked patchy or faded. If you couldn’t already tell… I *LOVE* this product!

The Smashbox L.A. Lights Blush & Highlight palettes can be purchased on sephora.ca for $40 CAD and on sephora.com for $35 USD.

The product featured in this post was sent to me for review.

Real Techniques: Bold Metals, Sponge Duo and Cleansing Gel

Real Techniques

Being a long time viewer of Pixiwoo on YouTube, the Real Techniques brand holds a very special place in my heart. Created by Sam Chapman (and her sister Nicola was later added on), this brand has easily taken over my makeup brush collection as I, without a doubt, have more Real Techniques than any other brush brand combined.

Suffice to say… when new stuff gets released by RT, I get excited. I’ve got a few items that have been released (relatively) recently and wanted to cover them all in a roundup post.

Real Techniques Deep Cleansing Gel

Sadly, no matter how much I love a brand, there’s always going to be a dud or two, so let’s get that one out of the way immediately. The Deep Cleansing Gel is a makeup brush cleanser that is intended to “remove makeup, oils and impurities from your bristles for a flawless result”. You’re instructed to wet your brush, squeeze a drop of the gel onto the bristles, rub between your fingers and then rinse.

Sorry, but no. This doesn’t work. It barely works on brushes that were only dipped into powder products (even then still leaving coloured residue on your brush) , but it definitely does not work on anything that had been dipped into a liquid or cream formula. Although the gel smells LOVELY (seriously, if they could bottle it as a perfume, I’d absolutely wear it), it does next to nothing on my brushes. It’s hard to squeeze out of the tube and no matter how much I used – from a drop to almost a handful – I could not get the bristles of my brush clean. I’m so sad to say, but this is a total pass for me. Save yourselves the money and go buy some baby shampoo. 🙁

Real Techniques Bold Metals in 300 and 200

Alright, on to the AWESOME stuff! This is my first foray into the Bold Metals lineup and I’m already smitten. A while back, the Pixiwoo sisters made a video introducing the Bold Metals line making sure to point out that while they were happy with their base Real Techniques brush line, that was the best they could do at that price point (which is incredibly low given the quality of the brushes in my opinion). So, they opted to create a new sub line called Bold Metals that would have higher quality brushes, but at the cost of a higher price point.

The bristles feel softer to me than the original RT lineup and feature a weight balanced handle that is triangularly shaped so that you brushes don’t run off on you when you put them down on your desk. They also have brand new shapes, so you’re not seeing a duplication of the original brush lineup. Very smart.

Real Techniques Bold Metals in 300 and 200

The two brushes I have are the 300 Tapered Blush and the 200 Oval Shadow.

The 300 Tapered Blush is fast becoming a new best friend to me. I brought the brush with me to Iceland and forced myself to use it instead of my usual MAC 130 with my Tarte blushes. AND YOU KNOW WHAT? It was AWESOME. It applied my blush beautifully and precisely, which is exactly what I wanted. Since this is a smaller blush brush, you will find the application is more pointed, however, the cut of the brush makes it easy to blend out the edges giving you that beautiful glowing look – and not like you just whacked your cheeks with a dollop of blush. Two massive thumbs up for this brush!

The 200 Oval Shadow was an interesting one to me. It’s far larger than any other blending brush I own and I wasn’t sure how it was going to fit into the contours of my eye. End result? It doesn’t QUITE fit, but it is pretty damn epic when you want to blend out all your crease and outer corner shades (specifically if you’d made a damn mess and need to blend till the cows come home. Don’t lie – you know it’s happened to you!). The press info I have for this brush indicates you can use it for undereye concealer (although I don’t wear that stuff) which I can still see it fitting in that area very, very well.

Both brushes cleaned very easily (with baby shampoo) and did not retain any pigment which is always a concern for me with white bristles. They retained their shape and are still as soft as ever. Two massive thumbs up for the Bold Metals lineup!

Real Techniques Miracle Complexion Sponge Duo

One of the best parts of the newly launched items is this double up of the Miracle Complexion Sponge! This is *the* tool I reach for whenever I want to apply foundation. It creates a seamlessly blended foundation without any rough patches and I really could not ask for anything more in a sponge. This is the product that turned me off applying foundation with a brush – it’s THAT good! So when RT decided to release it in a doubled up package, I could not have been happier. It saves me money when buying a product that I will eventually need to replace, so what’s not to love? For reference, I use a Miracle Complexion Sponge for about 9-12 months before I replace it. If you clean it regularly, then you can get away with using this little guy for a very long time!

If you’re looking for more specific brush usage and where to use them on your face, may I recommend checking out my brush video on YouTube? It (accidentally) focused on a lot of Real Techniques brushes:

If you’re Canadian (like me!) and want to know where you can actually pick up Real Techniques, please check out the following roundup via Farley Co for a full breakdown (you can also buy them on their site too!). For other countries, off the top of my head… I’ve seen RT at Walmart and Harmons in the USA and in Iceland I saw them freaking EVERYWHERE (seriously, pharmacies, random makeup stores and even a massive selection at the airport!).

And there we have it! That’s new from Real Techniques and whether or not I’m loving it. 🙂

The products featured in this post were sent to me for consideration.

Swatch Sunday: Anastasia Beverly Hills Glow Kit in Gleam

Anastasia Beverly Hills Glow Kit in Gleam

Ohhh boy. Because I need another FOUR highlighters in my life, right?

Anastasia Beverly Hills Glow Kit in Gleam

When the Anastasia Beverly Hills Glow Kits got released a very short time ago I was like “meh, I don’t need a new highlighter, I have TONS!”. But then the hype set in. And people kept talking about just how much they wanted to wear all four shades at once and look like a disco ball going down the street. SO AM I TO RESIST?

Anastasia Beverly Hills Glow Kit in Gleam

Without a doubt, the names suckered me in. It’s so very easy to fall in love with a product when you love all of the names of the products isn’t it? I went for the Gleam quad because it just appealed to me more than the other one did. (But yeah… I kind of want both anyway…)

Anastasia Beverly Hills Glow Kit in Gleam Swatches

Things to note: these are very, very heavy swatches in an attempt to show their true pan colour. Unless you’re wearing it as a blush or an eyeshadow, I doubt you’d wear it this strong on your cheekbones. Also, there’s no mirror in the lid of the palette. 😐

Anastasia Beverly Hills - Hard Candy
Anastasia Beverly Hills – Hard Candy

^ This one has a crazy duochrome that was really hard to photograph!

Anastasia Beverly Hills - Mimosa
Anastasia Beverly Hills – Mimosa
Anastasia Beverly Hills - Starburst
Anastasia Beverly Hills – Starburst
Anastasia Beverly Hills - Crushed Pearl
Anastasia Beverly Hills – Crushed Pearl