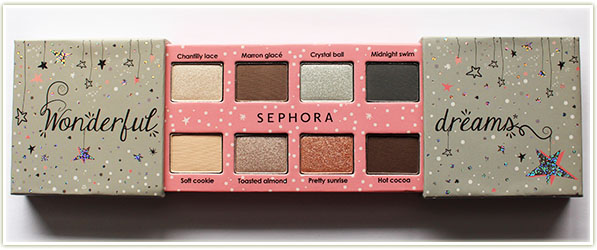
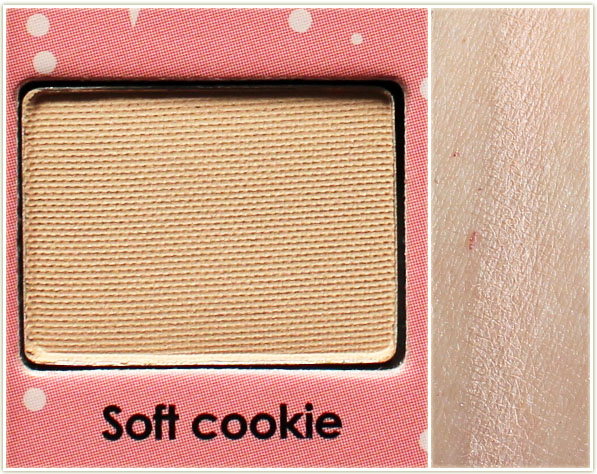
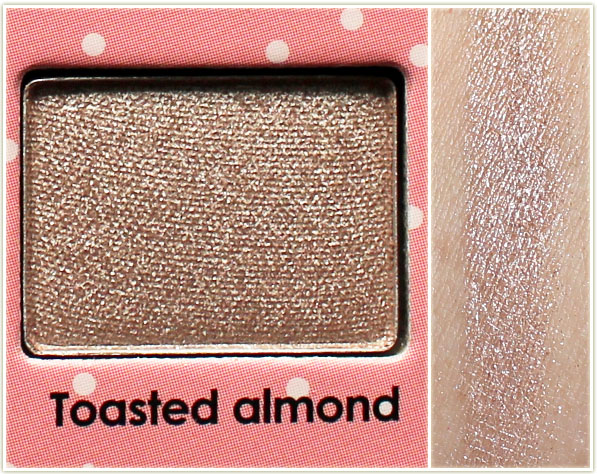
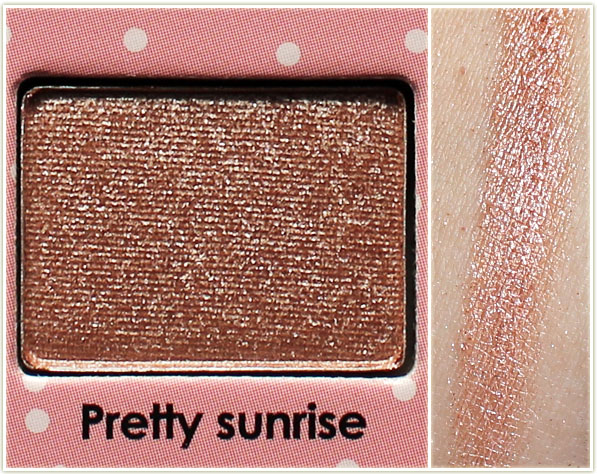
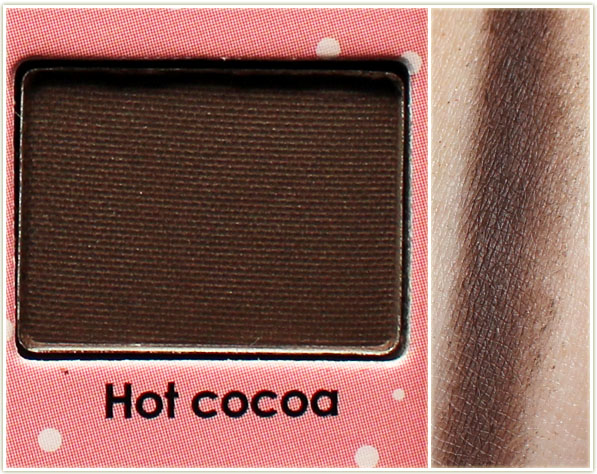
An often overlooked brand, the Sephora house brand (also called Sephora) regularly puts out new palettes every few seasons. Holiday 2015 was no different, and they released the Wonderful Dreams palette – an 8-pan, travel friendly palette.
Sephora Wonderful Dreams
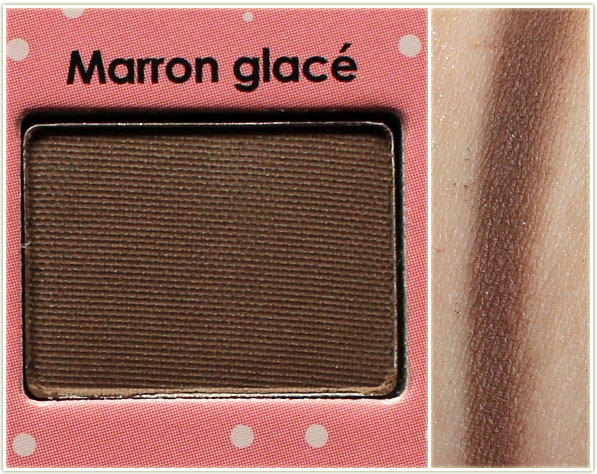
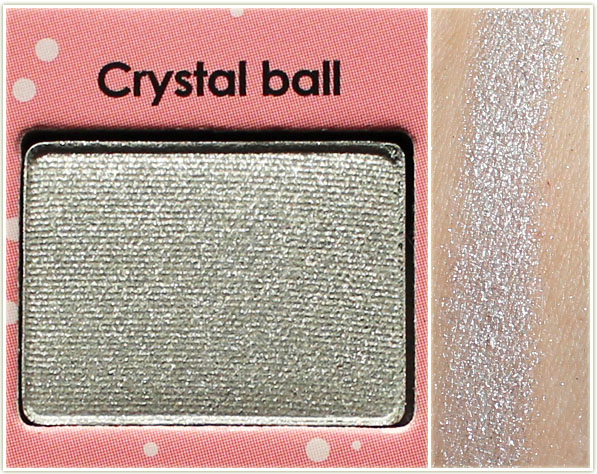
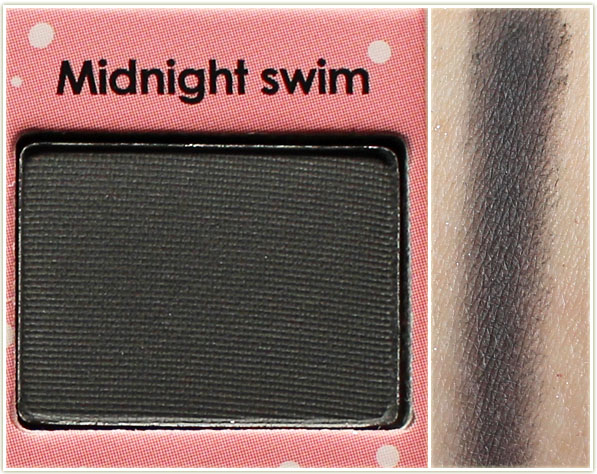
The palette contains four mattes and four shimmers. This is an absolute god-send in a palette this small as I often feel mattes are overlooked far too frequently. (For example, even the legendary Urban Decay Naked palettes only have two matte shades in a 12-pan palette!)
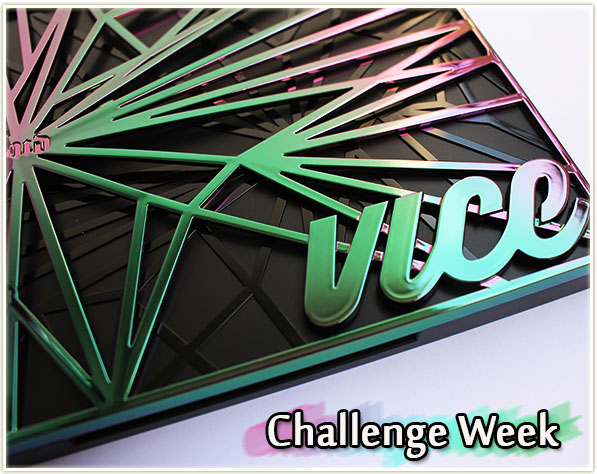
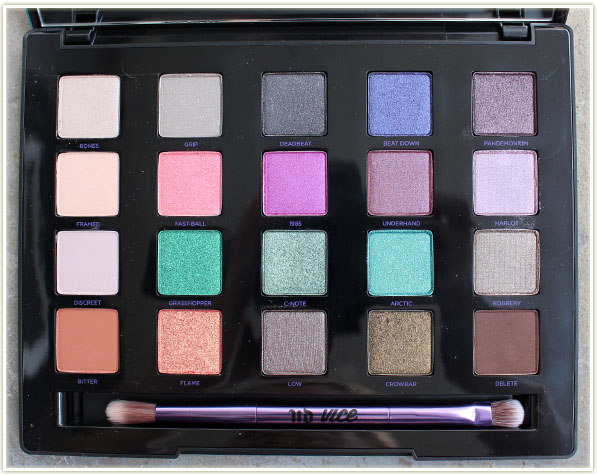
Without a doubt, the absolute best holiday packaging goes to Urban Decay‘s Vice 4 palette. Who DIDN’T get suckered in by that gorgeous oil-slick cover? Even more intriguing is the fact that everyone who bought this ended up with a different coloured lid. So unique!
Urban Decay Vice 4 eyeshadows
I bought this because I HAD to have it, but unfortunately not a lot of the colours really spoke to me (swatches here). The warm shades, for sure, but those three greenish/aquaish colours in the middle? They’re so similar that I feel that two of them could’ve been omitted for other colours. You’ll see two looks in this collection of five that look absolutely identical to each other, and yet *completely* different colours were used!
Regardless, the usual Urban Decay eyeshadow quality is there in this palette! Buttery, pigmented as all hell and a pleasure to work with.
Urban Decay Vice 4 Looks
Urban Decay Vice 4 – Look 1
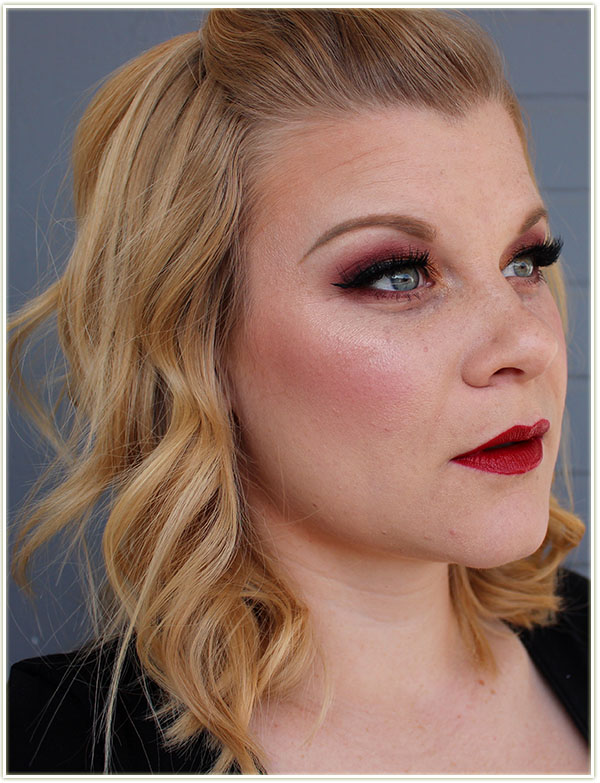
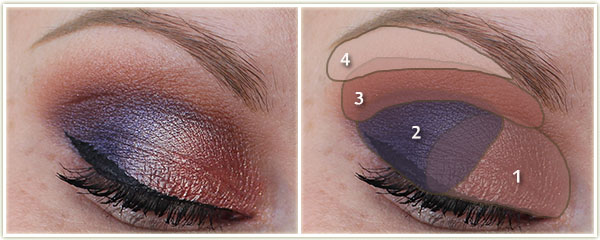
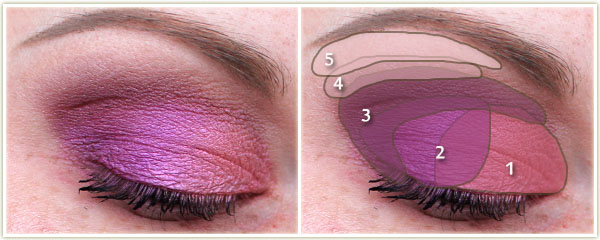
Normally I’d take both orange shades (bottom left of the palette) and call it a day, but I wanted to add something a bit different in this one so I added in the purple. It actually made the orange on the lid look a LOT more pink instead!
Eyes
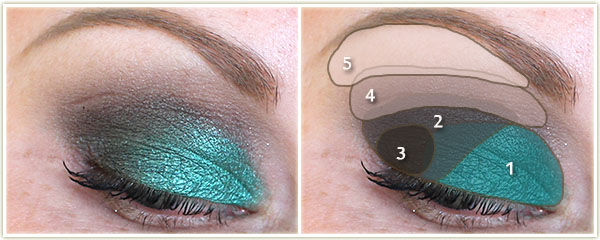
Flame all over the lid.
Beat Down on the outer half of the lid.
Bitter through the crease.
Framed on the brow bone.
I created the wing with MAC‘s Blacktrack fluidline and applied Too Faced Better Than Sex mascara to my lashes.
Face
Foundation: Yaby in Buff
Bronzer: BourjoisDelice de Poudre
Blush: MACPetal Pusher
Lips: NARSRikugien
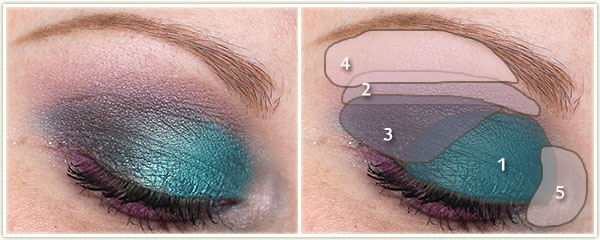
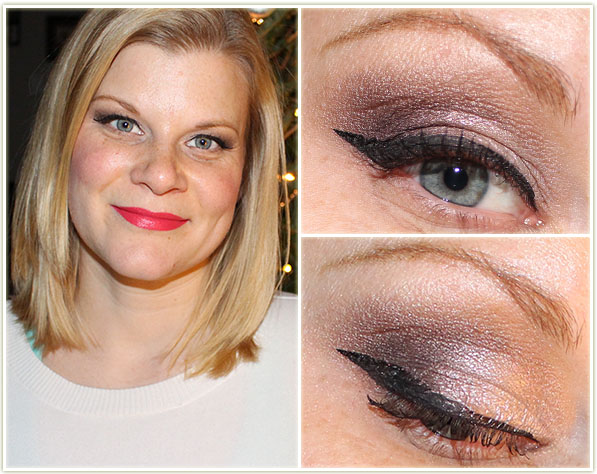
Urban Decay Vice 4 – Look 2
Using a shadow along the lash line has become a staple when I don’t know what to do with a particular colour (hence the pink!).
Eyes
Arctic on the lid.
Harlot through the crease.
Pandemonium on the outer corner.
Bones on the inner corner.
Discreet on the brow bone.
1985 was used on the lower lash line and Too FacedBetter Than Sex mascara was applied to my lashes.
Face
Foundation: Bourjois Healthy Mix Serum in 51 Light Vanilla
Bronzer: Soap & GlorySolar Bronze
Blush: MACSea Me, Hear Me
Highlighter: Soap & GloryGlow All Out
Lips: Maybelline Color Blur in Berry Misbehaved
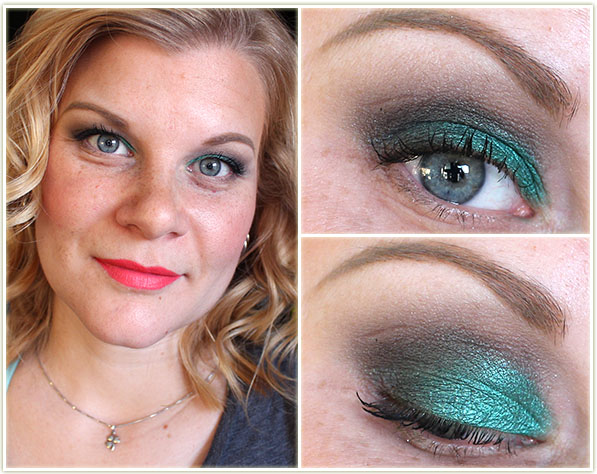
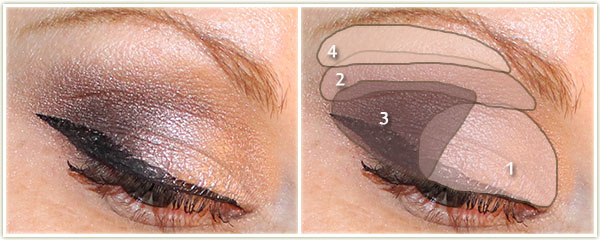
Urban Decay Vice 4 – Look 3
And this looks is dead similar to the one before it. The only real difference in the eyes is that there’s no pink on the lower lash line. And yet, I used totally different colours!
Eyes
Grasshopper on the lid.
Low on the outer half of the lid.
Deadbeat to deepen up the outer corner.
Grip through the top of the crease.
Framed on the brow bone.
On my lashes is Make Up For Ever‘s Smoky Stretch mascara.
Face
Bronzer: Too FacedMilk Chocolate
Blush: MilaniCoral Cove
Highlighter: Make Up For Ever ProSculpting Duo #1
Lips: MACBurmese Kiss
Urban Decay Vice 4 – Look 4
Flash shots – sorry! Thankfully, I’ll have a ring light by the end of the month and won’t be relying on the power of the sun for my photos any longer! I wanted something a bit more neutral for this look.
Eyes
Bones all over the lid.
Robbery at the top of the crease.
Delete on the outer half of the lid.
Framed on the brow bone.
I created the wing with MAC‘s Blacktrack fluidline and applied Make Up For EverSmoky Stretch mascara to my lashes.
Face
Bronzer: The Body Shop Honey Bronze Bronzing Powder in 01 Light Matte
Blush: MilaniTea Rose
Highlighter: Make Up For Ever Pro Sculpting Duo #1
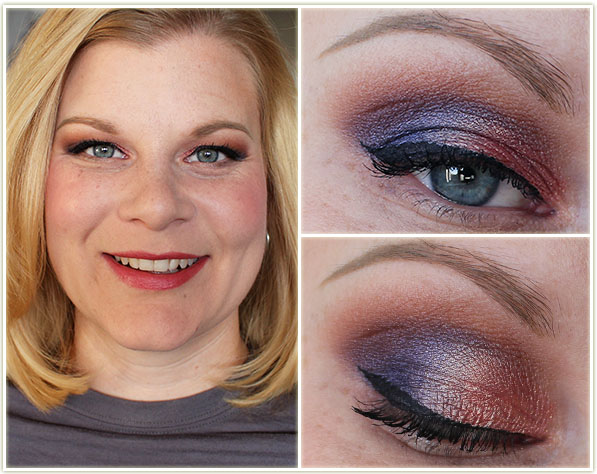
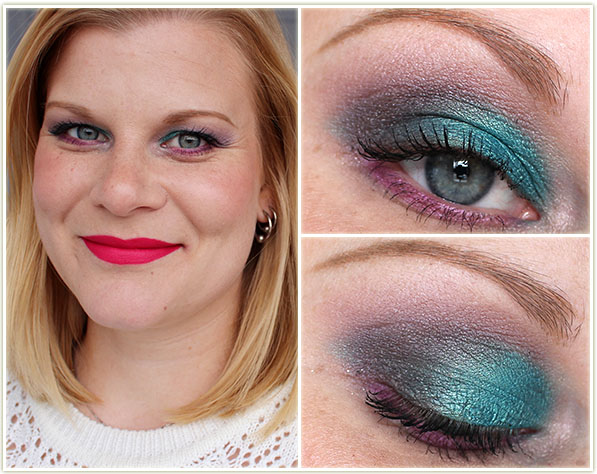
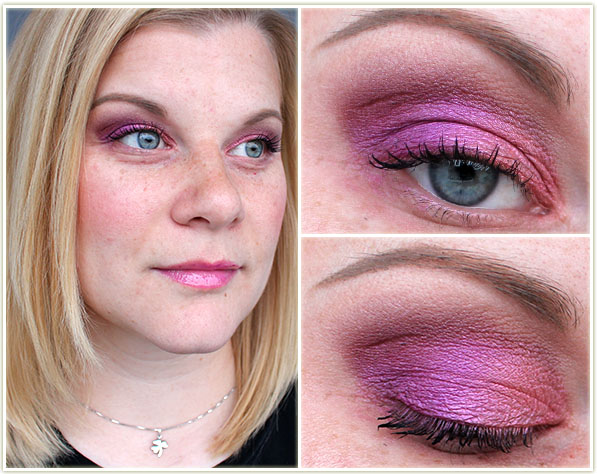
This was my FAVOURITE look I came up with out of this palette. I was looking at my previous pictures being like “aww man, nothing is THAT impactful”. So I started throwing some of the pink shades together and bam! IMPACT!
Eyes
Fastball on the lid.
1985 on the outer half of the lid.
Underhand on the outer corner and through the crease.
Harlot at the very top of the crease.
Framed to highlight the brow bone.
Make Up For EverSmoky Stretch mascara is on my lashes.
As far as I can tell, “duochrome” is a word that the makeup industry made up. Ask anyone outside the makeup world what duochrome is, and it’s highly likely they won’t have a clue what you’re talking about. (The only term that comes remotely close, and should probably be used instead, is “pearlescent“, but usually people are talking about car colours when they’re using that word.)
So what is a duochrome then? In makeup, it refers to a shadow that can display two different colours. Some duochromes are subtle enough that you can only see it on the edges of the product, or when the product is viewed from a certain angle, often out of focus. Some duochrome shadows are stronger and can be manipulated by changing your base colour.
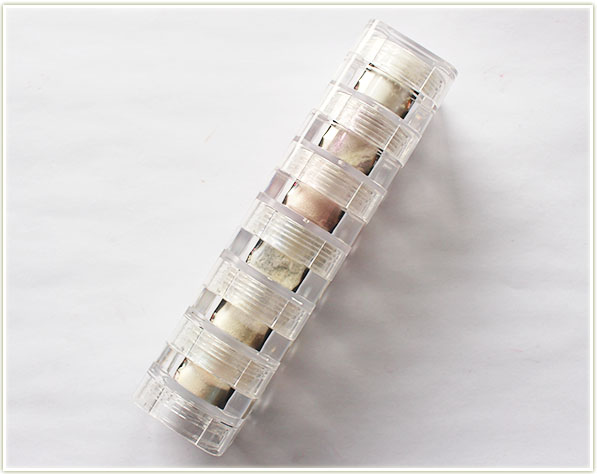
Naked Cosmetics – Ivory Stack
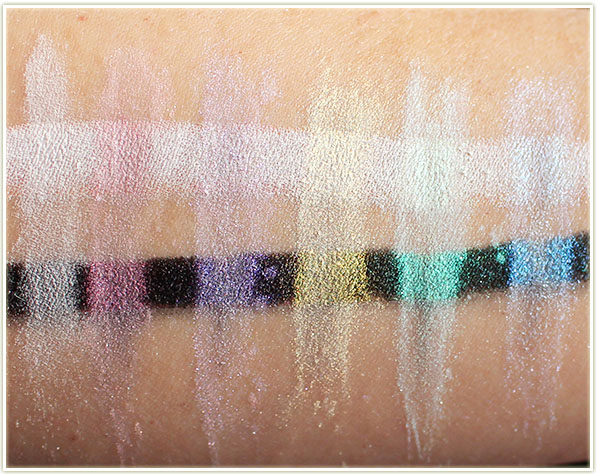
My Naked CosmeticsIvory stack is a great example for showing off duochromes. In the stack they look mostly white with a hint of colour. However, once you swatch them over different bases….
Naked Cosmetics Ivory stack swatches on bare skin, over a white base and over a black base
…they come ALIVE! Used without any base, there’s a faint whisper of colour, but nothing with much substance. But when you put it over a black base, the colour that’s hidden in the powder starts screaming at you.
That right there is the duochrome effect: on one hand the pigment looks like a faint pastel colour, but once used with a base, you can intensify the colour and give it far more dimension.
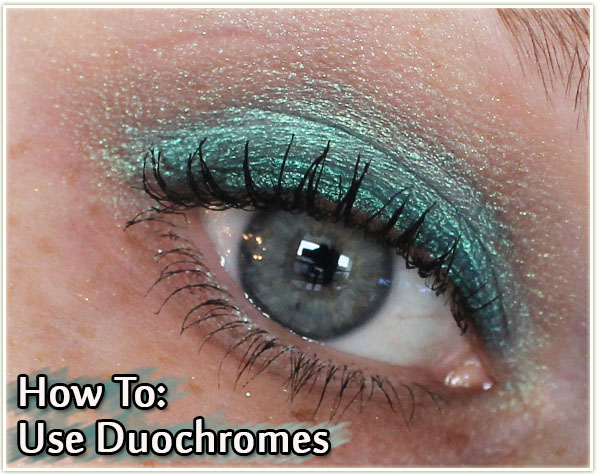
Here’s how I manipulate duochromes to create an eye look with impact:
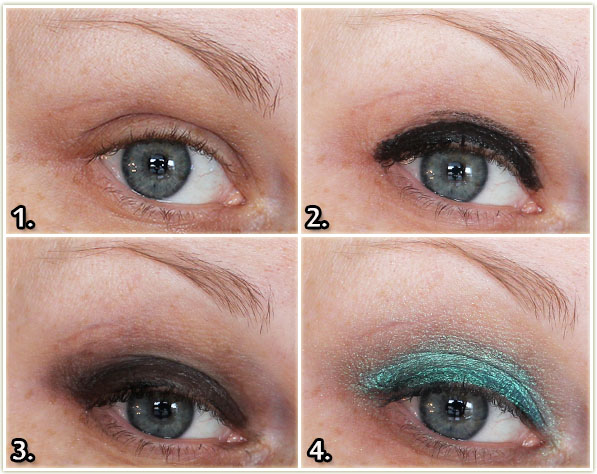
How To: Use Duochromes tutorial
My naked eye without anything on it.
I applied a black base messily (cream or powder eyeshadow, eyeliner, it really doesn’t matter).
I blended the black base out with a brush, making sure to keep it intense near the roots of my lashes and faded out towards my brow.
I applied the green-tinged pigment from the Naked CosmeticsIvory stack on top of the base, all over my lid.
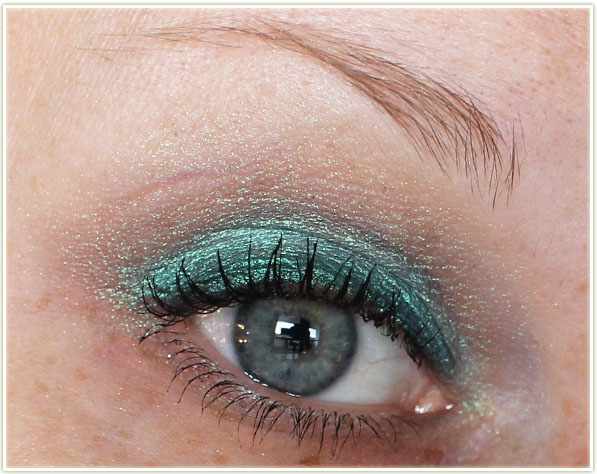
How To: Use Duochromes
The close up shot shows you that I really did apply the pigment ALL over my eye lid. It goes from my lash liner to just slightly below my brow bone. The green colour stays intense where the black pigment was darkest, and then fades out where there isn’t any black at all.
There are so many options on how to bring out different colours in duochromes. Try changing your base colour and see how the colour reacts to it. If you’re not sure what colours to try, start with a black and then go from there!
Fun fact: I learned all of this from a makeup artist at The Body Shop about 15 years ago!
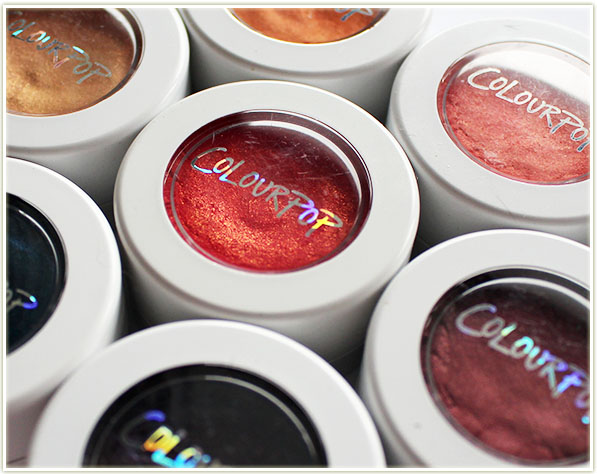
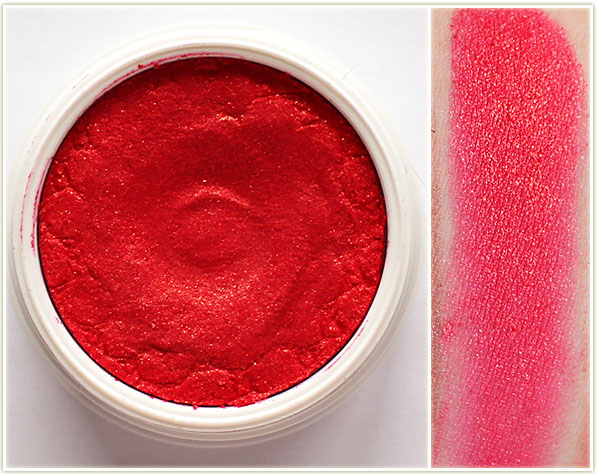
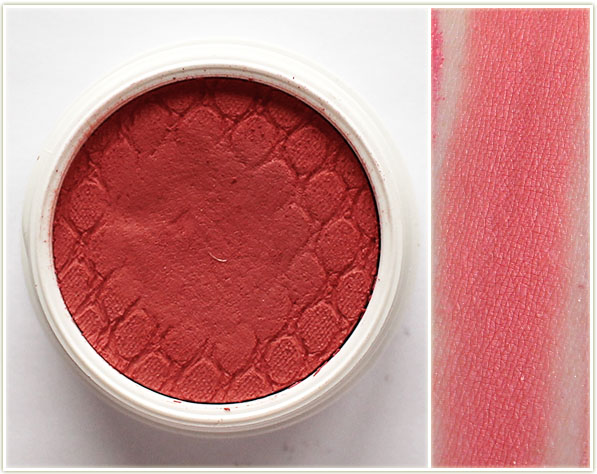
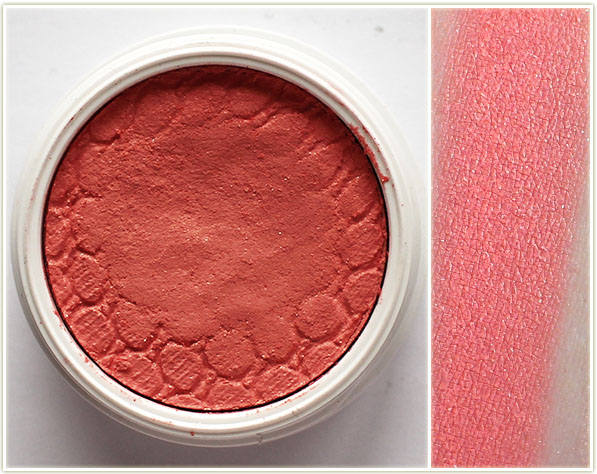
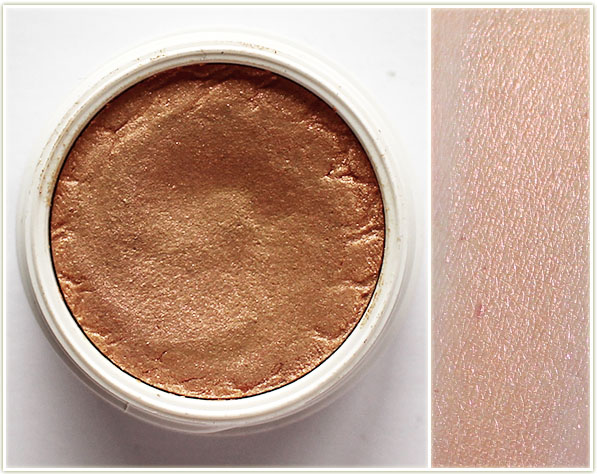
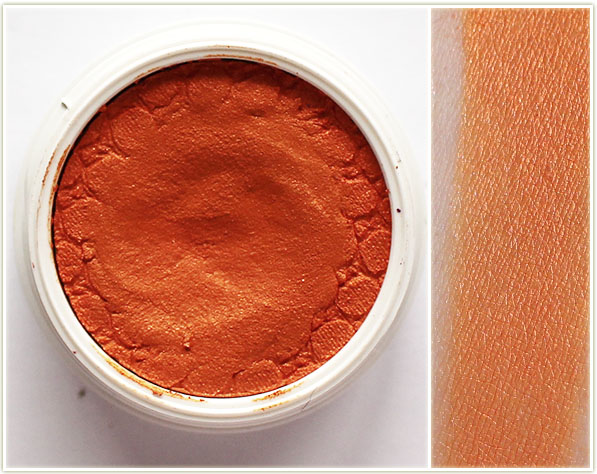
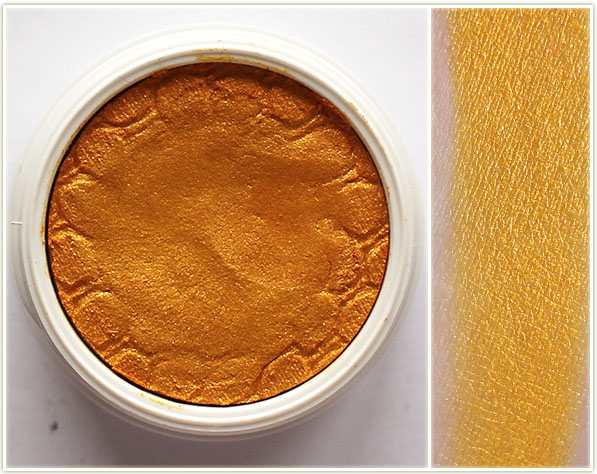
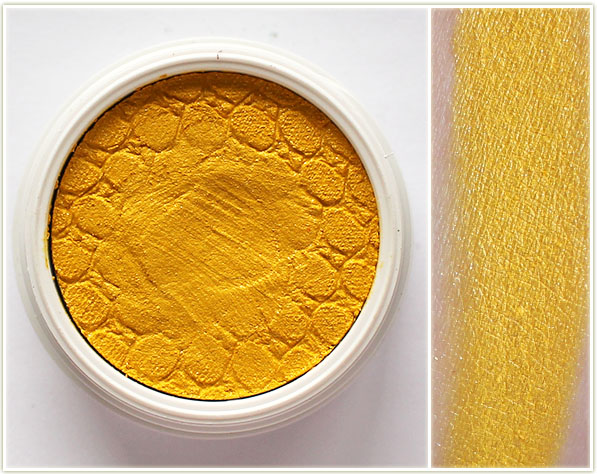
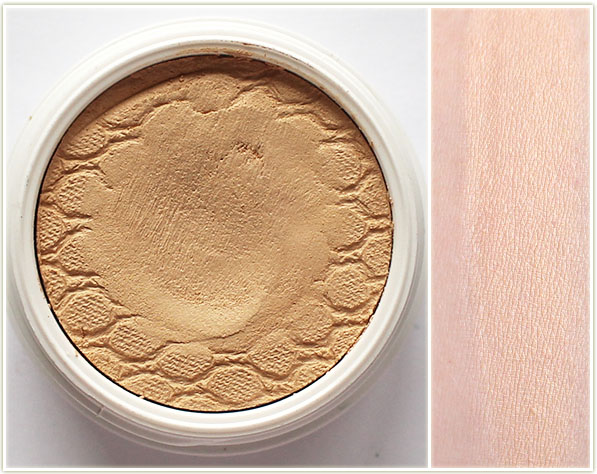
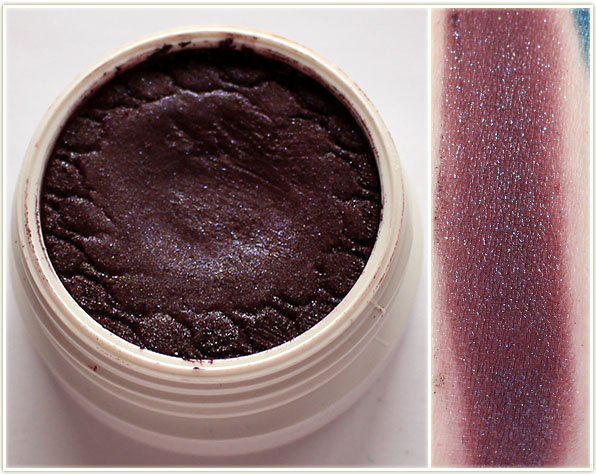
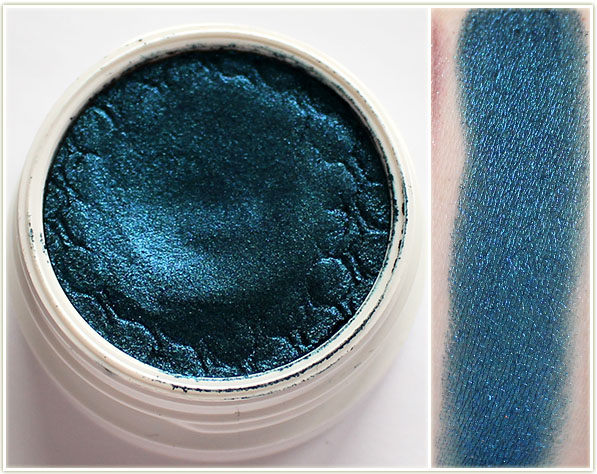
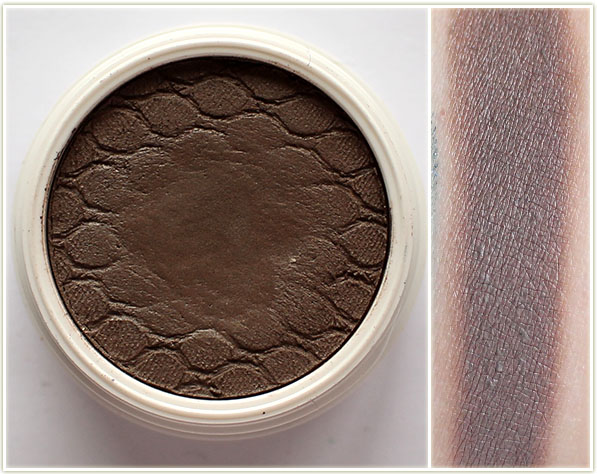
Although I’ve been sticking to palettes for Swatch Sundays (and there’s definitely still plenty more to come there), I wanted to also delve into my single shadows by brand. I’m not much of a single eyeshadow purchaser anymore unless the item is something totally unique – like these Colour Pop shadows!
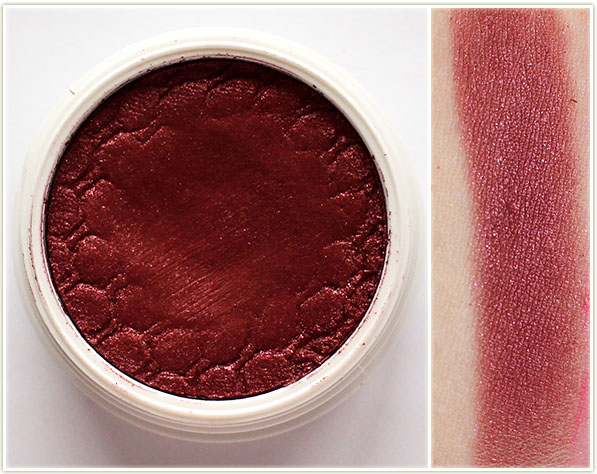
Colour Pop Swatches
Colour Pop – DriftColour Pop – EroticColour Pop – ExColour Pop – AnimalColour Pop – Too SoonColour Pop – SunniesColour Pop – HeatColour Pop – JuicerColour Pop – One & DoneColour Pop – BaeColour Pop – CoconutColour Pop – Adios