Category Archives: Makeup

What’s On My Face – Volume 27

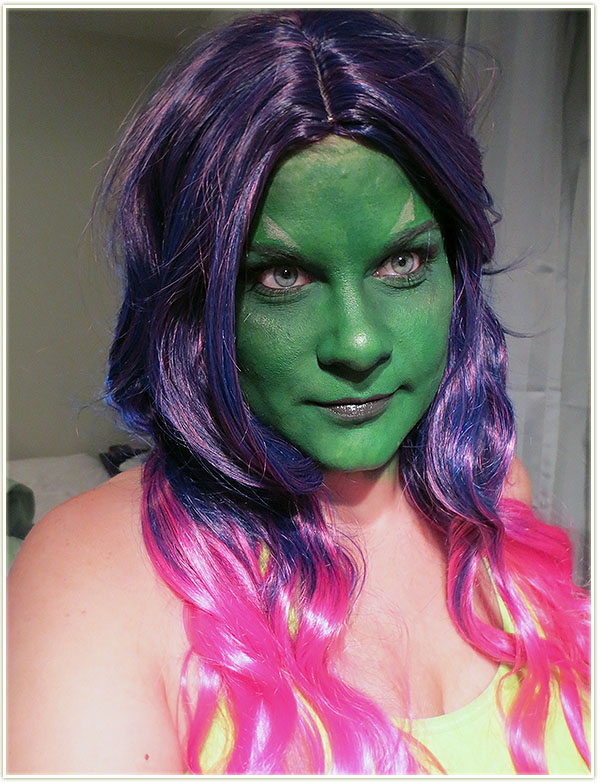
There’s an insanely cool look (to me) in this set amongst the usual ones. Read on!

20141114_look1-1

Standard neutral lid with bright lip combo.
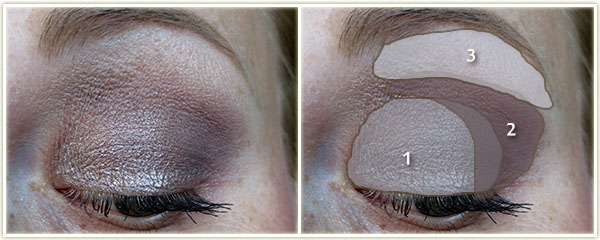
20141114_look1-2

Eyes

  1. e.l.f. Coral Reef gold shade all over the lid.
  2. e.l.f. Coral Reef purple shade on the outer corner and lightly through the crease.
  3. MAC Shroom on the browbone.

Tarte‘s black gel liner to create the wing with Urban Decay Perversion mascara on my lashes.

Rest of the Face

  • Foundation: Boots No7 Stay Perfect in Deeply Ivory
  • Bronzer: e.l.f. Surf’s Up
  • Blush: essence Pinky Flow
  • Lips: Too Faced Melted Candy

20141114_look2-1

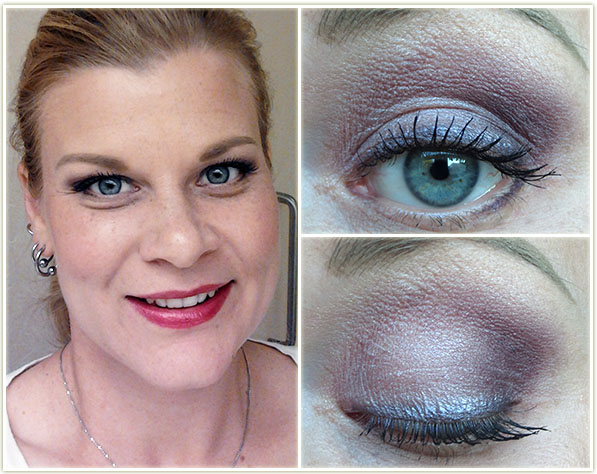
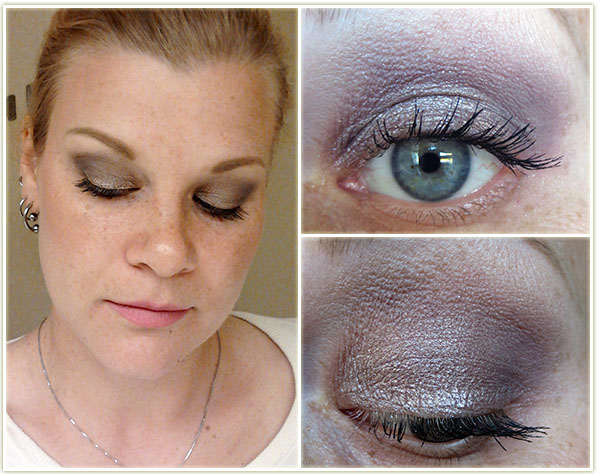
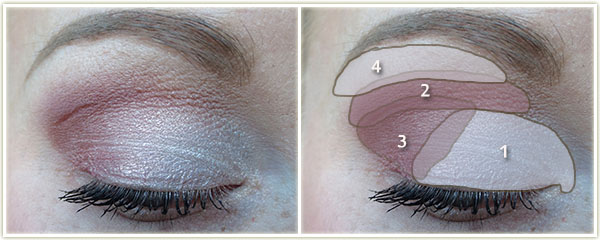
I had a bunch of freebie items from No7 (well, FREE if I spent enough money on the brand… which I had) that I wanted to try out and this was the look I got out of them.
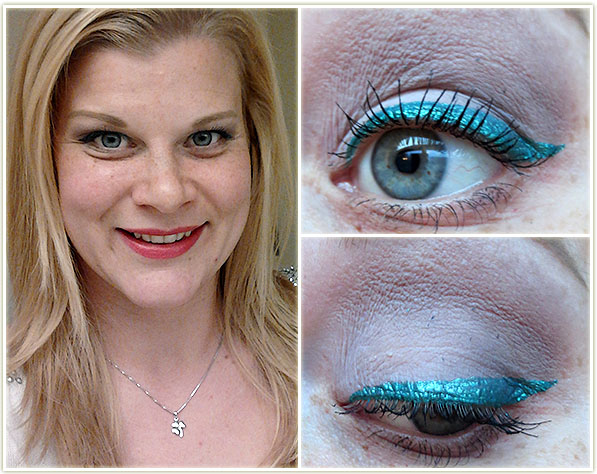
20141114_look2-2

Eyes

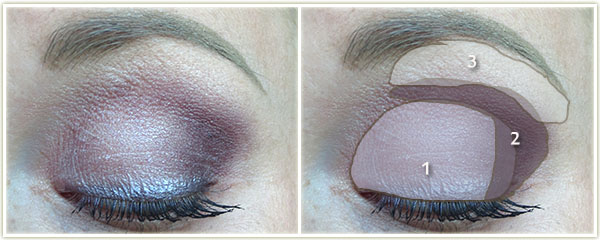
I first lined my upper lash line and outer corner of my lower lash line with Boots No7 Metallic Eyes Pencil in Purple, then I applied:

  1. Boots No7 eye shadow in Violet Shine all over the lid and over the liner.
  2. MAC Sketch on the outer corner and through the crease.
  3. MAC Shroom on the brow bone.

Urban Decay Perversion mascara is on my lashes.

Rest of the Face

  • Foundation: Boots No7 Stay Perfect in Deeply Ivory
  • Bronzer: Hard Candy Hula Hula
  • Blush: Can’t remember!
  • Highlighter: MAC Soft & Gentle
  • Lips: Soap & Glory Raplumzel

20141114_look3-1

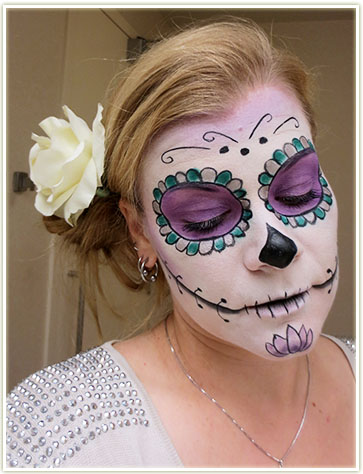
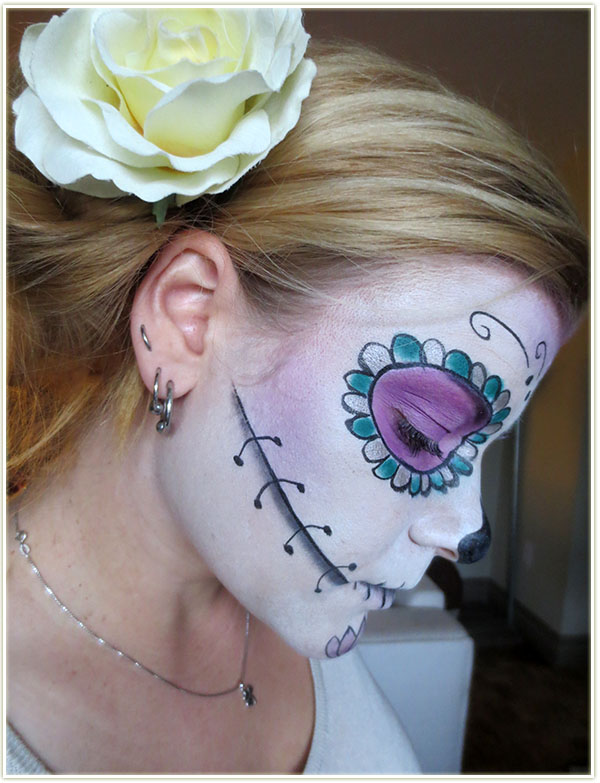
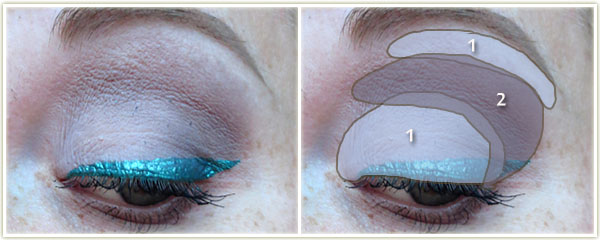
Playing around with e.l.f.’s Little Mermaid collection.
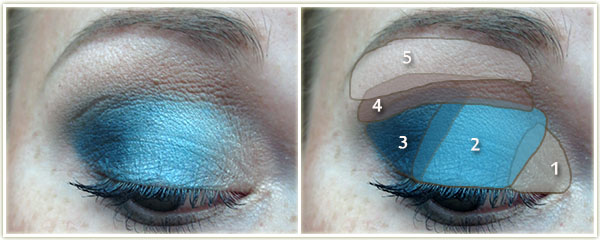
20141114_look3-2

Eyes

  1. e.l.f. High Tide gold shade on the inner third of the eye.
  2. e.l.f. High Tide blue shade on the middle of the lid.
  3. Inglot Matte 338 on the outer corner.
  4. Too Faced Chocolate Milk through the crease.
  5. MAC Shroom on the brow bone.

To line the outer corner of the lower lash line, I used MAC Phone Number pencil and then layered Inglot Matte 338 on top lightly. Urban Decay Perversion mascara is on my lashes.

20141114_look4-1

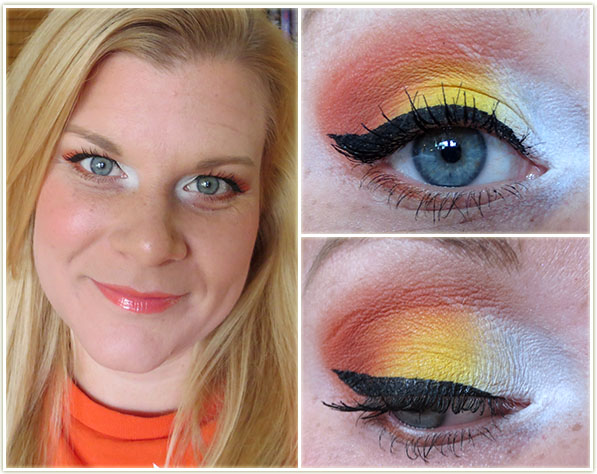
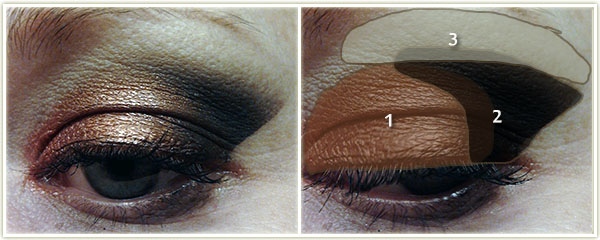
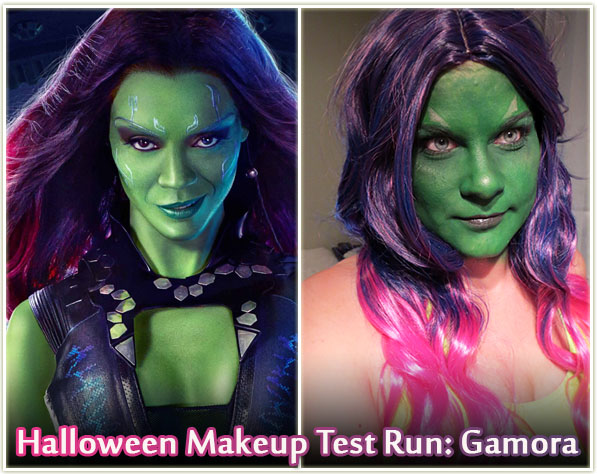
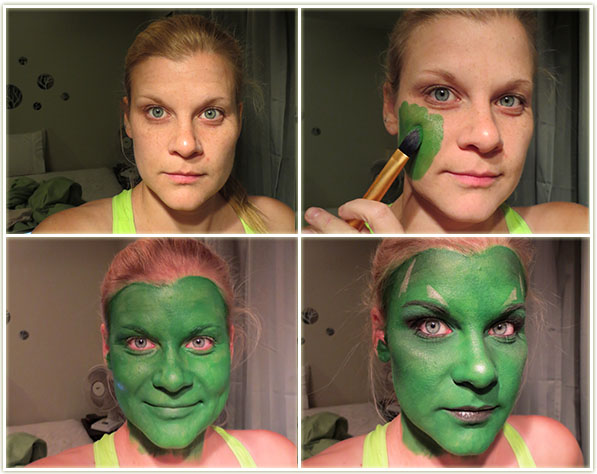
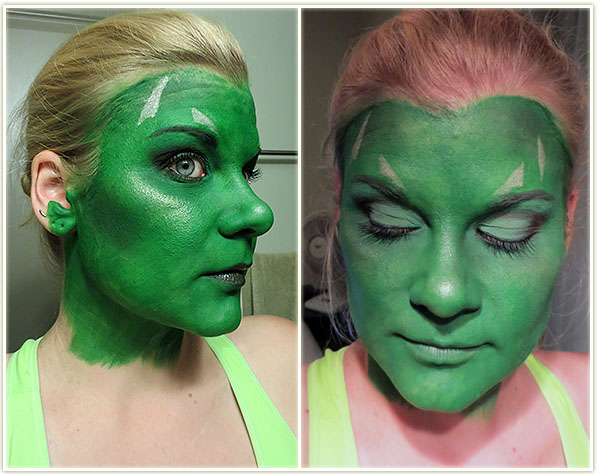
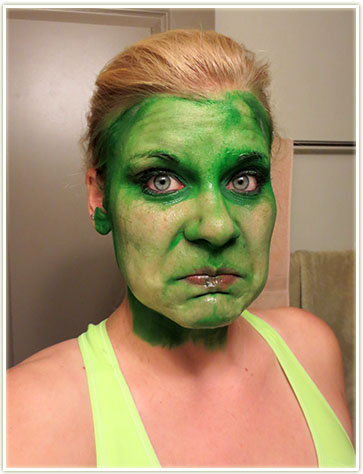
I love how this look came out from a visual perspective. It’s in no way flattering on its own (even though I’ve given you somewhat decent photos above) but it was a lot of fun to create. I was looking for orange cut creases online for Halloween and I found this as a source of inspiration/outright copying.

20141114_look4-2

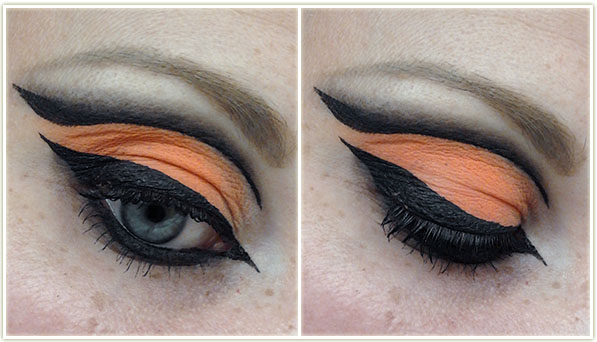
Taken at the right angle, this look is BEAUTIFUL in photographs. I love the sharp edges and the vivid colour. I wore this to work the day before Halloween (hey, any excuse right?) and it sure did net me some reactions alright! lol
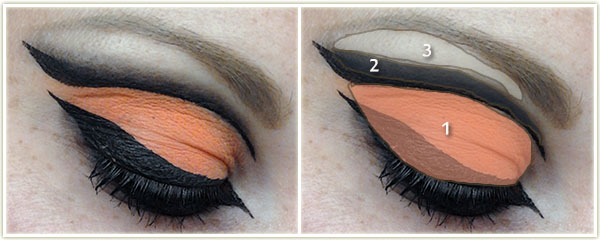
20141114_look4-3

Eyes

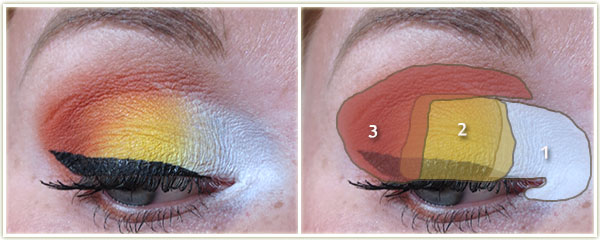
I first applied NYX‘s Jumbo Eye Shadow Pencil in Milk all over the lid and blended it out with my finger. I then applied:

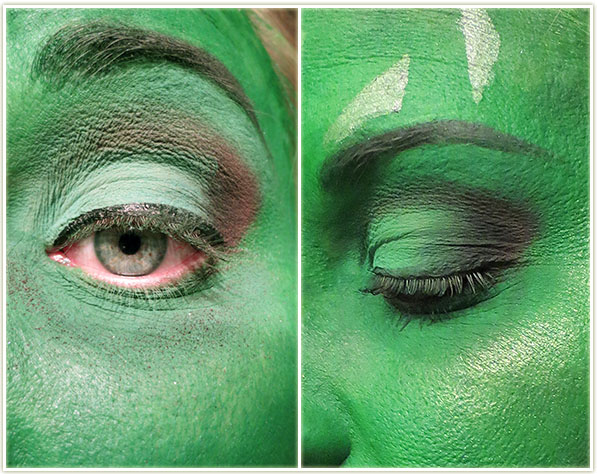
  1. Sleek‘s neon orange from the Acid palette all over the entire lid, right up and over my crease.I then used Kat Von D‘s Tattoo Liner in Trooper and carved out the top of the crease (keep your eye open for this), and;
  2. used Urban Decay‘s Blackout to blend out the edge of the liner upwards.
  3. Urban Decay Foxy is on my brow bone.

I used Kat Von D‘s Tattoo Liner to create the enormous wing and dragged it into a tiny point on the inner corner of my eye. I lined my lower lash line and water line with Urban Decay‘sBlack Velvet pencil. Estee Lauder Sumptuous Infinite Daring Length + Volume Mascara is on my lashes.

Rest of the Face

  • Bronzer: NYC Fire Island Tan
  • Blush: Hard Candy Skinny Dipping
  • Lips: Benefit Ultra Plush Lip Gloss in Coralista

20141114_look5-1

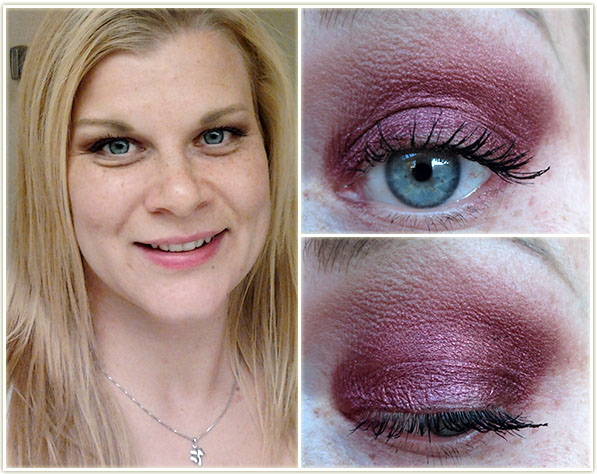
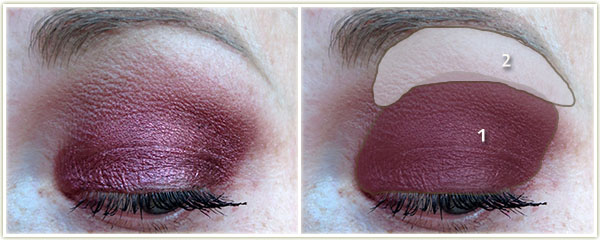
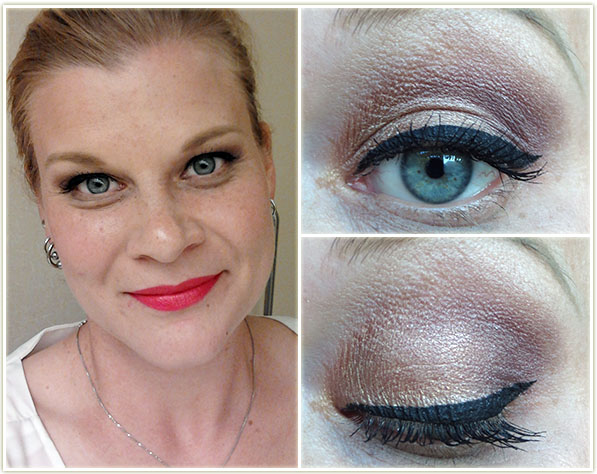
Totally falling in love with this lip colour! Too Faced Melted Berry is absolutely beautiful and goes with a whole variety of looks (+obvious observation that it’s fall and it’s a dark lip shade, yadda yadda).
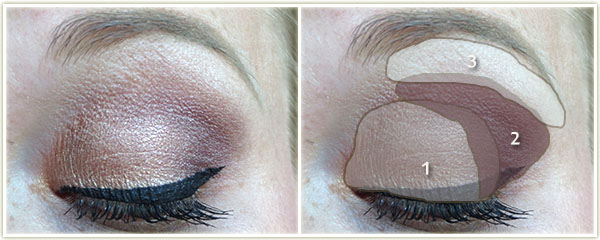
20141114_look5-2

Eyes

  1. MAC Vanilla pigment all over the lid.
  2. MAC Shag through the crease.
  3. MAC Expensive Pink on the outer corner.
  4. Wet n Wild Brulee on the brow bone.

Estee Lauder Sumptuous Infinite Daring Length + Volume Mascara is on my lashes.

Rest of the Face

  • Foundation: CoverGirl CC Cream in 110 Classic Ivory
  • Bronzer: NYC Fire Island Tan
  • Blush: Hourglass Luminous Flush
  • Highlighter: MAC Vanilla pigment

Halloween 2014 – Part 1 Sugar Skull

201411_sugarskull2

I am hugely proud of this look I created for work on Halloween day! I was little bit nervous to wear complete face paint since I do work in a corporate environment, but my Sugar Skull look was well received so I was pretty pleased with myself. /brushes off shoulder

Getting up long before dawn to try to get this look done before work!

I had been inspired to do this look by Shaaanxo’s pink sugar skull tutorial on YouTube. I liked her concept and how it was “pretty” enough. Since I knew I was going to be wearing green face and body paint that evening (you’ll see that in next Wednesday’s post) for my Gamora costume, I wanted something that was on the “lovelier” side of things.  I opted for different colours than the tutorial, primarily because I didn’t have two matte pink shadows that would work well together.  I also incorporated other ideas from different sugar skull looks I had seen on the internet.

The look started off a bit weird. When I just had the colour blobs on and none of the shading, I looked really, REALLY bizarre. And I was starting to wonder if this was even going to come together. Luckily, adding on the black liner helped tie everything together.

Face details
Face details

I first layed down a base using the lightest foundation shade I had, which was Revlon Colorstay in Buff (very little of this) mixed with a *lot* of Inglot‘s Cream Concealer in 37 (white). I sponged this onto my face and managed to get a pretty smooth and even layer of product covering my whole face.

I then started to fill in the eye sockets with Inglot‘s Matte eyeshadow in 334 all over the lid. I filled in my brows with Matte 325. I then dotted on alternating colours around the purple usingInglot‘s AMC Shine 454 and Matte 317 shadows. When those were done, I used Kat Von D‘s Tattoo Liner in Trooper to create the black outline.

Full face
Full face

Using the same liner, I then drew lines coming straight out of my mouth, under my cheekbones. I used Urban Decay Blackout eyeshadow to create a fade down from the liner. And then drew on sewing lines to make it look (somewhat) like my face was sewn back together. I really could’ve done that better, but I was running out of time!

I filled in my nose with the same liner and then added some shading to the back of my cheeks and the top of my forehead with Inglot’s Matte 334 eyeshadow.

Yet another bathroom selfie

The last few steps were drawing on some random dots and swirls, as well as the lotus flower in the middle of my chin which was then shaded with the same purple Inglot eyeshadows.

My lips were easy to do with the liquid liner: I drew lines vertically to demonstrate teeth and then patted some black eyeshadow on the inner part of my lips to add some depth.

This shot was taken after I got home from work. You can see the makeup held up well for about eleven hours!

In the end, I was so pleased with how this turned out! I’ve never done any kind of makeup like this before and was really happy with the results. I didn’t need much touching up aside from my lips after I had eaten lunch and a little bit around my nose where the concealer got a bit cakey. All in all though… super successful!

What’s On My Face – Volume 26

I’ve been having “blah” kind of makeup days lately. A lot of neutrals, with brighter lip shades (tis the season?) but it’s actually starting to make me feel a bit depressed. With the darkness in the morning, I have far less desire to get out of bed. And because of that, I spend a lot less time on my makeup, which means not only boring looks (to me), but it also means sometimes I don’t even have enough time to take pictures of my makeup before I dart out the door to work. Sigh. Beauty blogger problems? I don’t know. I’m looking forward to DST ending so I can get an extra hour of that sun in the mornings (uhhh that is how that works right? I think I mess this up every year…), because right now, the only relatively suitable light I have to take pictures is at 7:55-8:05 a.m., which is when I’m supposed to be out the door!

So I tried to spice it up and do some interesting things every now and then. This is a mix of “meh” and “oooo”. I hope you find something you like!

20141027_look2-1

Let’s start out with my favourite! Themed after one of my favourite candies of the Halloween season: candy corn!

20141027_look2-2

Eyes

I first applied NYX‘s Jumbo Eyeshadow Pencil in Milk all over the lid, blended it out, then:

  1. Makeup Geek White Lies on the inner third of the lid and pulled around the tearduct.
  2. Inglot Matte 370 on the middle third of the lid.
  3. Inglot Matte 383 on the outer third of the lid and on the outer corner of the lower lash line.

Tarte‘s black gel liner to create the wing with Urban Decay Perversion mascara on my lashes.

Rest of the Face

  • Foundation: Boots No7 Instant Radiance in Cool Vanilla
  • Bronzer: NYC Fire Island Tan
  • Blush: Hard Candy Skinny Dipping
  • Lips: NYX Butter Gloss in Cherry Cheesecake

20141027_look5-1

While I love this shadow, this is what I mean when I say I’m too damn lazy to get out of bed in the morning. This is basically a one eyeshadow look with no liner. Not something I’m fond of, but this colour certainly gets the job done!

20141027_look5-2

Eyes

  1. L’Oreal Infallible in Golden Mahogany all over the lid and blended up through the crease.
  2. MAC Blanc Type to highlight the brow.

On my lashes is Estee Lauder‘s Sumptuous Infinite Daring Length + Volume Mascara.

Rest of the Face

  • Bronzer: NYC Fire Island Tan
  • Blush: MAC Gingerly
  • Highlighter: Too Faced Candlelight
  • Lips: Sephora Color Reveal Balm in Unique Pink

20141027_look1-1

I actually did this in 2012, but never got around to posting it. I believe I wore it to work on Halloween that year.

20141027_look1-2

  1.  MAC Coppering all over the lid.
  2. I then used a piece of tape to create the sharp outer edge, and then blended appliedUrban Decay Blackout to the outer corner.
  3. MAC Brule was used to highlight the brow.

L’Oreal Voluminous Carbon Black mascara is on my lashes.

20141027_look3-1

These are the kinds of looks I just don’t gravitate towards, but they’re a heck of a lot simpler to put together in the morning!

20141027_look3-2

Eyes

  1. L’Oreal Infallible in Tender Caramel all over the lid.
  2. MAC Copperplate on the outer corner and through the crease.
  3. MAC Shroom on my brow bone.

On my lashes is Urban Decay‘s Perversion mascara.

Rest of the Face

  • Bronzer: Hard Candy Hula Hula
  • Cheeks: Hourglass Mood Exposure
  • Lips: NYX  Soft Matte Lip Cream in Istanbul 

20141027_look4-1

Another easy one. Whack on boring eyeshadows, a super bright liner and tada!

20141027_look4-2

Eyes

  1. MAC Blanc Type on the lid and on the brow bone.
  2. MAC Copperplate in the outer corner and crease.

Nicka K Shimmer Eyeliner in Green to create the wing with Dermacol Party Time mascara on my lashes.

Rest of the Face

  • Bronzer: NYC Fire Island Tan
  • Blush: essence Pinky Flow
  • Lips: Revlon Pink Velvet

Inglot (re)Opens in Toronto

201410_inglotreopensintoronto1

At long last! Toronto is finally seeing the return of Inglot! Beauty lovers can finally get their hands on Inglot‘s huge range of colours and products.

Seriously doesn’t this just feel slightly pornographic? No? Just me then?

You’ll notice I say re-opened. Inglot actually had a few locations in Toronto several years ago but the company never really got off the ground in this city. It turns out that Inglot, although primarily owned and operated in Poland, does actually operate their external locations as a franchise.

Inglot’s Nail Polish Rack

I had the good fortune to speak to Toronto’s store manager Jason, and he kindly gave me the latest information on Toronto’s fresh new Inglot store that opened on September 20, 2014. The shop is in an absolutely phenomenal location (19 Dundas Square), so much so that they had to beat out some seriously prominent franchises (Starbucks!) from that particular retail location. Being right beside the Eaton Centre will potentially bring in a lot of shoppers and tourists into the store since the square has good visibility.

Lip colours as far as the eye can see!
Loose pigments, gel liners, pencils…

The Toronto location has now become the only Inglot location in all of Canada since the Montreal location closed down a few months ago. There are plans to open more Toronto locations in the future, but right now they need to make sure that the one at Dundas Square gets off to a solid start.

Loose pigments
Loose pigments

201410_inglotreopensintoronto9

Jason said that they were surprised with how quickly some of their products were selling out. Their red gel liner has turned out to be super popular and they’re already having to order new product in. (It’s one of my personal favourites.) Their other best sellers have been their black gel liner (no brainer there!) and their breathable nail polishes.

Powders in every shade of the rainbow

One thing I was incredibly surprised to hear was that all of Inglot‘s products are fresh made. None of them are sitting in a warehouse anywhere waiting to be shipped to the store. When a store runs out of product, they need to order it in from Poland where the products are then made by the batch and shipped directly to the store that ordered it. On average, between production and shipping time, any new products that are put on a shelf in an Inglot store are actually fresh made within 7 days! I was particularly impressed to hear this since it means you’re unlikely to get stale products.

Face products
Face products

The shop is well-lit and airy. It’s a giant playroom for makeup junkies with huge windows and makeup laid out like finger paints. Inglot has always had a store layout that has made me salivate. I’m glad that I no longer need to pick up my much-beloved cosmetics while on vacation in other countries (so far the list stands at the US, England and Ireland!) and can walk the ten minutes to this shop to pick up my goodies.

This table is everything

I’m mostly well-versed in their eyeshadows and gel liners. These are products that I keep coming back to and will continue to keep snapping up. Inglot is wonderful for having some completely unique colours in not only shimmery formats (which everyone seems to have) but also in a matte formula! It’s really nice to be able to pick up vibrant matte shades that aren’t just neutral.

I hope the eye candy was enough to give you the urge to check out Inglot when you get a chance. Aside from visiting their physical location, you can check them out on the following platforms:

Halloween Makeup Test Run: Gamora

201410_gamora4

As I mentioned in my previous Halloween post of the year, I, along with several of my friends, are going out as the Guardians of the Galaxy. I’m one of the lucky ones out of the group and managed to buy my outfit on Ebay. The big issue with my outfit was going to be turning my skin colour green. I’ve never worked with full body makeup or anything of that ilk, so this was going to be super interesting for me!

Gamora Test Run
Gamora Test Run

So this was my first time trying out this kind of makeup. I picked up MAC‘s Landscape Green Chromacake a few weeks back after doing a little bit of research. It’s a water-based cake makeup that applies quite easily to the skin (as I quickly discovered). I did find I needed several layers (roughly three in the last photo on the bottom right) to get a somewhat even texture. I’ll probably do an extra layer on the night of Halloween just to make sure it’s extra smooth.

Highlighting and Contouring

The Chromacake pigment does feel a bit tight on the skin. It doesn’t feel as emollient as foundation does. In the hour that I wore the pigment, it didn’t crack on me, but it never really felt completely comfortable. (As a side note, foundation itself never really feels “comfortable” on me either, so ymmv.)

Since the green on its own would be too flat, I had to add in some shading. I used MACPrint eyeshadow to carve out a bit of my cheekbones. I found that blending was somewhat difficult: If I blended out too much, I ended up removing some of the green Chromacake. I also used Print to fill in my eyebrows. For highlighting, I used MAC‘s Whisper of Gilt Extra Dimension Skinfinish on the tops of my cheekbones and down my nose.

My lips turned out to be a bit of a disaster. Gamora has darker green lips but I didn’t have anything that would really work. I tried using a dark lip colour mixed with gloss but I don’t like how it came out, so I’m going to have to try something else.

Those silver lines were created with eyeshadow and didn’t turn out so hot either. Argh!

Eye Makeup
Eye Makeup

Lastly were the eyes. The promo shot seems to show Gamora having a dark purple outer corner of her eyes. I deepened it up with some black, but like the contouring, I had a heck of a time blending on top of the Chromacake. I also had a heck of a lot of fallout from the shadow – something to be aware of the next time I try this! I’ll definitely throw on a pair of huge false lashes for this when I wear it out on Halloween – that should help cover up some of the terrible blending!

With wig
With wig

So in the end, it was a decent first try. I primarily wanted to get a feel for the Chromacake and what I would have to do with it on Halloween. It seems very easy to apply to the skin, although blending is still my major problem. If you have any suggestions for me – either a great silver liquid liner, or a way to blend out the shadows better on top of the green paint, I’d love to hear them!

Frankenstein’s Monster

And no, this stuff was not fun to take off!