I lost all the date from this post, but I still have the pictures!


I lost all the date from this post, but I still have the pictures!
Lately I found I had been wearing far too many neutral looks and I was boring myself with my makeup in the morning. Neutral colours are so easy and safe to play with… but they just don’t get me excited. When I wear something more vibrant on my eyes, I actually feel better. I can’t explain it any better than that really. Colour makes me happy!
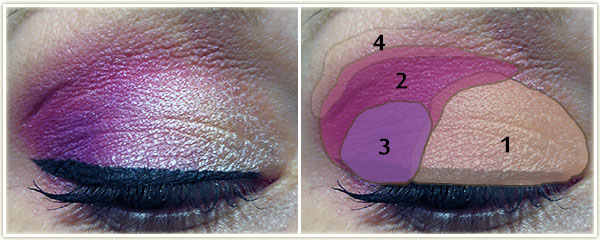
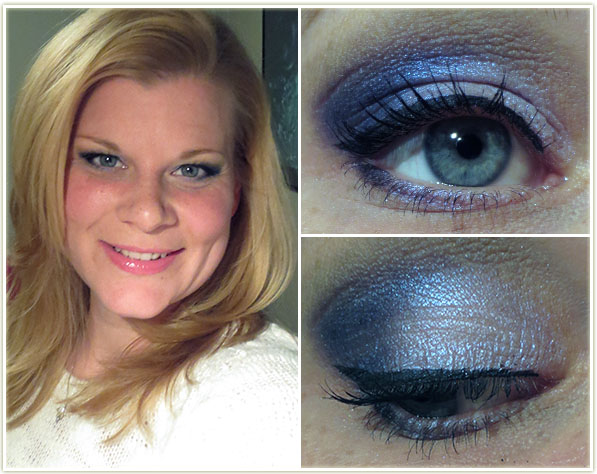
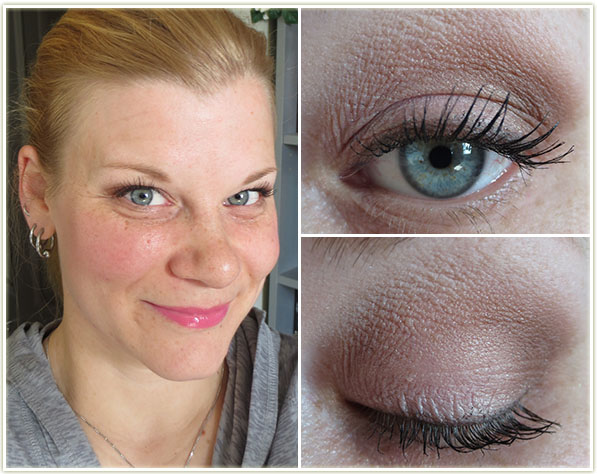
I *love* this one. It’s not particularly hard to achieve, I just think it’s the colour combination that I love so much. Excuse the derp face – I find if I smile in pictures, my eyes crinkle up too much to actually show what the shadows look like on a full face shot!
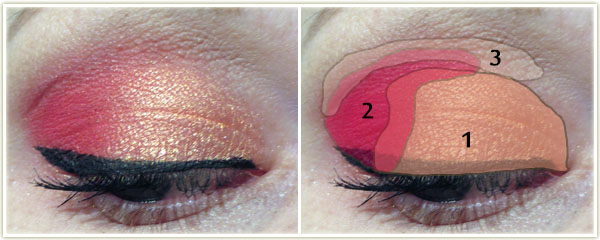
Eyes:
MAC Brule was used to highlight my brow. And, of course, I used MAC Blacktrack fluidline to create the wing and applied L’Oreal Voluminous Carbon Black mascara to my top lashes. For brows, I used MAC Omega.
Rest of the Face: Bourjois Healthy Mix Serum foundation in 52 Vanilla with Revlon‘sBronzed & Chic bronzer on the high points of my face. I used Tarte Charisma on my cheeks and since that blush has enough shimmer to it, I didn’t bother with a highlighter. On my lips is Benefit Ultra Plush Gloss in Coralista.
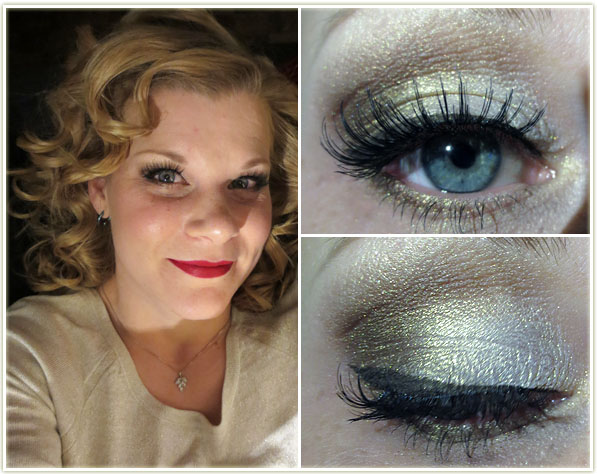
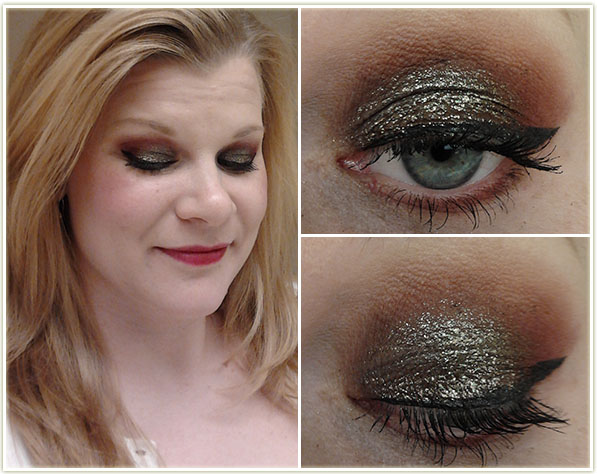
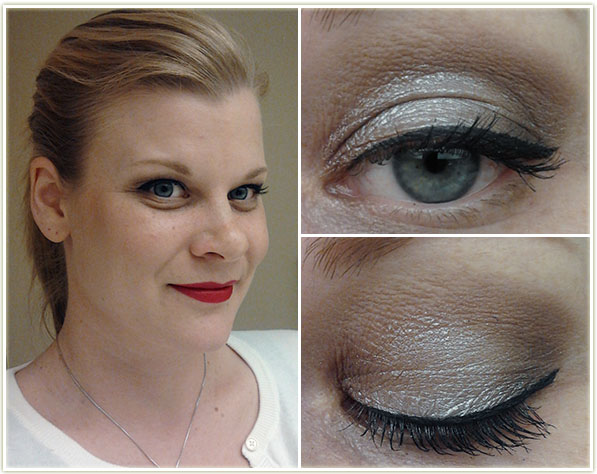
I wore this one out to a (friend of a) friend’s Christmas party. Red, gold, false lashes. All the staples of holiday season makeup!
Eyes: To make the white-gold eyeshadow show up better, I have to lay down a white base. For that I use NYX‘s Jumbo Eyeshadow Pencil in Milk. Make sure to keep the white base below the crease and also blend it out so you don’t have any harsh lines.
I used MAC Dipdown fluidline to create the wing and applied L’Oreal Voluminous Carbon Black mascara to my lashes. False eyelashes are Ardell Demis applied with Duo adhesive.
Lips: Since the eyes are so shimmery, I stuck with a matte red. I used MAC Brick lipliner to line and fill in my lips, then followed it up with MAC Russian Red lipstick.
Rest of the Face: Foundation is Bourjois Healthy Mix Serum in 52 Vanilla. I used Joe FreshSand bronzer to contour since it’s matte. On my cheeks is Tarte Exposed.
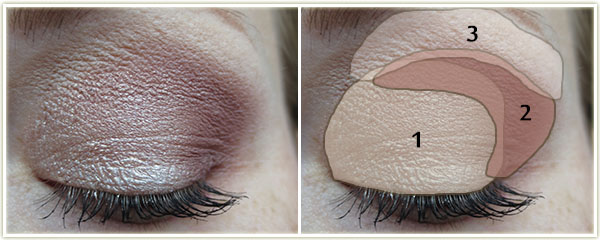
With this one I just knew I wanted it to be bright! I also tend to get stuck in ruts and keep re-using the same colour combinations because I generally know they’ll work. While trying to break out of that rut, I ended up going with a fail-safe colour palette anyway. Whoops!
Eyes:
As per usual, I used MAC Brule to highlight my brow. Followed it up with MAC Blacktrack as my liner and L’Oreal Voluminous Carbon Black mascara. MAC Omega was used to fill in my brows.
Lips: NYX Strawberry Parfait
Cheeks: Wet n Wild Heather Silk
Rest of the Face: My foundation is MUA‘s Matte Foundation in Shade 1 Soft Sand withRevlon‘s Photoready bronzer in Bronzed & Chic.
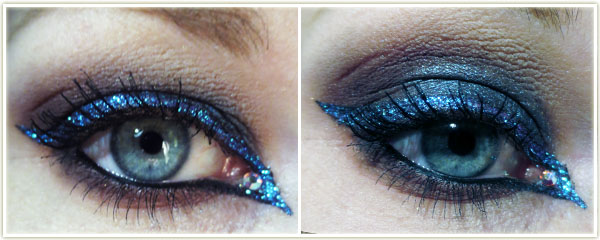
No full face for this one because I was only messing around. I wanted to play around with my Too Faced A Few of my Favorite Things palette and then it kind of developed into this glitter bomb.
I first used NYX‘s Jumbo Eyeshadow pencil in Black Bean and applied it all over the lid as a base. I then;
I used MAC Feline Kohl Power pencil to line my upper and lower waterlines. I appliedL’Oreal Voluminous Carbon Black mascara heavily to my upper and lower lashes. The small crystal was from some set that I got at Michael’s a few years ago and I stuck it to inner corner of my eye with some Duo clear lash adhesive.
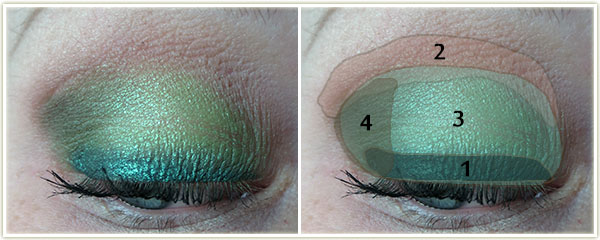
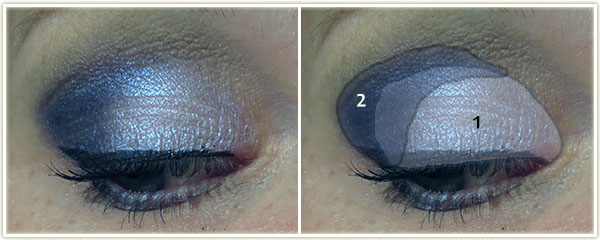
Hey everyone! I’m going to try something new and insert diagrams for the eyeshadow portion of my looks – let me know if you find them useful (or not!).

I did this look in an attempt to look Christmas-y themed for an event we were having mid-day at work without going too over the top. I did get a few looks regarding the crystals, but once people clocked on that it was for the event, it didn’t seem quite as odd to them! Having recently bought the Too Faced “A Few of my Favorite Things” palette, I wanted to make use of it right away!
Eyes: (All Too Faced)
I then used MAC‘s Blacktrack fluidline to create a winged liner and applied L’OrealVoluminous Carbon Black to my lashes. The rhinestones were from a craft store and I usedDuo lash adhesive to get them to stick to my skin.
Lips: MAC Brick lipliner with Russian Red lipstick on top.
Cheeks: Too Faced Melt Into Spring with Dior Amber Diamonds to highlight.
Face: Bourjois Healthy Mix Serum foundation in 52 Vanilla
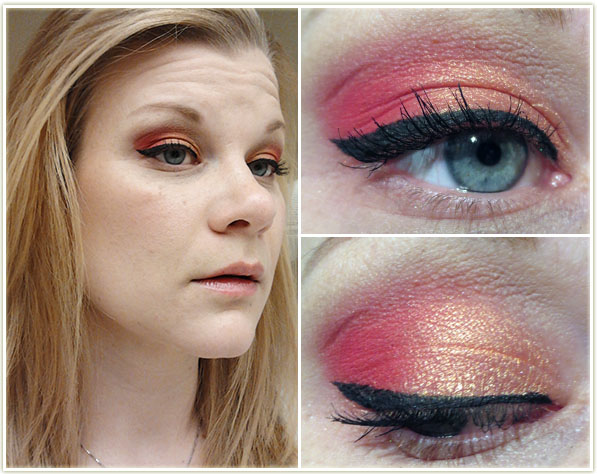
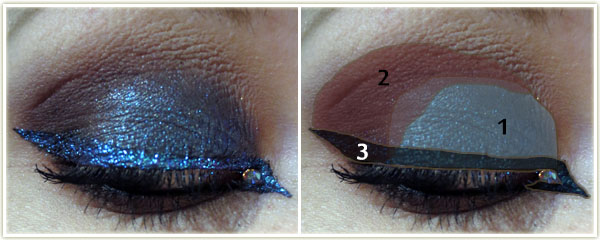
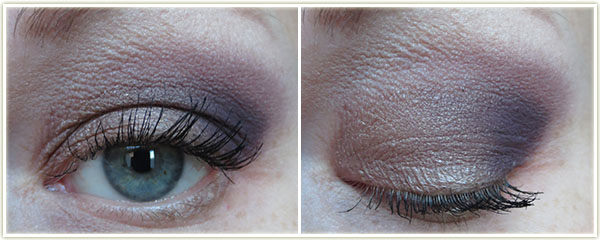
I loved this look! I wanted to wear something a bit more glitzy to go see Catching Fire (although really, I should’ve gone for an oranger/red theme@) and this is what I came up with.
Eyes:
MAC Brule was used to highlight the brow. I then used MAC‘s Blacktrack fluidline to create a winged liner and applied L’Oreal Voluminous Carbon Black to my lashes.
Lips: NYX Vanilla Cream Pie
Cheeks: Tarte Dollface with MAC Silver Dusk to highlight.
Face: No foundation.
More messing about with Laura Mercier‘s Artist (2013 edition) palette.
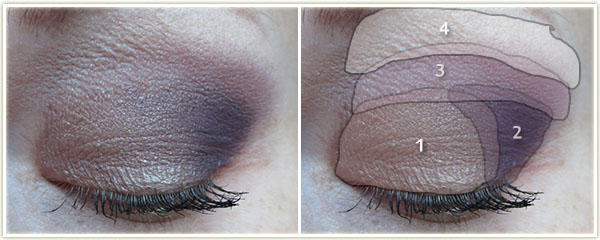
(All Laura Mercier)
As per usual, L’Oreal Voluminous Carbon Black mascara on my lashes.
A replication of a Makeup Geek look using the Naked 2 palette.

Eyes: (All Urban Decay)
For the winged liner I use MAC‘s Blacktrack fluidline and applied L’Oreal Voluminous Carbon Black to my lashes.
Lips: MAC Brick lipliner with Russian Red lipstick on top.
Cheeks: Tarte Exposed
Face: Bourjois Healthy Mix Serum in 52 Vanilla, Revlon Bronzed & Chic bronzer.
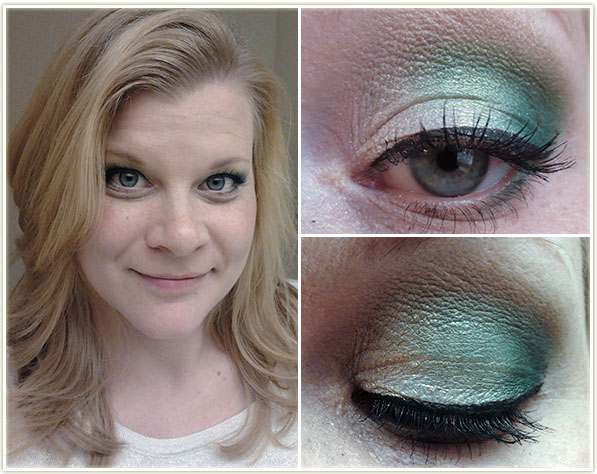
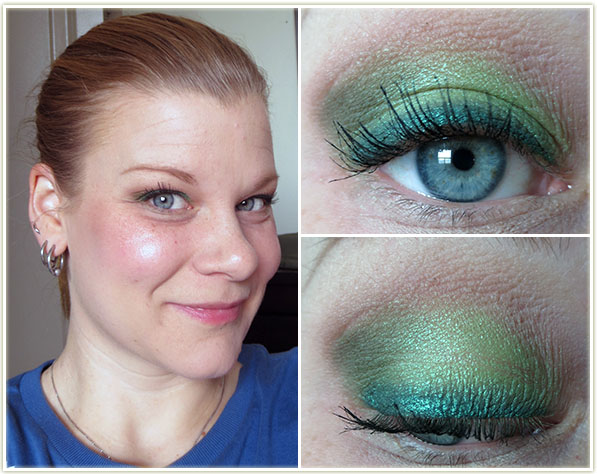
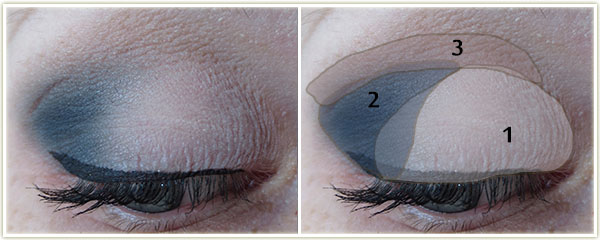
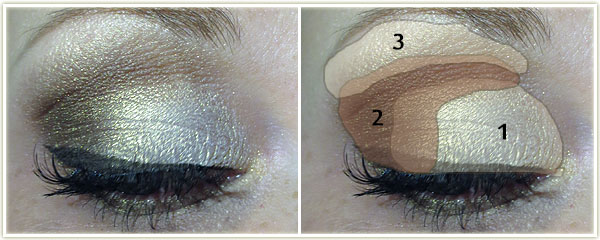
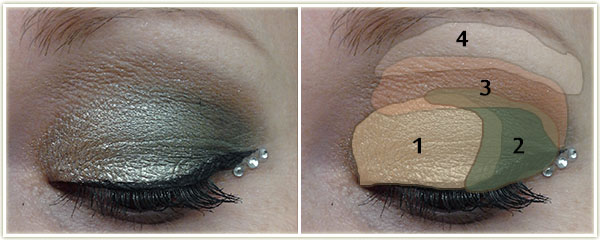
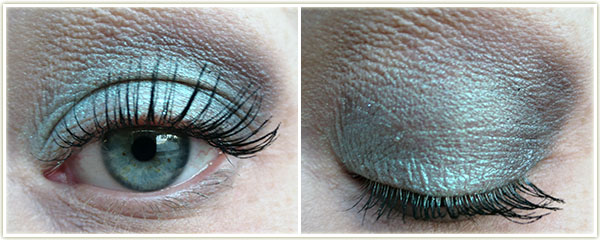
I love how the iridescence of the white-gold mineral eye shadow makes the matte green actually sparkle. Beautiful colours.
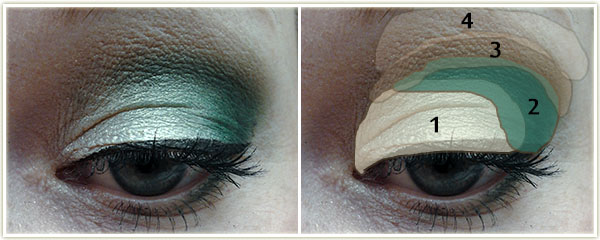
Eyes: I first applied NYX‘s Jumbo Eyeshadow Pencil in Milk all over the lid because I feel I really need a sticky white base for the mineral shadow I’m about to apply next.
MAC‘s Blacktrack fluidline to create a winged liner and applied L’Oreal Voluminous Carbon Black to my lashes.
Lips: Nothing
Cheeks: Physicians Formula Happy Booster Blush in Natural
Face: Bourjois Healthy Mix Serum in 52 Vanilla with Physicians Formula Bronze Booster in Light to Medium.
This is one of two staple looks that I have (‘ll post the other one at a later time). This is the more rushed, “need to get out the door” look. This look was predominantly created so I could finally finish up Haux, my oldest MAC shadow.
Topped it off with L’Oreal Voluminous Carbon Black mascara.
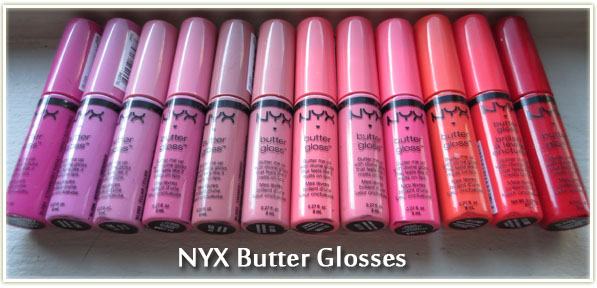
In a moment of madness, I picked up the rest of the entire NYX Butter Gloss line after having been gifted two by a friend. These may just be the be-all, end-all of glosses for me.
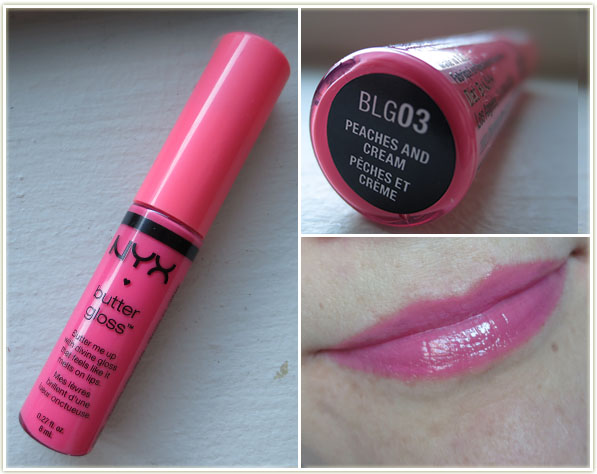
The glosses come in an assortment of shades, ranging from a few neutrals, to pinks, to peaches and finally to some oranges and one red. They are on the milkier side, which the lighter colours tend to display more. The brighter peaches and oranges tend to look more juicy than milky and come across as having a slightly gel-like appearance (although they don’t feel gel-like).
There is a slight tackiness, but it’s so slight that chances are you won’t even notice it, although it does give the gloss some grip on the lips to help increase the longevity of the product. I wouldn’t say these are especially long lasting, they are a lipgloss after all, but you can expect about two hours of wear before you’ll need to re-apply (assuming you haven’t been eating or drinking).
As for the scent/taste of the gloss… well it’s a bit bizarre. The shades have a lovely buttery, slightly vanilla, creamy scent to them (some smell stronger than others). It’s certainly a tasty scent! However, once you get the product on the lips, it does tend to actually taste like plastic. I don’t find the taste to be off-putting really, but it is something worth noting as they definitely do not taste the same way they smell. Some colours have more of a plastic taste than others, so it’s not completely widespread across the entire range. (At the moment, I’m wearing Peach Cobbler and it has one of the stronger plastic tastes.)
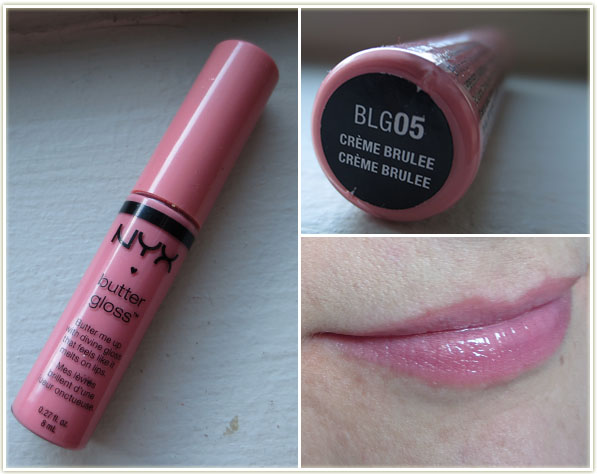
In my opinion, these Butter Glosses are an absolute must-have. My favourites out of the bunch are Creme Brulee, Strawberry Parfait and Vanilla Cream Pie.
See below for pictures and swatches of the entire collection of Butter Glosses.
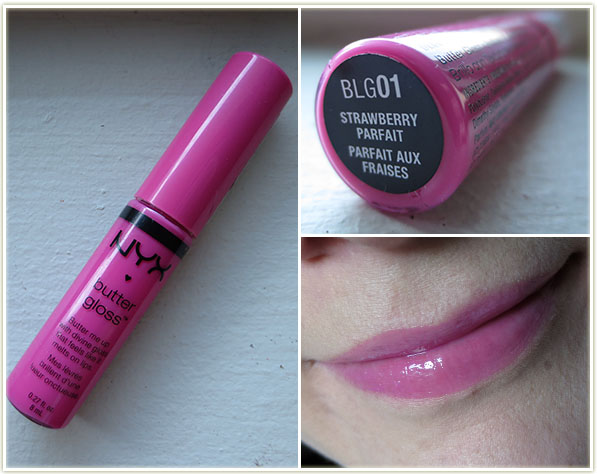
The brightest, slightly fuschia, pink in the collection.
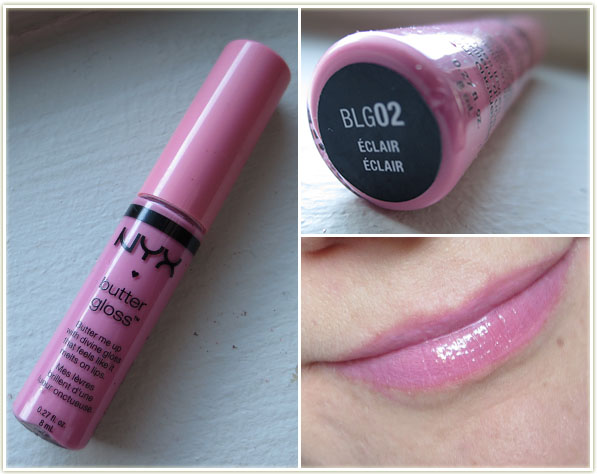
One of the milkier shades. Definitely pale, pink and milky.
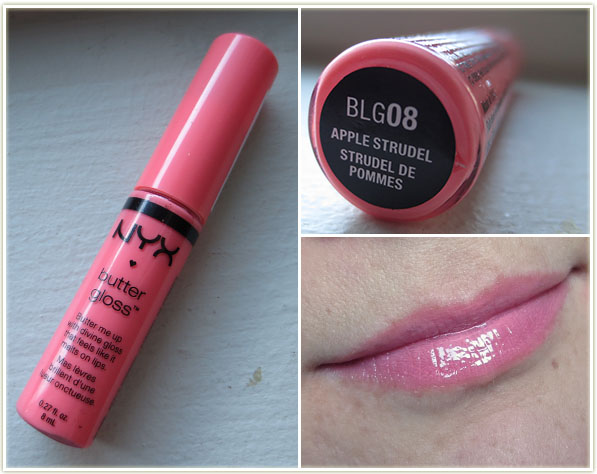
Looks quite coral/peach in the tube, but comes across as quite pink on my lips. I love this colour.

Merengue has a definite lavender tone mixed with pale pink. Very pale and milky in appearance.
A slightly pinky nude.
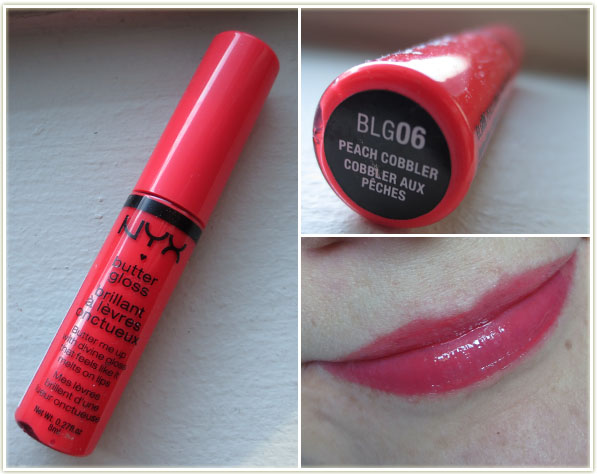
This one is super bright! Very orange in the tube, but comes across slightly redder on the lips.
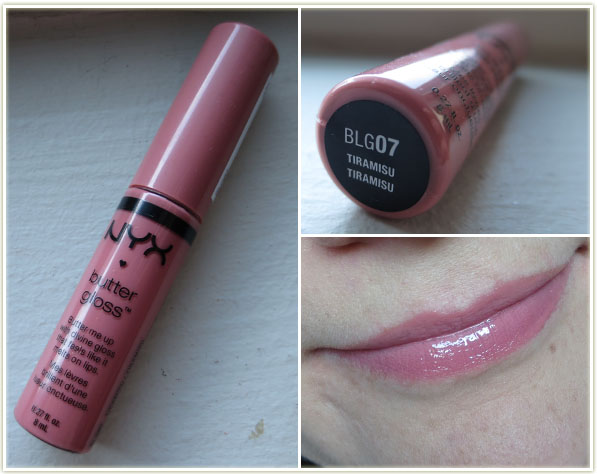
The “pure” nude of the bunch. Slightly, pink/mauve tone.
Peach in the tube, slightly pinker on the lips.
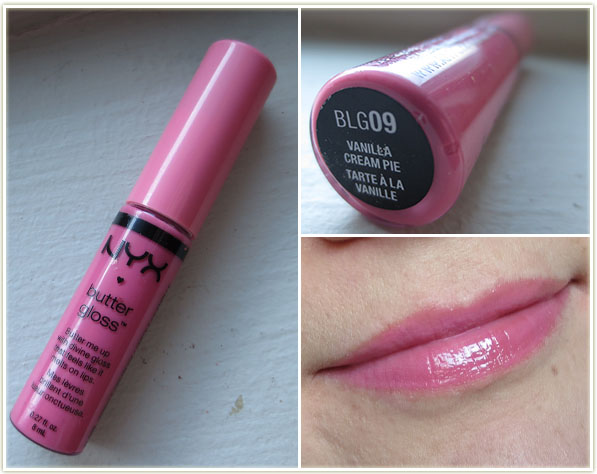
Lovely mid-tone pink.
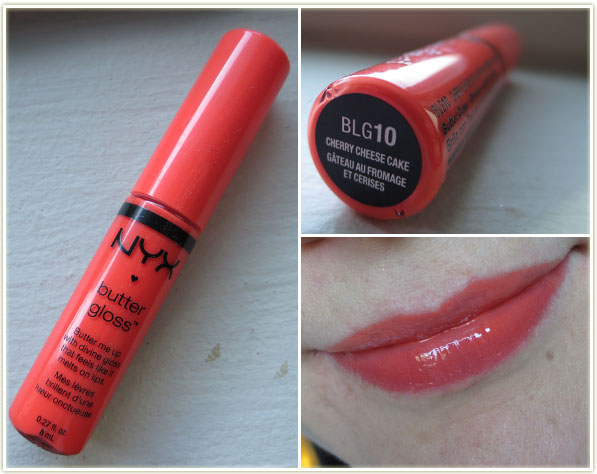
Bright orange in the tube and on the lips.
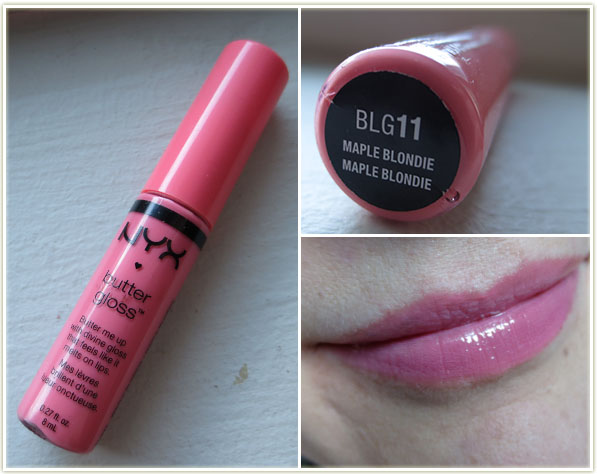
Peachy pink with a slightly milky appearance.
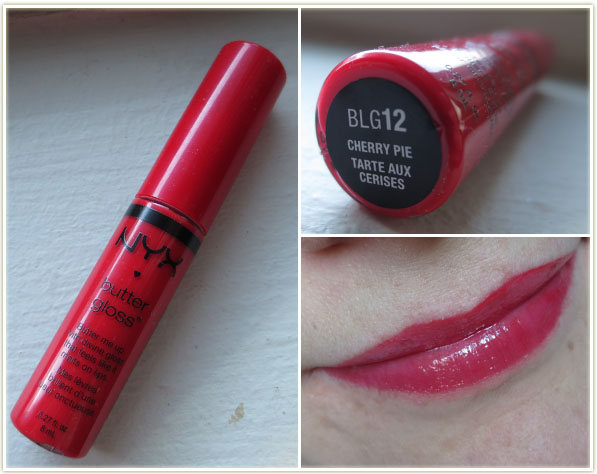
The red out of the whole lot. Looks slightly gel-like on the lips.
The NYX Butter Glosses can be purchased at Ulta.com for $4.99 USD each.
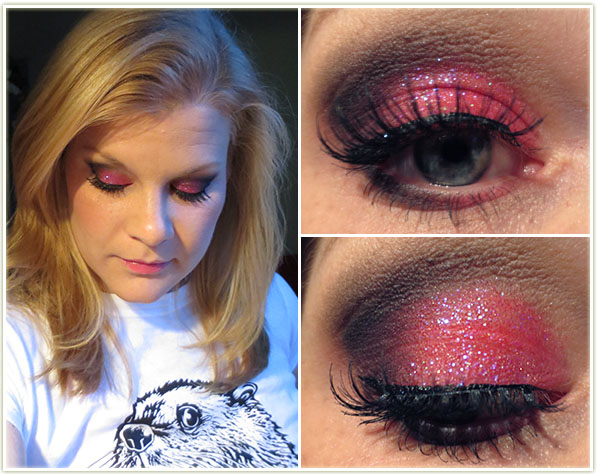
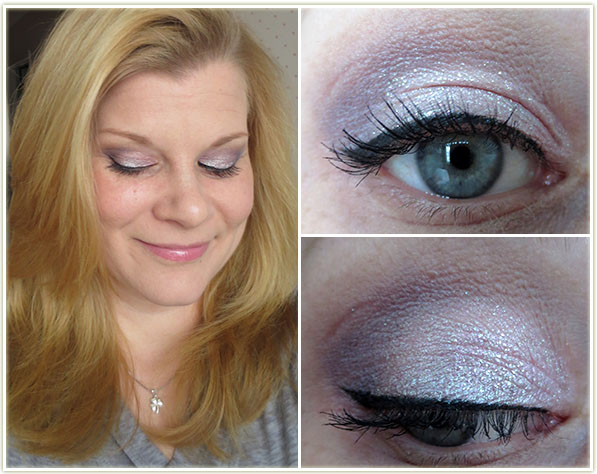
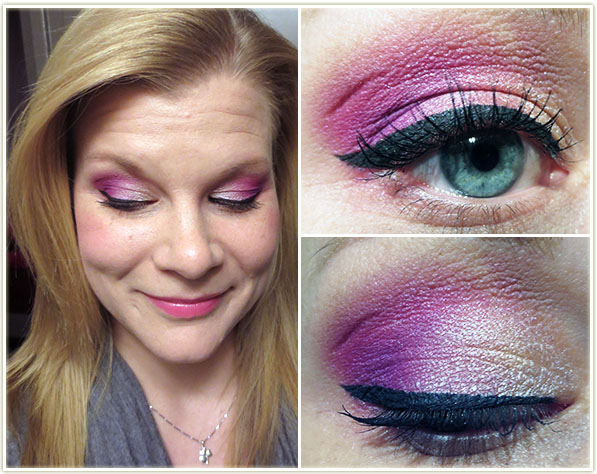
Wore this one out to a concert (Phildel was playing at the Drake Hotel in Toronto – check her out). I’ve been hoarding this pink cosmetic glitter for what feels like eons now (seriously, a friend gave me some of this about ten years ago) and never really thought to wear it because I didn’t used to wear a lot of pink (I still don’t really). For whatever reason, it sprung into my head as I was getting ready for the show so I decided to give it a shot.
Eyes: I used Urban Decay Primer Potion in Original to prime the lid. I then applied SleekPout all over the lid (take a while to pack this on) and then used Urban Decay Blackout in the outer corner and into the crease. To blend out the black, I used Urban Decay Buck at the top of the crease to help blend it into my brow highlight which was MAC Brule. I also lined the lower lid with Pout (inner half) and Blackout (outer half).
To add the glitter, I first applied Too Faced Glitter Glue wherever the pink eyeshadow was, then dabbed the glitter over top. I wish I knew what the glitter was, but I don’t as it’s been decanted into an unlabeled bottle. It’s a very transparent pink glitter with a slight blue iridescence.
I then lined the upper lash line with Physicians Formula Ultra Black liquid liner and applied Ardell Demi lashes with some Duo adhesive. To finish off the look I appliedL’Oreal Voluminous Carbon Black mascara (waterproof).
Face: Bourjois Healthy Mix Foundation in 52 Vanilla with Revlon Bronzed & Chic as my bronzer.
Lips: NYX Butter Gloss in Strawberry Parfait
Cheeks: Tarte Blissful
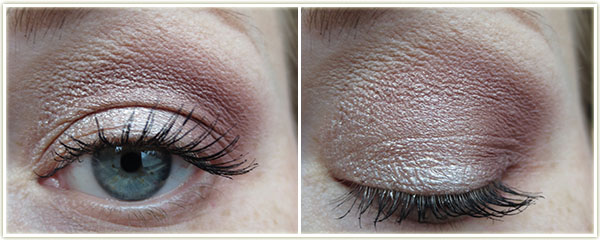
Just a very plain, neutral look.
Eyeshadows: Urban Decay Primer Potion in Original all over the lid and up to the brow. Maybelline Color Tattoo in Bad to the Bronze layered on top of the primer (all over the lid, barely into the crease). I then applied Urban Decay Sidecar (be careful with this one, the glitter gets EVERYWHERE) to the inner two-thirds of the lid with Urban DecayHustle in the outer corner and slightly blended into the crease. MAC Brule was used to highlight the brow and blend Hustle in slightly.
Liner: Maybelline Gel Liner in Blackest Black
Lashes: Well, according to my notes on this look, I have single lashes glued in, so they would be by Ardell. Good thing I wrote it down, because I wouldn’t have picked up on them from these shots. I used CoverGirl Clump Crusher in Very Black as my mascara.
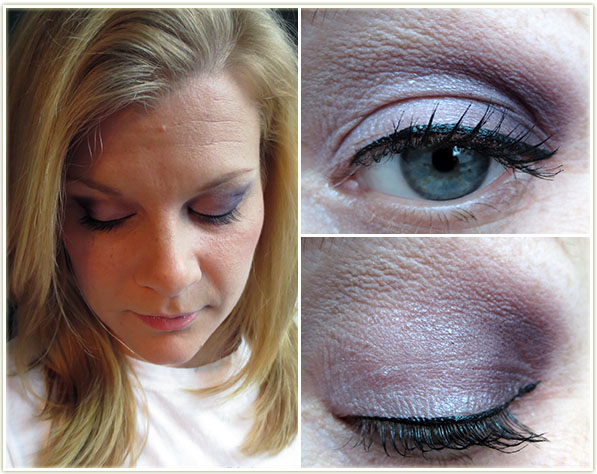
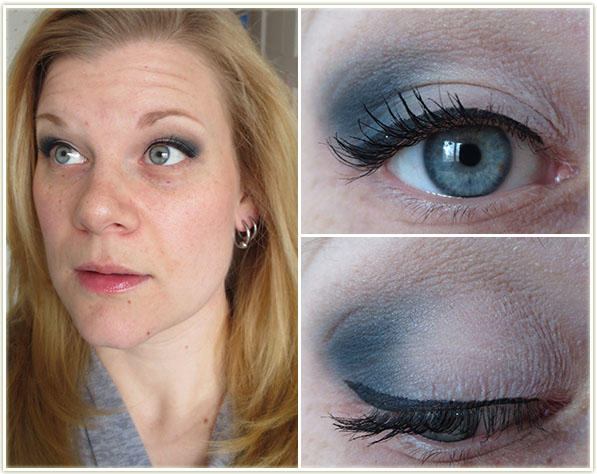
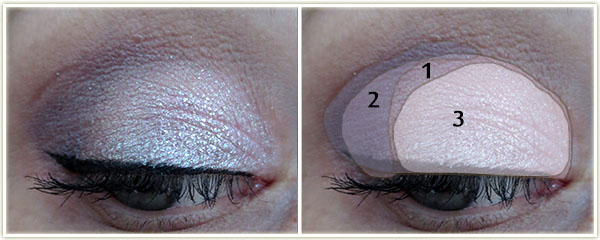
Playing around with my Laura Mercier Artist palette.
Primer: Urban Decay Primer Potion in Original
Eyeshadows: I used the light lavender shade from the MUA Pretty Pastels palette all over the lid with Laura Mercier Ink on the outer third of the lid. Laura Mercier Vanilla Nuts was used to highlight the brow.
Liner: Physicians Formula Eye Booster in Ultra Black
Mascara: L’Oreal Voluminous Carbon Black (waterproof)
Rest of the Face:
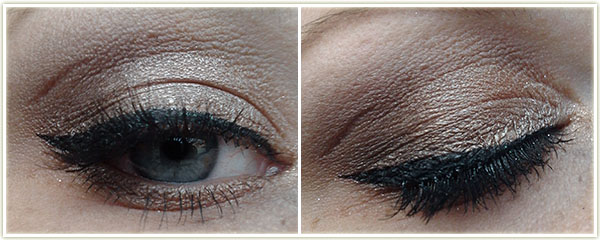
Just an easy one I did while getting ready for work in the morning.
Primer: Urban Decay Primer Potion in Original
Eyeshadows: Inglot AMC Shine 24 over the entire lid with Urban Decay Gunmetal in the outer corner and blended into the crease. MAC Brule as my brow highlight.
Mascara: L’Oreal Voluminous Carbon Black (waterproof)
Jeez, this one just looks boring looking at in pictures! Although I’m sure there’s some neutral lovers out there that will prefer this to my more colourful looks.
Eyeshadows: UDPP in Original all over the lid. (All Laura Mercier) Guava all over the entire lid, Truffle blended into the outer corner and through the crease with Vanilla Nuts as a brow highlight. I then pressed Espresso into the lashline to create a soft liner.
Mascara: L’Oreal Voluminous Carbon Black (waterproof)
Rest of the Face: