Fitness Friday: Personal Update

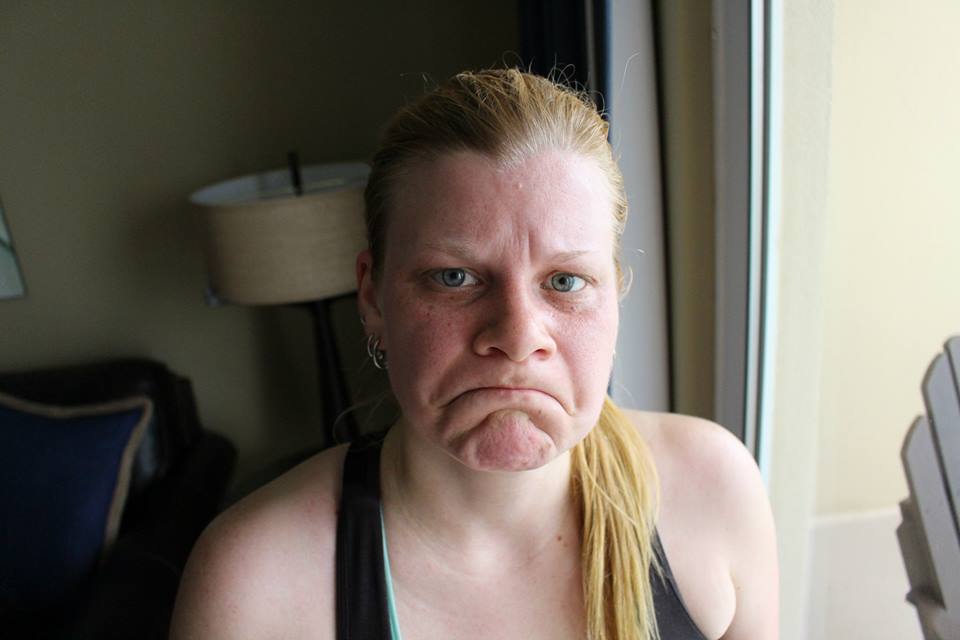
Me after a run in Florida in April (also helpfully depicting how I feel about my current level of physical fitness)

I don’t have anything overly exciting to share with you guys this week for Fitness Friday – no fun photos or achievements. This is more of a personal update on how I’ve been doing.

2015 has kind of sucked for me from a personal fitness achievement perspective. I set out some goals at the start of the year and the ones I most wanted to achieve were:

  1. Run a 5K in under 25 minutes
  2. Get down to 145 pounds.

Well, it’s felt like a constant battle since I made those goals for myself back in January. I saw my weight slowly increase from 150 to 160 pounds and became really, REALLY upset with myself over it. Unfortunately, I kept half assing the weight loss aspect of tracking my calories so I’ve been pretty much been carrying that weight since January (thanks Christmas!). Even though it’s “only” ten pounds, for me, it’s around this threshold that I become completely pissed of with how I look. I don’t like how I appear in pictures and I don’t like what I see in the mirror. It’s frustrating, to say the least.

I also only really half trained to increase my speed in a 5K and I managed to get the exact same time as my personal best last year (26:10) during a race back in March. But man, I do not know how to balance training for half marathon distances while also trying to increase pace on 5Ks. What a mess.

I got so irritated with myself over the last two weeks that I basically just said “enough” and got back into exercising 5-6 days a week. I’m running three times a week, lifting twice, while still playing soccer and I’ve also chucked in a few Jillian Michaels DVDs every now and then too. I also started restricting my calories pretty drastically – keeping it between  1250 and 1500. It’s a slow damn battle, but I’ve actually managed to drop 4 pounds in 2 weeks which is almost unheard of for me.

Of course, part of the motivation is that Halloween is just around the corner and, like last year, we have another epic group costume planned – Batman villains! The last thing I want to do is be upset with how I look in my Harley Quinn outfit, so I’m all in at this point. My initial goal is to hit 150 pounds by the time I go on vacation mid-September (that’s REALLY, REALLY ambitious as it requires I drop 7 more pounds in 3 weeks) and the stretch goal is to hit 145 by Halloween. It’s hard going, but I’ve been eating clean (no alcohol, low carbs, high protein and more fruits and vegetables than I can count) for a week and a half now and it’s absolutely working – never in my life have I experience such consistent and rapid weight loss without horrific fluctuations.

Not to be a total downer though, I do have some things I’m looking forward to in my fitness endeavours! I managed to rope Zoe of Writing Whimsy into doing a 5K race here in Toronto in September. I’m super excited for that because I love running races with friends and I believe this is her first one! I am also running the Scotiabank Waterfront Half Marathon again this year in October and I’m trying to raise $500 for United Way Toronto. Having a half marathon to train for is definitely keeping me in check with my goal to run 550 kilometers this year! (Which I am absolutely on track with thankfully!) We’re also going to be in Wisconsin over Christmas (my husband’s family is there) and I’m planning to do a New Year’s race near Madison. I love races in new locations!

I’ve also managed to stay on track with weight lifting – I’m not lifting any new and exciting poundage, but I’ve managed to stay stable all year in that respect and I am really, REALLY happy that I never had a break so long that it required me to start from scratch!

So if you’re struggling, even if it takes you months to get back on track like me, you can still do it if YOU want to do it. Try to remember that. 🙂

And if you made it through this whole post, thank you for listening – it helps me to get it out there and it keeps me motivated.
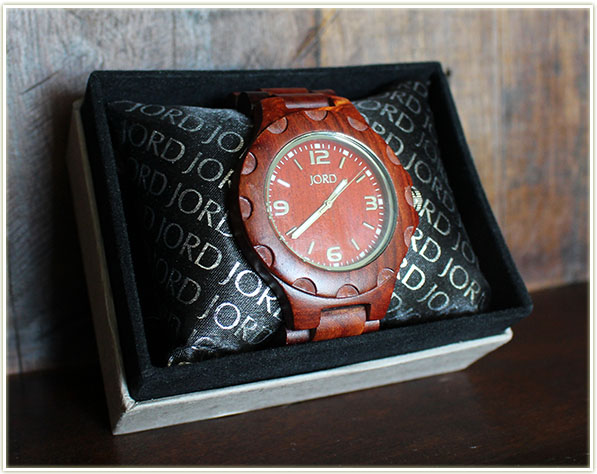
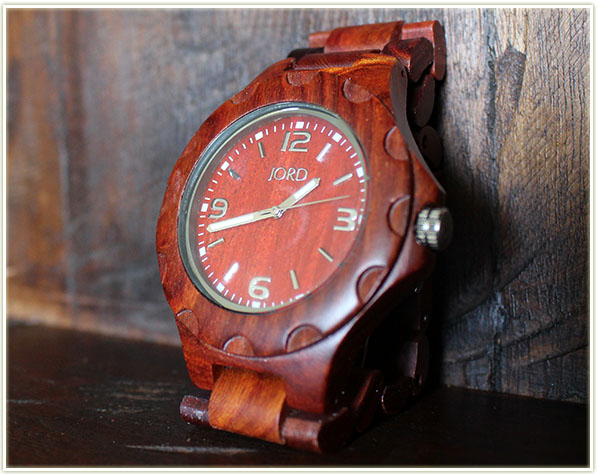
JORD Wood Watch in Sully (Red Sandalwood)

201508_jord_woodwatch_sullyredsandalwood2

JORD wood watches seem to be hitting the beauty world by storm. I’ve seen them on blogs and on YouTube and I couldn’t help but be intrigued by them. JORD‘s wooden watches are a totally new take on a accessory that is fast being replaced by cell phones. And perhaps that’s what makes them so interesting – the fact that a company is producing a product that looks elegant yet still has a hint of “old fashion-ness” to it in a time when cell phones are taking over timekeeping duties.

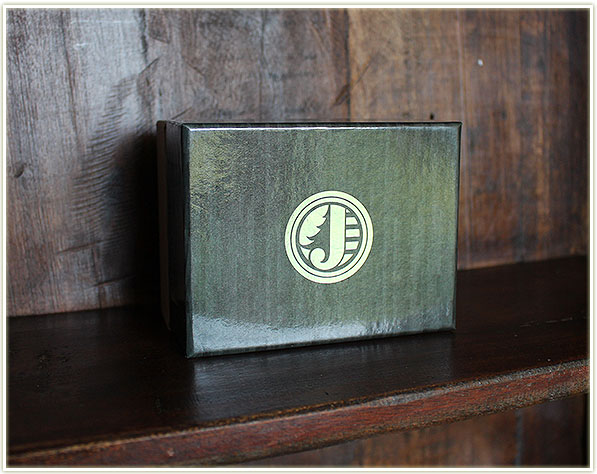
JORD Wood Watch - box
JORD Wood Watch – box

I am thankful to have been sent one to review since prior to their offer I had spent time on their web site but had never pulled the trigger on ordering one (Sharon Farrell bought one, okay? Anything she loves, I love too!). Imagine my surprise when they reached out to me to try one!

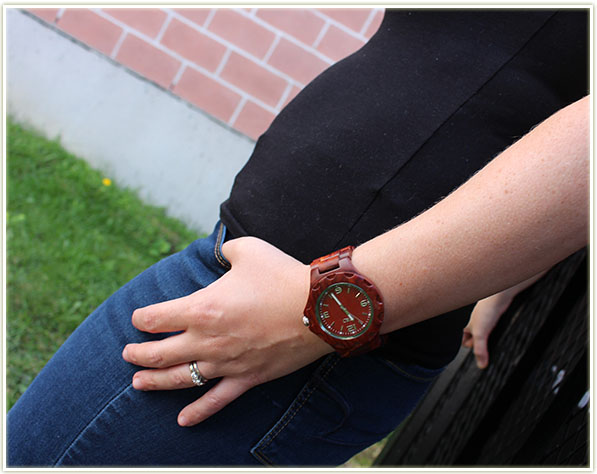
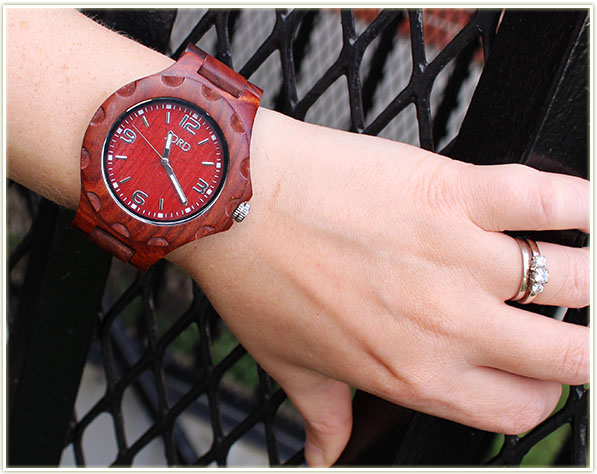
JORD Wood Watch in Sully (Red Sandalwood)

I opted for the Red Sandalwood version of the Sully watch (although it was originally called “Cherry” when I placed my request). I liked that it was one of the more vibrant colours of wood and it had that tone of red that I seem to love in my eyeshadows.

JORD Wood Watch in Sully (Red Sandalwood)

The watch is larger than anything I’ve owned before as I had never really fallen into the boyfriend watch trend that Michael Kors seems to have made famous. So this was an opportunity to try something new! I like that the faceplate is bold and easy to read. I also got used to the feeling of the larger faceplate pretty quickly – hell, it makes it easier to read the time! It’s also worth noting, this isn’t a heavy accessory at all. My husband even picked it up one day and was surprised by just how lightweight it felt.

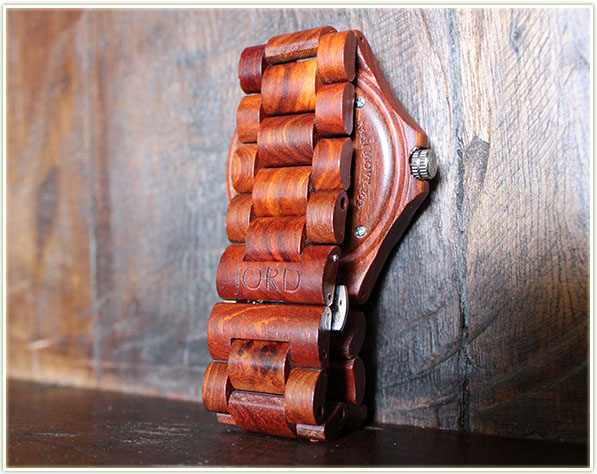
JORD Wood Watch in Sully (Red Sandalwood)

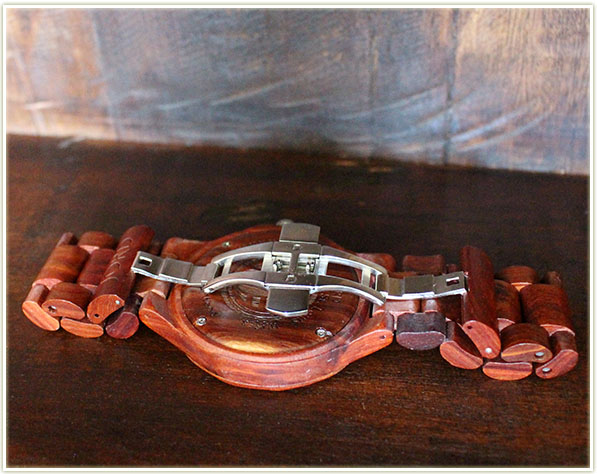
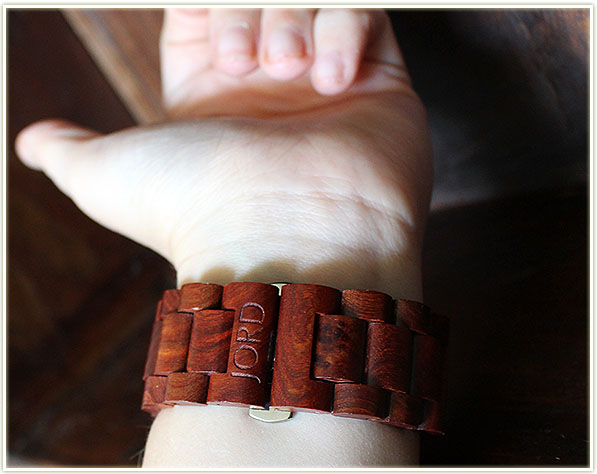
The back of the watch is incredibly intriguing. The closure at the back of the watch is hinged so that the entire metal component is hidden almost completely by the wooden strap.

JORD Wood Watch in Sully (Red Sandalwood) - check out that clasp!
JORD Wood Watch in Sully (Red Sandalwood) – check out that clasp!

You open and close the clasp with two pressure points on either side – this releases the clasp and lets you take the watch off (or on, obviously).

Completely hidden closure

But when it’s closed, the metal is mostly hidden away. I’ve never seen anything like it, and I love how it makes the entire back of the watch look completely uniform with the rest of the piece.

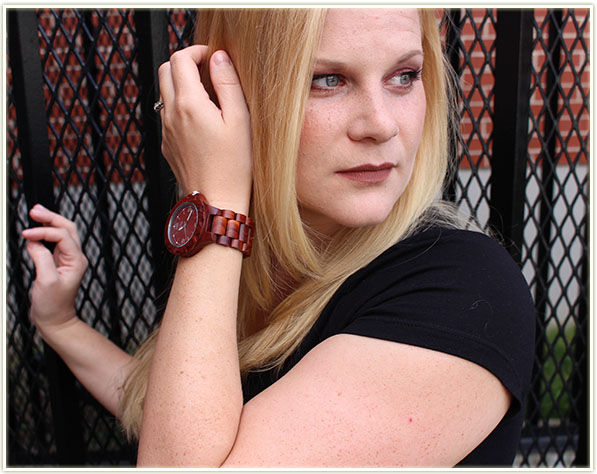
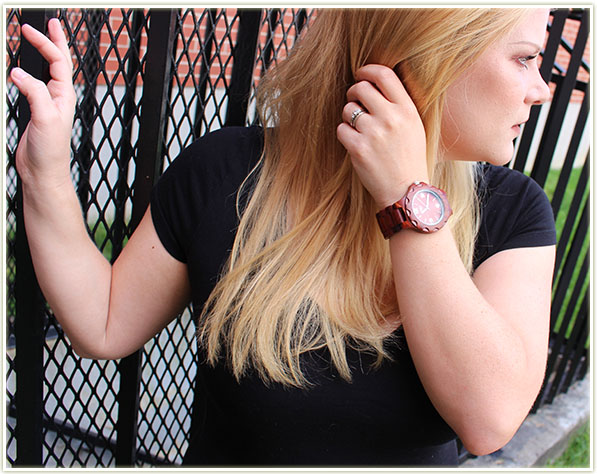
Wearing my Sully watch and... trying to pose. Oh dear.
Wearing my Sully watch and… trying to pose. Oh dear.

As I said earlier, I chose the Red Sandalwood version because I’m such a sucker for anything red-toned. I’m not usually one to style myself around my accessories, but I couldn’t help but be inspired by the shade of the dark red wood.
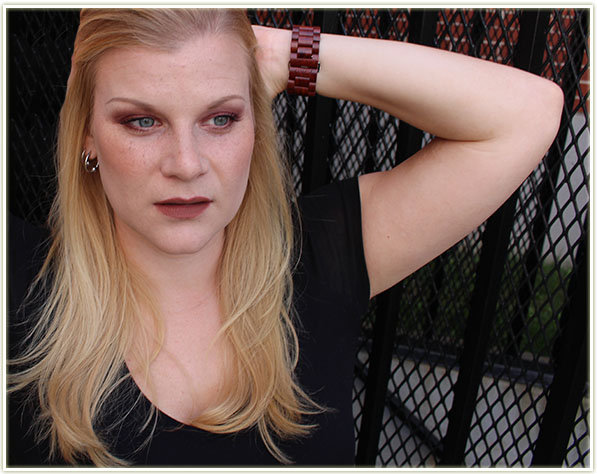
Wearing my JORD Wood Watch in Sully

I ended up using L’Oreal’s Infallible eyeshadow in Golden Mahogany to blow out my eyes and paired it with Clarins’ new Lipliner  Pencil in Nude Beige.
JORD Wood Watch in Sully

Sidnote: I didn’t think of this till after my anniversary, but the traditional theme for a fifth wedding anniversary is WOOD. Since these watches are so gorgeous, you may want to consider getting your spouse one of these if you stick with traditional gifts! They have a lovely variety of both mens and womens watches so there’s plenty of options to scour through.

Are you intrigued by these JORD Wood Watches yet? I’m really, REALLY enjoying mine!

Unique Watches

This post features a product that was sent to me for review purposes.

What’s On My Face – Volume 41

While this set of looks doesn’t top Volume 40 for epic-ness (seriously – I’m way proud of some of the looks in Volume 40), there’s still some really, really pretty ones in here.

Enjoy!


201508_womf41_look2.1

I can’t even rember why I was so done up for this look to be honest. I must’ve been doing SOMETHING important to warrant false lashes…

201508_womf41_look2.2

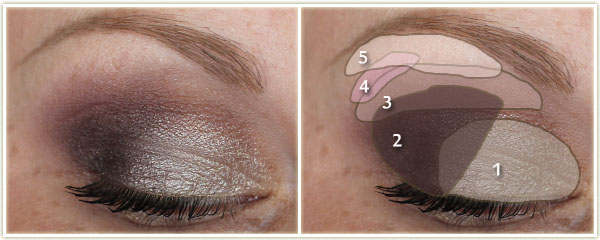
Eyes

  1. MAC Cork through the top of the crease.
  2. Inglot AMC Shine 28 all over the lid and inner tearduct.
  3. Inglot Matte 325 on the outer half of the lid and to line the lower lash line.
  4. Urban Decay Blackout in the outer corner.
  5. Wet n Wild Brulee on the brow bone.

I created the wing with the Kat Von D Tattoo Liner in Trooper and tightlined my water lines with Marc Jacobs‘ Highliner Gel Crayon in Blacquer. On my lashes is CoverGirl‘s Clump Crusher mascara with a pair of Houses of Lashes Bombshell falsies on top.

Rest of the Face

  • Bronzer: Hard Candy Hula Hula
  • Blush: Milani Tea Rose
  • Highlighter: MAC Silver Dusk
  • Lips: Rimmel Apocalips in Celestial

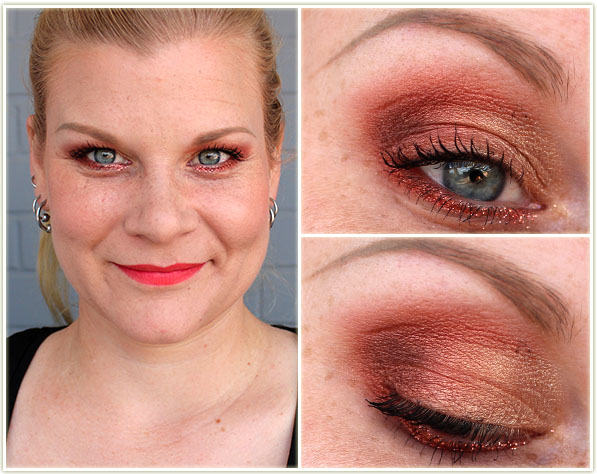
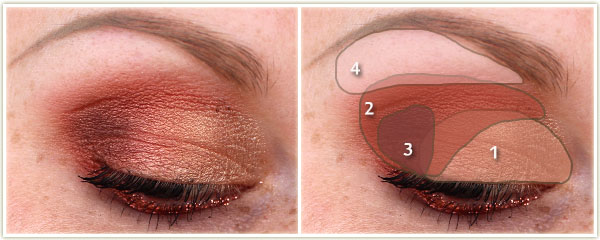
201508_womf41_look4.1

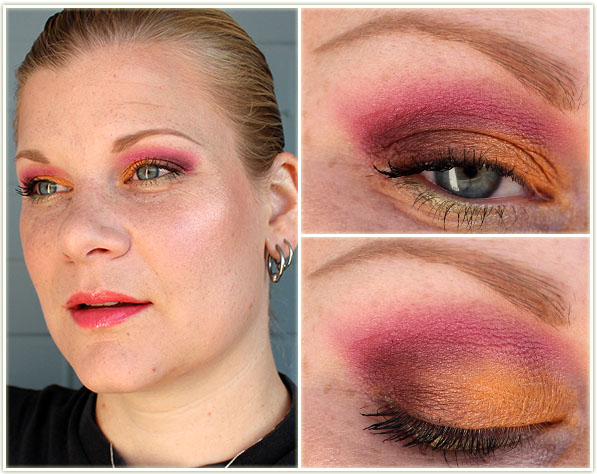
This look (without the glitter) has been a constant favourite of mine over the years. It’s one I know I can resort to if I want to look like my eyes are on fire and don’t have to think about the eyeshadow combination. Kind of a failsafe, you know? I wore this to the VIB Rouge event at the Eaton Centre in Toronto (thank you for the invite Julie!) and had to add on some glitter just for fun. Except I love it so much with the glitter that now it’s REQUIRED for this look…

201508_womf41_look4.2

Eyes

  1. MAC Gleam all over the lid.
  2. MAC Coppering on the outer half of the lid and through the crease.
  3. MAC Handwritten to deepen the outer corner.
  4. MAC Blanc Type on the brow bone.

I applied some Too Faced Glitter Glue all along my lower lash line, then patted on MAC‘s Reflect Copper glitter (THIS STUFF IS INSANE). On my lashes is Urban Decay‘s Perversion mascara.

Rest of the Face

  • Foundation: Boots No7 Instant Radiance in Cool Vanilla
  • Bronzer: Too Faced Chocolate Soleil
  • Blush: MAC Ripe Peach
  • Highlighter: Becca Champagne Pop
  • Lips: Revlon Lipstain + Balm in Flame

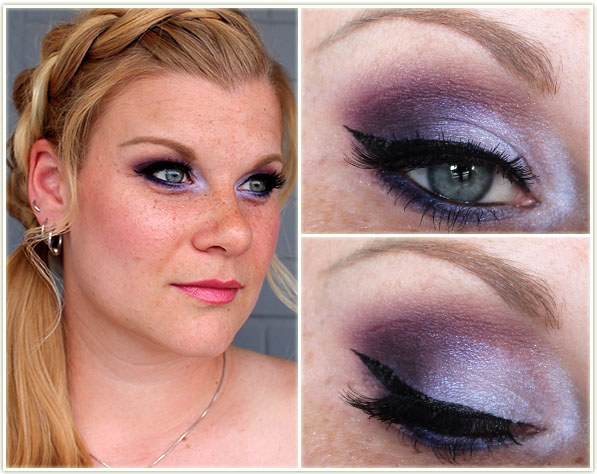
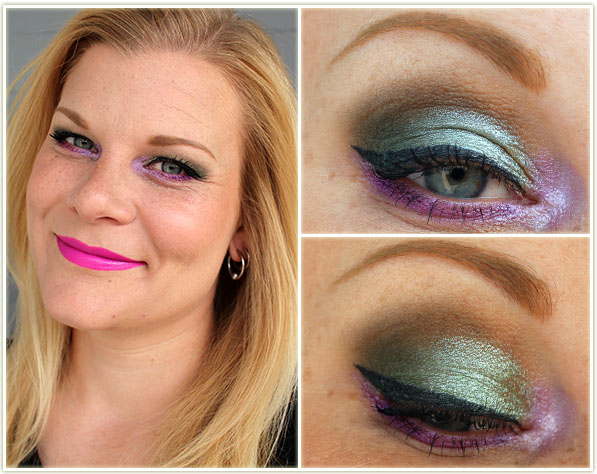
201508_womf41_look1.1

This one is fairly “old” since it’s been sitting on my harddrive since June. I think I was trying to figure out how to balance coloured eyeshadow with bright lips. I actually think this works… but I’m not sure if I’m trying to convince myself of that, you know?

201508_womf41_look1.2

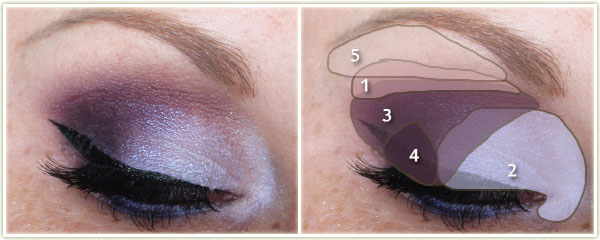
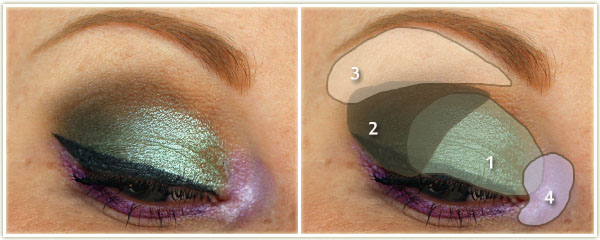
Eyes

  1. Makeup Geek Fantasy all over the lid.
  2. Makeup Geek Dirty Martini on the outer half of the lid.
  3. Makeup Geek Vanilla Bean on the brow bone.
  4. Makeup Geek Daydreamer on the inner corner.

I lined my lower lash line with Makeup Geek‘s Masquerade eyeshadow and created the wing with MAC‘s Blacktrack fluidline. On my lashes is Make Up For Ever Smoky Stretch mascara.

Rest of the Face

  • Foundation: Boots No7 Instant Radiance in Cool Vanilla
  • Bronzer: Hard Candy Hula Hula
  • Blush: essence Life’s a Cherry
  • Highlighter: MAC Soft & Gentle
  • Lips: Too Faced Melted Rainbow

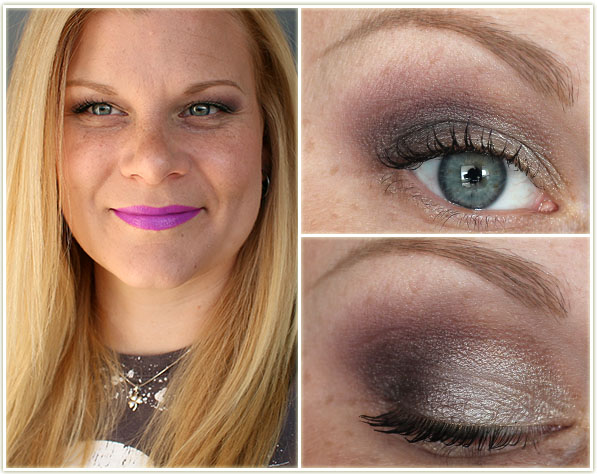
201508_womf41_look5.1

With all the hype surrounding the upcoming holiday palettes by Too Faced, I just had to whip out some of my older holiday palettes by them. I love their holidays palettes so much!

201508_womf41_look5.2

Eyes
(all Too Faced shadows from the Everything Nice palette)

  1. Shiny Happy on the lid.
  2. Secret Lovers on the outer half of the lid.
  3. Be You through the crease.
  4. Kindess is Free barely tapped on the outer corner of the crease.
  5. Dream On on the brow bone.

On my lashes is Urban Decay‘s Perversion mascara.

Rest of the Face

  • Foundation: Boots No7 Instant Radiance in Cool Vanilla
  • Bronzer: Too Faced Chocolate Soleil
  • Blush: Too Faced Papa Don’t Peach
  • Highlighter: Too Faced Inner Light
  • Lips: Too Faced Melted Violet

201508_womf41_look3.1

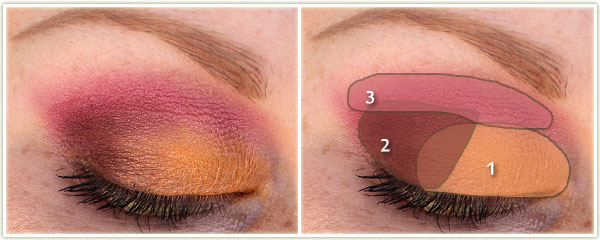
And last up is a look I wasn’t sure how to do when I first looked at the quad. This utilizes The Body Shop‘s Pink Poppy shimmer cubes which have a very vibrant hot pink, an orange, a somewhat timid lime green and a silver. That’s one hell of a combination!

201508_womf41_look3.2

Eyes
(using The Body Shop shimmer cubes in Pink Poppy)

  1. Orange shade all over the lid.
  2. Too Faced Cherry Cordial to deepen up the crease (had to use something else because the look would’ve had no dimension).
  3. Hot Pink shade through the crease.

I lined the lower lash line with the Green and Silver shades from the shimmer cube quad, then applied CoverGirl‘s Clump Crusher mascara to my lashes

Rest of the Face

  • Foundation: Boots No7 Instant Radiance in Cool Vanilla
  • Bronzer: MAC Refined Golden
  • Blush: Hard Candy Skinny Dipping
  • Highlighter: Becca Champagne Pop
  • Lips: Revlon‘s Papaya lipgloss

Make Up For Ever UltraHD Foundation (Review, Swatches & Application)

201508_makeupforever_ultrahdfoundation1

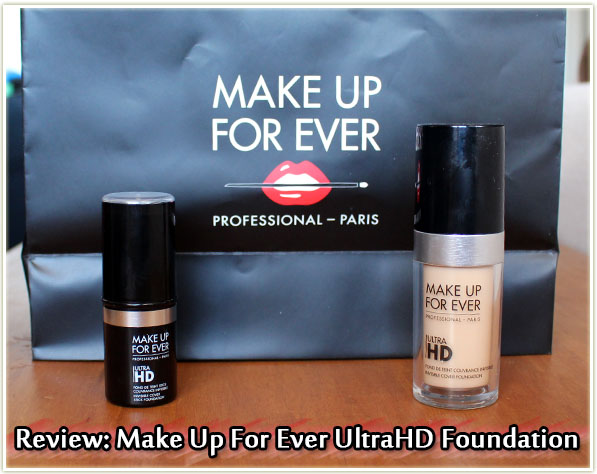
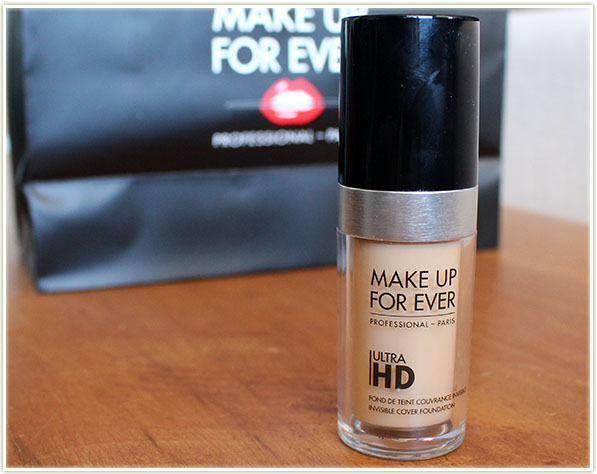
To much fanfare (and terror, I might add), Make Up For Ever recently launched their UltraHD foundation. Designed with 4K technology in mind, the new UltraHD foundation is intended to be completely invisible  under the latest, ultra-magnified resolution while looking natural on camera and in person.

Now, I said this was met with terror, and I meant it – there are a LOT of people out there that swore up and down that Make Up For Ever HD foundation was their holy grail. With the new launch of UltraHD, it’s totally wiped out their range of HD foundation. Despite wanting to try it, I had never gotten around to trying the HD foundation, so I have nothing to compare it against except other foundations in my collection.

Make Up For Ever UltraHD Invisible Cover Foundation

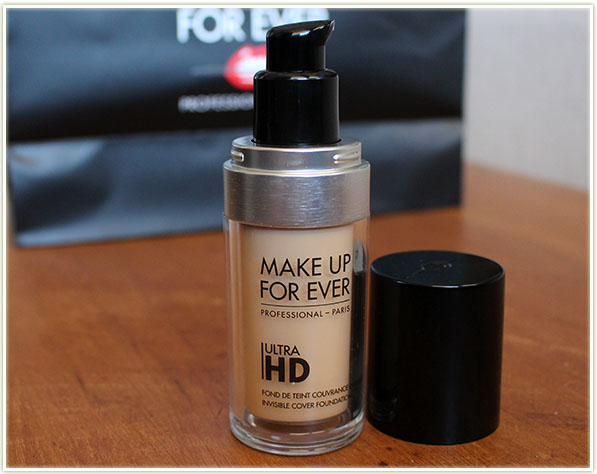
As is typical for a foundation, it comes with 30 ml (1 fluid ounce) of product and will cost you $50 CAD. The new liquid range comes in a whopping 40 shades! Is there another range of foundations out there that comes in that many shades? (If there is, educate me!) That seems ENORMOUS to me. Kudos to Make Up For Ever for appreciating the fact that there’s a lot more than 10 shades of skin out there!

The liquid foundation has light to medium coverage and is buildable.

Make Up For Ever UltraHD Invisible Cover Foundation

And, blissfully, it comes with a pump. <3

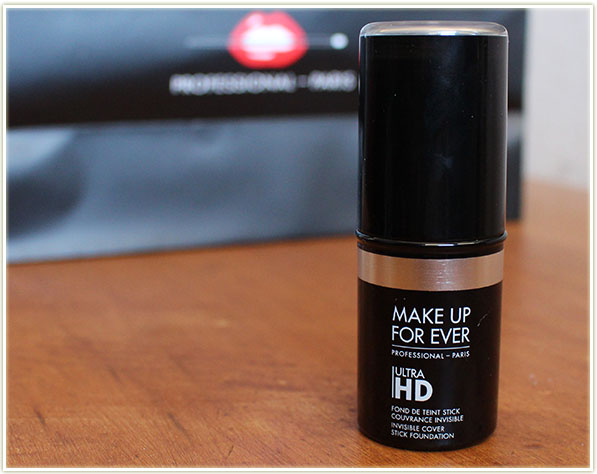
Make Up For Ever UltraHD Invisible Cover Stick Foundation

I wasn’t even expecting it, but the UltraHD range also comes in a cream stick formula as well. It’ll also set you back $50, but there are only 15 shades in this formula. It comes up a little short on the product side with 12.5g (0.44 ounces).

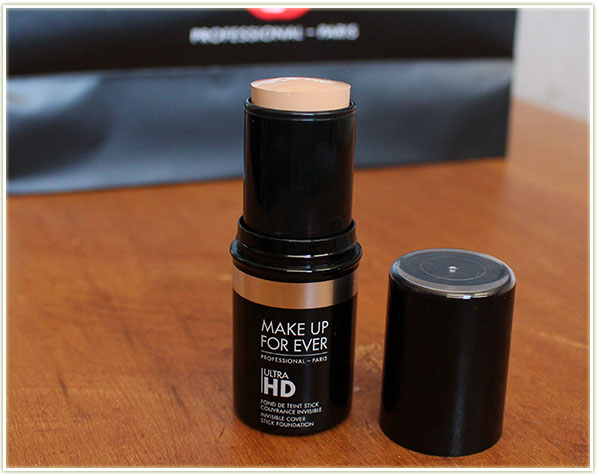
Make Up For Ever UltraHD Invisible Cover Stick Foundation

The UltraHD stick foundation provides medium to full coverage.

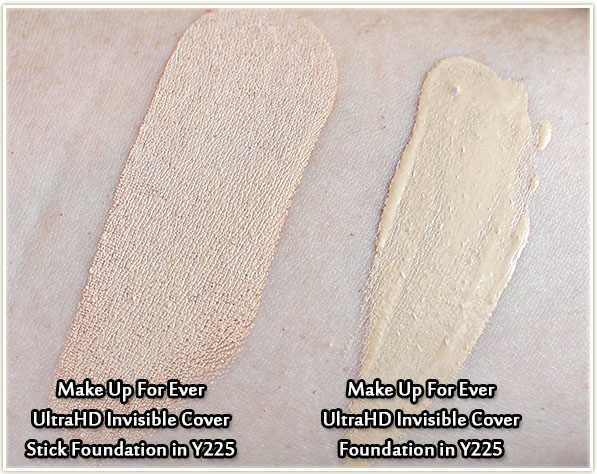
Make Up For Ever UltraHD - Y225 Swatched
Make Up For Ever UltraHD – Y225 Swatched

I was colour matched to Y225 which is apparently shade 117 in the original HD formula. (For reference, I am typically colour matched to NW20 in MAC shades.) There is a very definite difference between the same colour in the two different formulas though. On the left is the stick foundation in Y225 and it is definitely leaning more pink than the Y225 in the liquid formula on the right.

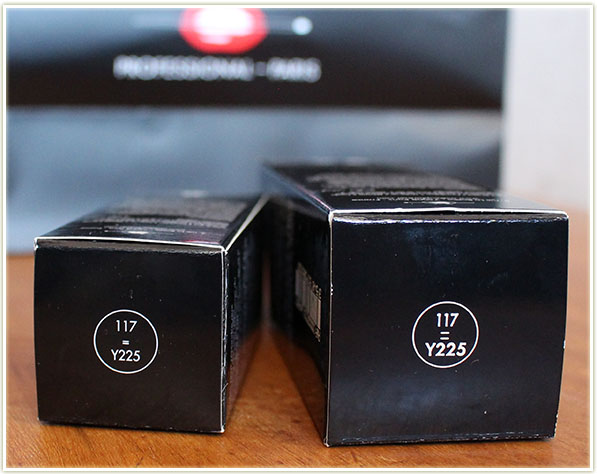
Make Up For Ever UltraHD foundation

A handy thing (or so I thought) was that each bottle tells you what the current shade of the foundation is called (in this case, the real name is Y225), but it also tells you that if you were 117 in the HD foundation, then Y225 would be your shade in the new lineup.  However… the shades don’t quite line up that well. Chelsea of Olive & Ivy has a comparison of the previous HD shades in her review here and the colours do not line up exactly with the previous line. So definitely make sure you get colour matched for this!

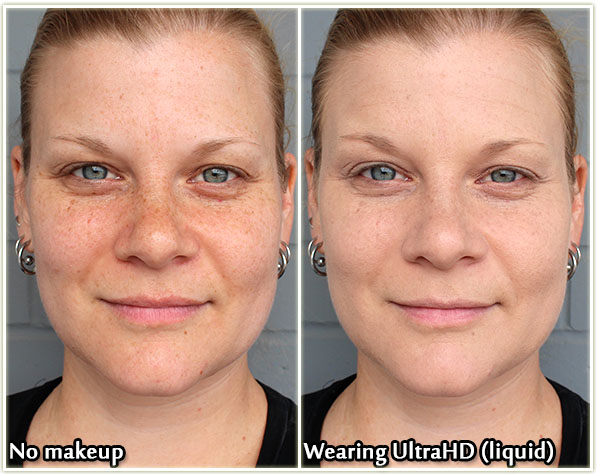
Make Up For Ever UltraHD Liquid

Anyway, on to the actual product. The liquid foundation feels incredibly lightweight. It’s one of the most comfortable foundations I’ve ever worn, which makes it an absolute pleasure to wear. It does look good on camera (as seen above) but it doesn’t cover everything on my face – my freckles are definitely still shining through after a first layer. I’d never add a second layer of foundation since I don’t like the feeling of it, but I imagine you could build it up to a thicker opacity.

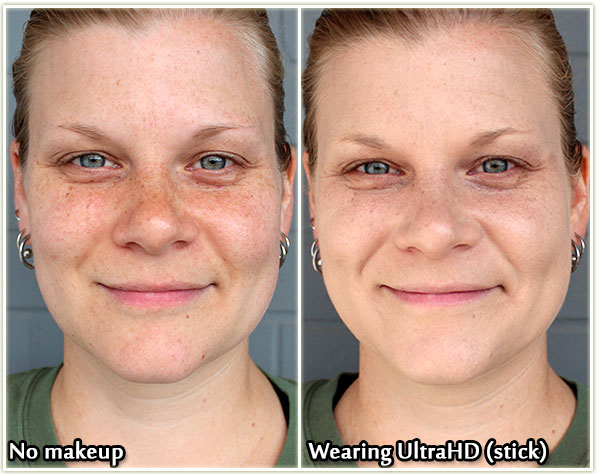
Make Up For Ever UltraHD Stick

With the stick foundation, it’s definitely creamier and thicker. It evens out my skin tone, but again, my freckles are still showing through although I do feel they’re a bit better covered up with the stick.

Final Thoughts

Edit 2016/01/07: Please read after my original summary below for another take on this foundation during a different season.

I’m having a tough time writing this review because I do really like the feel of the foundation. I love how it looks on my skin in person and how it appears on camera. It’s incredibly easy to apply (in both formulas) and blends into the skin seamlessly.

BUT, and this is a giant one, it doesn’t last a whole work day on me. I’m not an especially oily person, but I find I start getting oily patches on my skin halfway through my work day (~5 hour mark) and it starts to break up the foundation. I’m not the only one experiencing this issue either – Steph of Fun Size Beauty also had problems with the foundation unless she powdered or touched up.

Overall, I think the UltraHD foundation is great for camera work (where touchups are constant and necessary), but I don’t feel that it’s a foundation that can last you through a work day without touchups. It’s a bit too high maintenance for me in that regard. That being said, if you’re a YouTuber or on camera a lot? Go for it – it looks and feels amazing!

2016/01/07 Edit:

I went back to using the Ultra HD foundation during the cooler months to see if maybe the wear had changed on my skin. And (thankfully!) I found that to be the case! During the fall (and now winter), I discovered that the foundation doesn’t break up on my skin like it did during the warmer months. This will last now last me a whole day without having to worry about it. So for me, this is more of a winter foundation than a summer one. I still love the weightless finish of it, so I’m really glad to be able to use this foundation on a regular basis now!

Both the liquid and stick formula are available for $50 each on Sephora.ca.

This post features press samples sent for consideration.


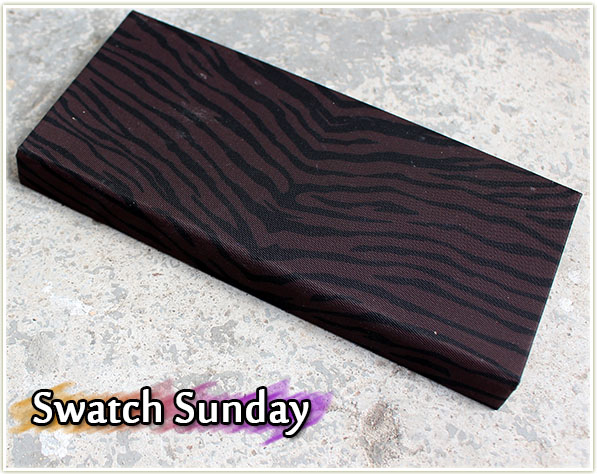
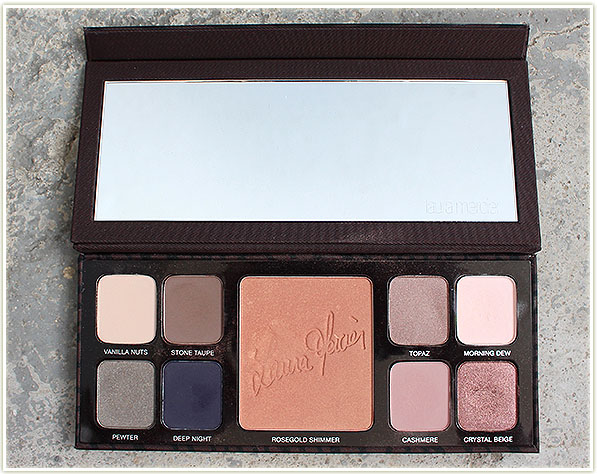
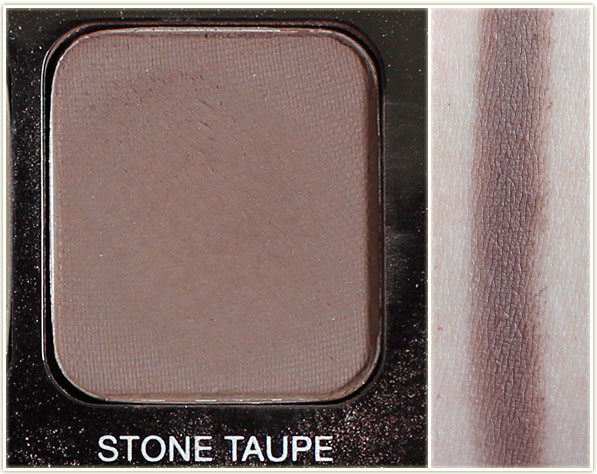
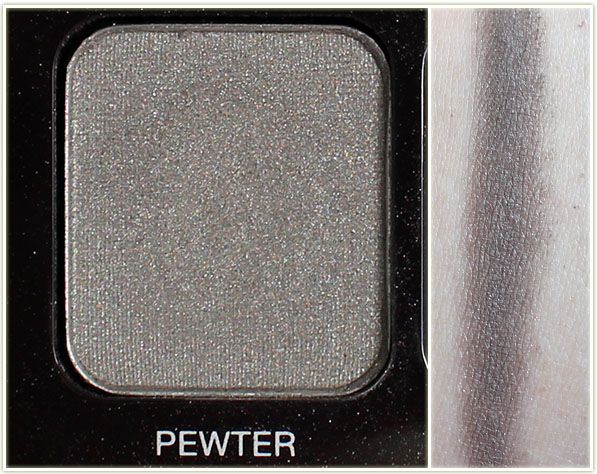
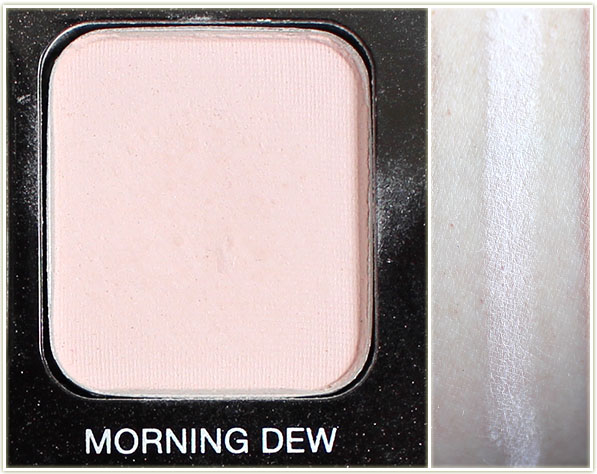
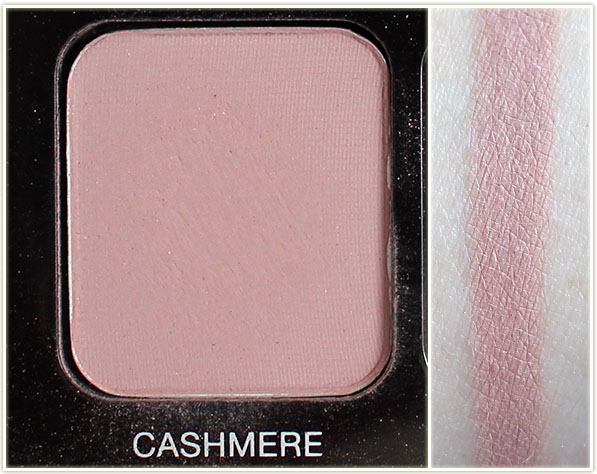
Swatch Sunday: Laura Mercier Artist’s Palette for Eyes & Cheeks (Holiday 2014)

201508_lauramercier_2014holidayartistpalette1

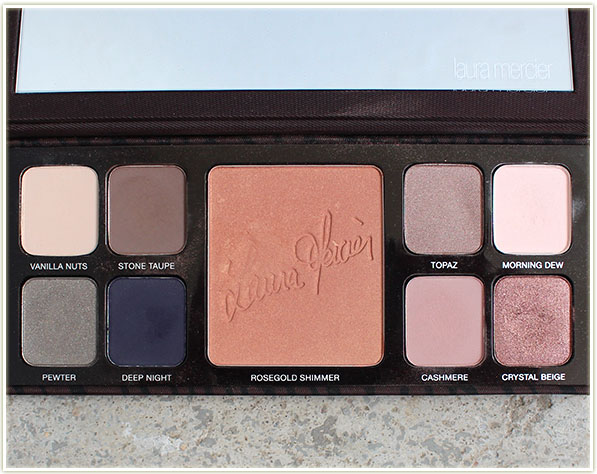
One of my absolute favourite brands to buy palettes from is Laura Mercier. Individually, her eyeshadows are priced way too high for liking, so the palettes really give me an opportunity to get a bunch of shadows at a great price.

This Artist’s Palette for Eyes & Cheeks was a holiday 2014 exclusive, but it must not have sold nearly as well as the previous year’s because it’s now was on sale this past week on Sephora’s web site for only ~$25 CAD. And considering I paid $70 when this first came out… that’s a HUGE price discrepancy!

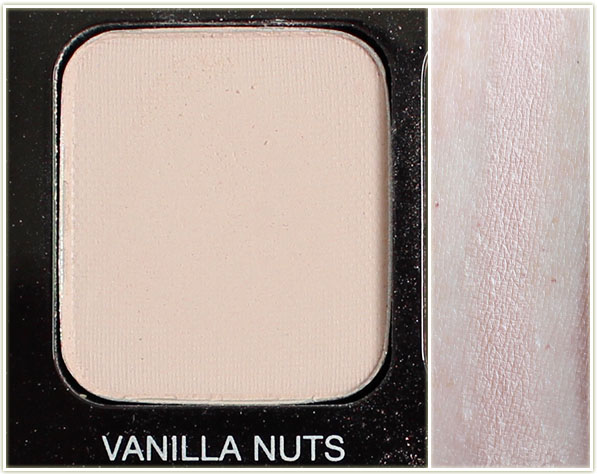
Enjoy the swatches!

Laura Mercier Artist’s Palette for Eyes & Cheeks (Holiday 2014)
Laura Mercier - Vanilla Nuts
Laura Mercier – Vanilla Nuts
Laura Mercier - Stone Taupe
Laura Mercier – Stone Taupe
Laura Mercier - Pewter
Laura Mercier – Pewter
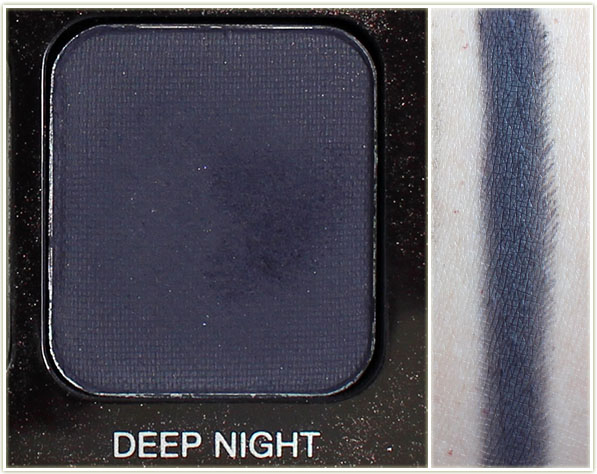
Laura Mercier - Deep Night
Laura Mercier – Deep Night
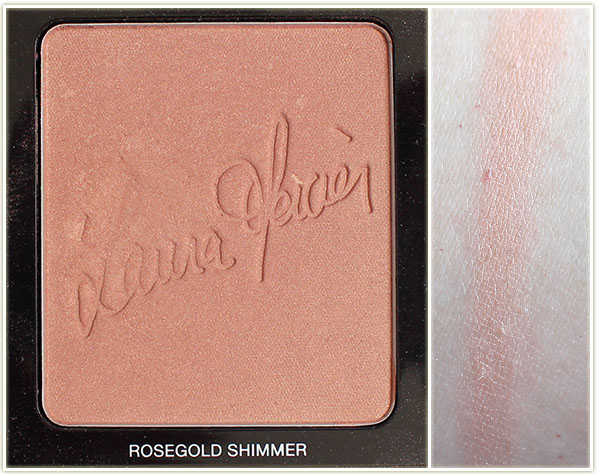
Laura Mercier - Rose Gold Shimmer
Laura Mercier – Rose Gold Shimmer
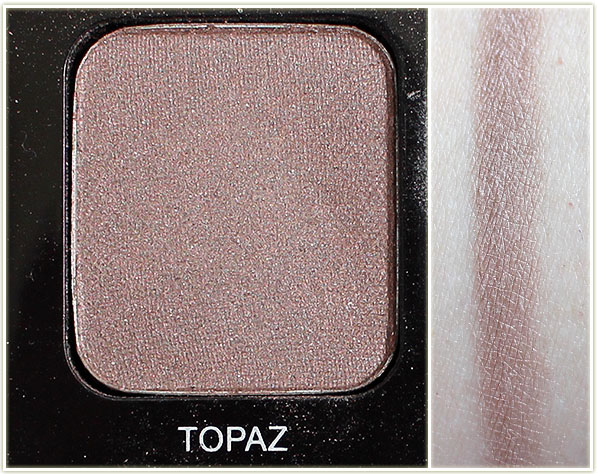
Laura Mercier - Topaz
Laura Mercier – Topaz
Laura Mercier - Morning Dew
Laura Mercier – Morning Dew
Laura Mercier - Cashmere
Laura Mercier – Cashmere
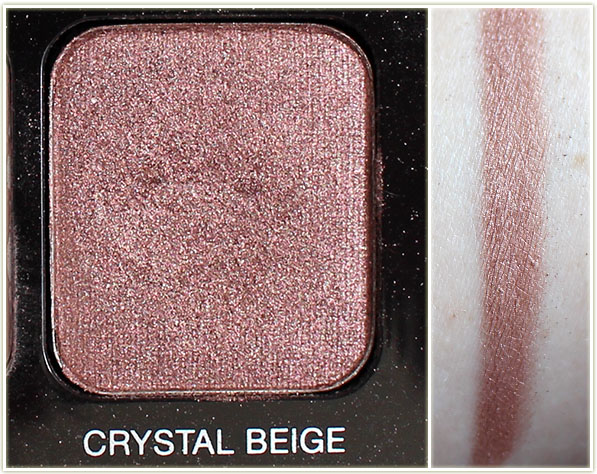
Laura Mercier - Crystal Beige
Laura Mercier – Crystal Beige