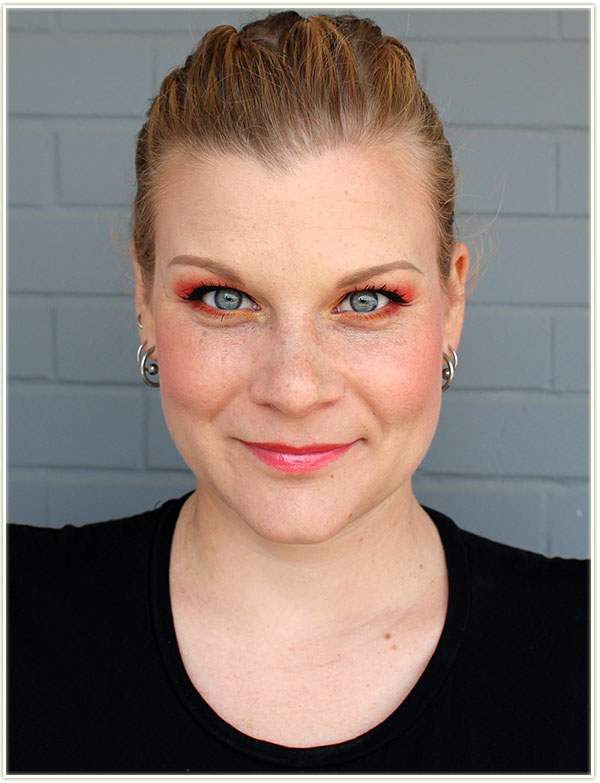
As beauty bloggers, we take a lot of pictures of ourselves. Way too many really. Hell, we probably average around a hundred shots a day between our makeup, our products, our face, our eyes. Every now and again you end up with a shot that you feel is just YOU. The lighting is right, your makeup is right, and you looked at the camera in *just* the right way. This is *that* shot for me.
And it was all done for a guest post over on Vancouver Eyeshadow Addict! Come check out what I used to get the look above. 🙂
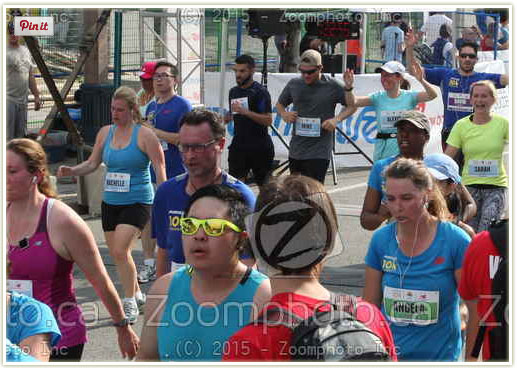
This was my second year doing the Sporting Life 10k and I was excited to be back. It’s a lovely downhill course down Yonge Street that nearly guarantees you a new personal best. I had a few odds stacks against me, but I kind of hoped I could somehow bust out a new personal best (pb) regardless.
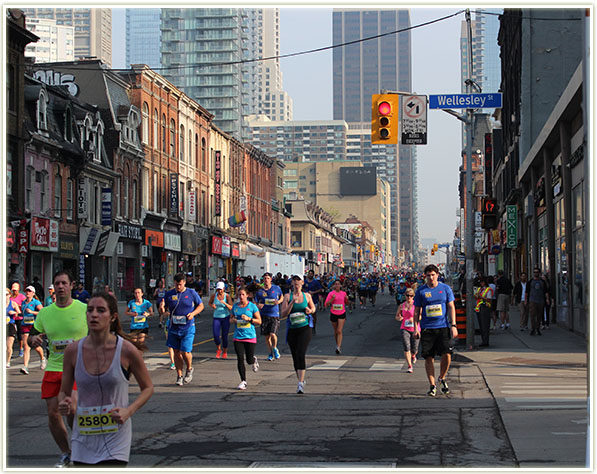
Sporting Life 10k – looking up Yonge Street at Wellesley
With an 8 am start time, this race is slightly awkward to get to since the subway doesn’t actually open till 9 am on Sundays in Toronto. I hopped in a cab to get up to the starting zone and met up with Jenn from A Beautiful Zen who was also running the race. Hooray for beauty bloggers running races! I was glad to have the company before the start because waiting for your corral to start by yourself can be especially boring.
I had signed up for the 50-55 minute corral months ago. This was… ambitious. My time last year on this course had been around 56:20, and my all time personal best was around 55:10 (Toronto Island 10k). I had expected to train a bit better throughout the winter months in order to get under 55 minutes, but I knew I hadn’t done a good enough job by the time race day hit.
I caught my husband offguard!
As it stands though, corrals are determined by yourself, and no one else. Some people sign up for the faster corrals (sub 50 minutes) who don’t even have a hope in hell of completing the race in under an hour and a half, so it’s a bit frustrating at times. (Which leads me to an upcoming post I’m going to make to vent out my frustrations on racing etiquette…)
ANYWAY. My corral started out around 8:20 and it was… HOT. Hot, humid and just all around nasty feeling. My first 2k were fine, but there’s that nasty slight uphill around the 2.5k mark that got me last year and it got me again this year. It just feels so unexpected to suddenly be climbing in such predominantly downhill race.
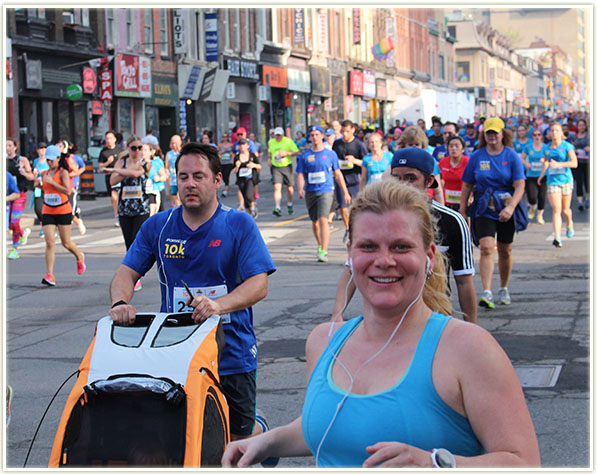
My husband was waiting, camera in hand, at the 5.5k mark at the intersection of Yonge and Wellesley. It’s actually a rather emotional experience to see him while racing, but it’s a good one. Unfortunately, by the time I saw him, I knew this wasn’t going to be a good race. My 5k split time was just over 28 minutes and I ALWAYS slow down in the second half of the race, so I knew I was going to be well over 56 minutes for a finishing time. Ugh.
And away I go. Mmm check out that back sweat.
Unfortunately, although I wasn’t feeling especially terrible despite the disgusting humidity and heat, I just couldn’t pull it out to run any faster. The extra ten pounds I’ve been carrying on my frame since Christmas just haven’t fallen off and it was definitely causing me to slow down a little bit.
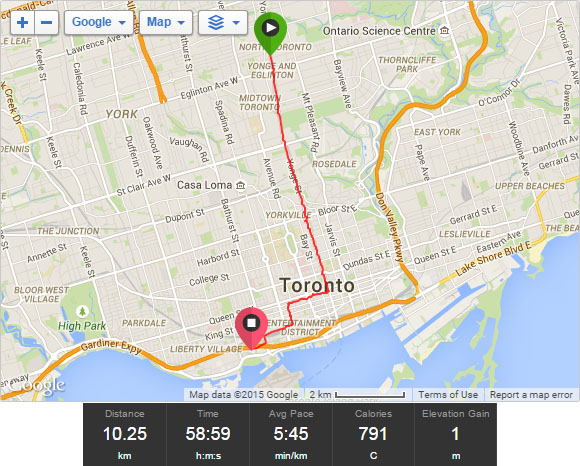
2015 Sporting Life 10K Map
I finished with a disappointing 58:53. Roughly 3:45 slower than my best 10k and 2:30 slower from last year’s race. It also feels especially weird that I turned out such a poor race when my 5k in March was such a good one!
Oddly, despite my time being significantly worse than last year, I actually MOVED UP in the ranks. How weird is that? Last year I was in the top 25% for both my gender and category placement, but this time I clocked in around the top 21%. Additionally, I finished in the top 30% overall, whereas last year I was in the top 36%. This has given me some much needed perspective! While my race time might have been highly disappointing to me, I can see that other people struggled on the course this year, and I’m pretty happy that I moved up in placement compared to last year!
In the end though… I’m not happy at all, and it’s given me the push I need to really up the ante with my training. I can no longer just “go for a run” really – I have to be focused on tempo runs and intervals which aren’t fun, but seem to be necessary for improving my speed.
Right after the finish line. Not looking terrible, but not overly impressed either.
Loads of Makeup Geek (no surprise there), MAC and some Colour Pop thrown into the mix this week!
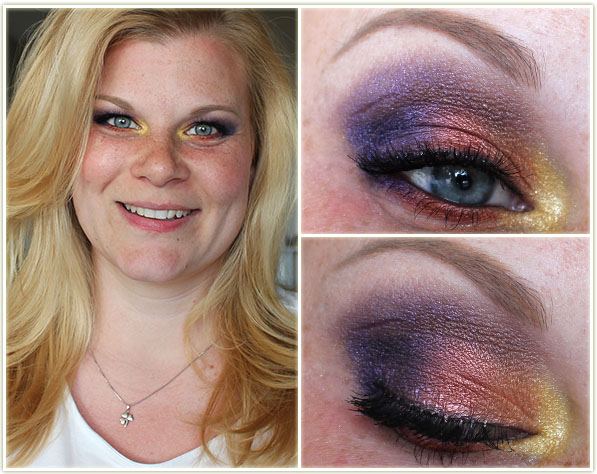
My absolute favourite YouTuber – Sharon Farrell – does some ridiculously stunning makeup tutorials. She often has neutral makeup, but she knows how to bust out a bright look too. I fell in love with her Desert Sunrise tutorial when she posted it in January, but never got around to trying it out. I finally did, and I loved the results!
Eyes
Makeup GeekMesmerized through the crease.
Makeup GeekSin City on the inner third of the lid.
Makeup GeekRoulette on the middle of the lid and on the middle of the lower lash line.
Makeup GeekCaitlin Rose on the outer corner and on the outer half of the lower lash line. The outer corner is also darkened up a bit with Makeup GeekCorrupt.
Makeup GeekVanilla Bean on the brow bone.
InglotMatte 370 on the inner corner with L’Oreal Infallible in Goldmine on top.
I tightlined my inner lash lines with Urban Decay‘s Black Velvet liner and used the same product to line my upper lash line. I applied Make Up For EverSmoky Stretch mascara to my lashes and then added in some individual Ardell lashes.
Rest of the Face
Bronzer: Hard CandyHula Hula
Blush: MACRipe Peach
Highlighter: Make Up For EverPro Sculpting Duo #1
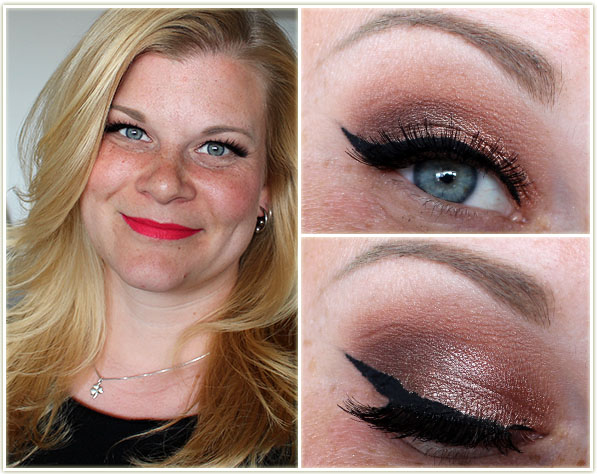
I pulled out this “traditional” look because I was headed to my cousin’s baby shower and wanted to wear something flattering (the eyeshadows) while still wearing a really bold colour on the lips.
Eyes
Makeup GeekGrandstand all over the lid.
Makeup GeekCocoa Bear on the outer corner and through the crease.
Makeup GeekVanilla Bean on the browbone.
I created the wing with Catrice‘s Dating Joe Black liner and applied Make Up For EverSmoky Stretch mascara to my lashes. I then added in some Bombshell lashes by House of Lashes (my first time wearing House of Lashes… and holy crap I’m in love!).
Rest of the Face
Bronzer: Hard CandyHula Hula
Blush: I think it was HourglassDiffused Heat, but I’m not positive.
Highlighter: MACSoft & Gentle
Lips: MACRelentlessly Red
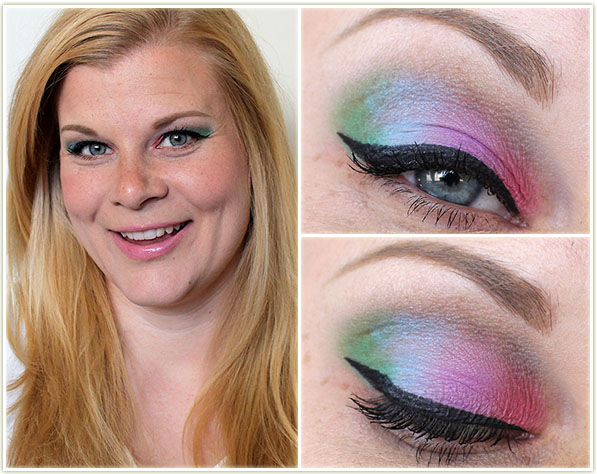
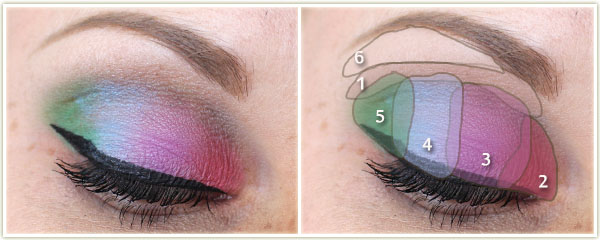
A quick re-post for posterity… I did this pastel rainbow look for Workaday Ramblings for April’s guest post.
Eyes
Too FacedMilk Chocolate through the crease.
MACSushi Flower on the inner corner of the lid.
InglotMatte 334.
MACFade.
SleekCricket on the outer corner.
MACDazzlelight to highlight the brow.
I used MAC‘s Blacktrack fluidline to create the wing and then tightlined my upper waterline with Urban Decay‘s Black Velvet liner. I coated my lashes with Make Up For Ever‘s Smoky Stretch mascara.
Rest of the Face
Foundation: Bourjois Healthy Mix Serum in 52 Vanilla
Bronzer: Hard CandyHula Hula
Blush: essencePinky Flow
Highlighter: Hard CandyTiki
Lips: NYX Butter Gloss in Eclair
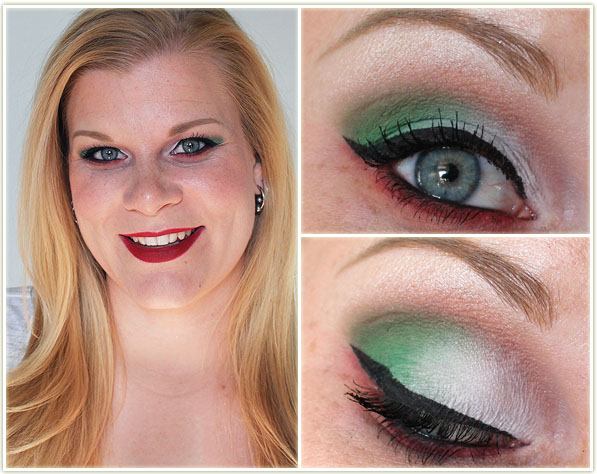
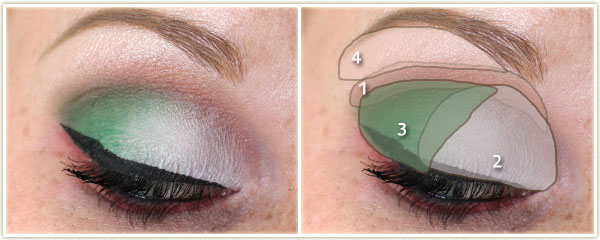
Jill of Beauty Vixen was headed off to Mexico, so I helped her out with this look that was inspired by the flag of Mexico.
Eyes
Makeup GeekCreme Brule through the crease.
Makeup GeekWhites Lies on the inner half of the lid.
MACLandscape Green pigment on the outer half of the lid.
Makeup GeekBling on the brow bone.
I created the wing with MAC‘s Blacktrack fluidline and then tightlined my upper and lower lash lines with Urban Decay‘s Black Velvet liner. On my lower lash line I applied MAC‘sStrike While Haute eyeshadow and blended it out the edges with Makeup Geek‘s Creme Brule. On my lashes is Make Up For Ever‘s Smoky Stretch mascara.
Rest of the Face
Foundation: Bourjois Healthy Mix Serum in shade 52 Vanilla
Bronzer: Hard CandyHula Hula
Blush: essenceLife’s a Cherry
Highlighter: MACWhisper of Gilt
Lips: NARS Velvet Matte Lip Pencil in Cruella
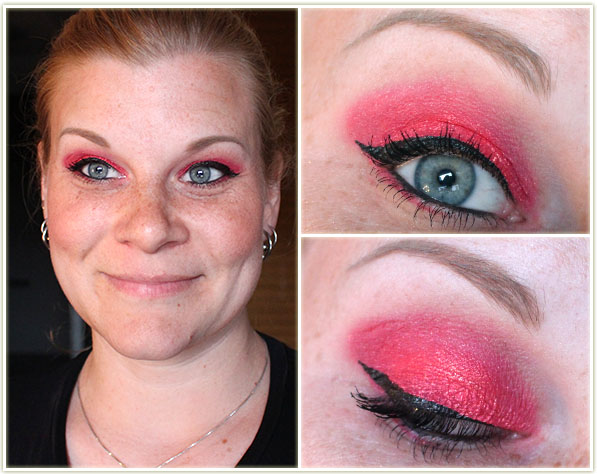
Stop the presses! I have been after a neon red eyeshadow for a very long time. A lot of shadows have come close, but have never really quite hit the mark. Then came alongColour Pop‘s Erotic, and suddenly my search is over! Technically it’s a pressed pigment, but that’s never scared me away from using a product on my eyes. Erotic is incredible – it’s a neon red that has tiny specs of orange and pink glitter.
Eyes
So the eye look is easy on this one – the only shadow I’m wearing is Colour Pop‘s Erotic! I then created the wing with Kat Von D‘s Tattoo Liner in Trooper and lined my inner rim withUrban Decay‘s Black Velvet liner. On my lashes is Make Up For Ever‘s Smoky Stretch.
Rest of the Face
Bronzer: Hard CandyHula Hula
Blush: MACWarm Soul with Milani‘s Coral Cove on top
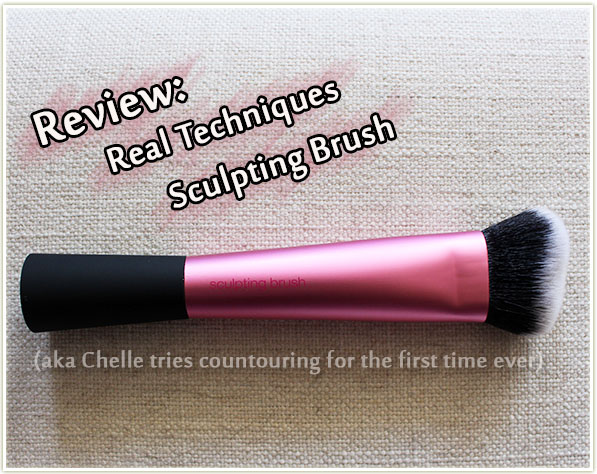
Oh boy. Okay so… I don’t contour my face. I never have, simply because I’ve seen a lot of bad contours in my day and I *don’t* want to be the woman on the street with terrible unblended streaks on her face. So when I was sent the Real TechniquesSculpting Brush to try out, needless to say… I was slightly intimidated.
HOWEVER! I spend sooo many hours of my day watching makeup video after makeup video on YouTube that I feel like I’m armed with enough information to give this contouring business a try.
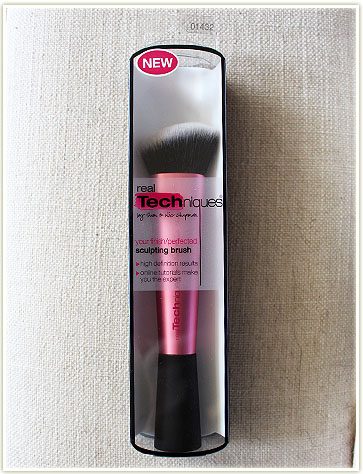
Real Techniques Sculpting Brush
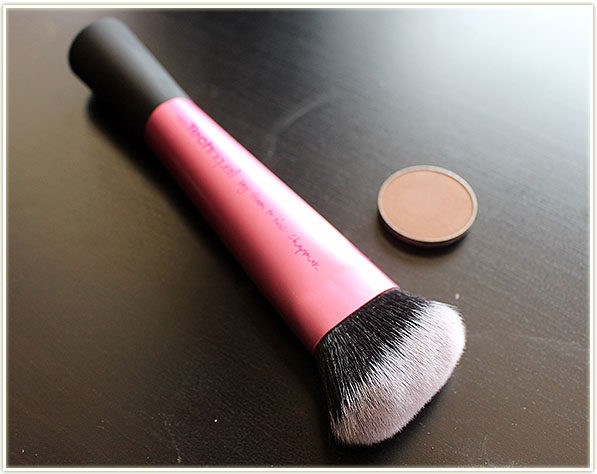
Where do we start? Well, a brush is as good as any. The relatively newly released Sculpting Brush from Real Techniques has the basic shape to get you off on the right foot.
Real Techniques Sculpting Brush
It’s a fat, dense brush, but it’s pinched neatly so it can get into the crevices of your cheekbones. It’s not so stiff that it’ll give you grief while blending, but it’s not so floppy that you can’t get any definition. In my eyes, this makes this brush perfect for newbies like myself.
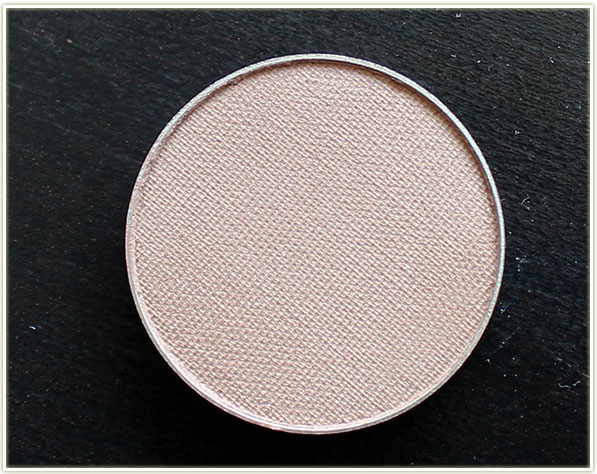
Makeup Geek Barcelona Beach eyeshadow
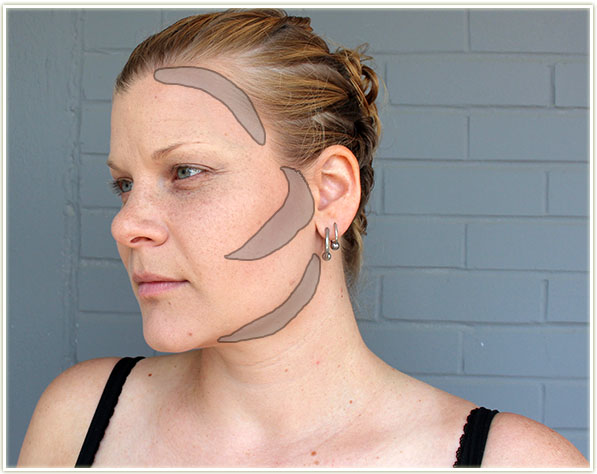
Essentially, the idea behind contouring is to make your face look more gaunt. It helps to slim out our features, pop out our cheekbones and recede anything that we don’t want to draw attention to on our faces. The best way to do this is to use products (powders, creams, etc.) that have a natural grey-cast to them. Ideally, you should be contouring with a product that is darker than your own skin; one that can cause the effect of a natural shadow. Shadows aren’t orange or brown in colour, nor do they sparkle, which is why bronzers are not recommended for contouring. That’s not to say they can’t be used, but orange and glitter definitely don’t scream “shadow”, do they?
Contouring guidelines
So here’s what I did: I took Makeup Geek‘s Barcelona Beach eyeshadow on my Real TechniquesSculpting Brush and drew a line along the areas I wanted to recede. This included my jaw line, the hollow (not that I have much of one) UNDER my cheekbone and, because I forgot what I was doing, the sides of my forehead (an area I normally bronze. Oops!).
Using the lines as a guide, I then blended upwards and downwards to soften the streak I had created. This is highly necessary, otherwise you end up looking like a badly done up drag queen.
Contouring completed!
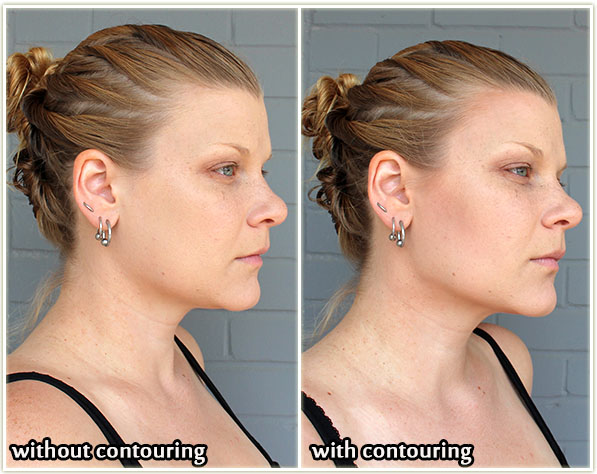
And here’s how it came out. Seeing myself with contouring for the first time is very weird. My first reaction is that I feel like I overdid it, or that it wasn’t blended in enough. As I look at the pictures more over time, I get used to looking at my face like that and it seems less stark than I had originally thought it was.
With and without contouring
On a side-by-side comparison, I can see how much it chiseled out my jaw bone and created a definite recession underneath my cheekbone. I’m not a huge fan of the forehead business, but I can live with it. Amazingly, I don’t think it makes me look dirty either, which is something I half expected to see.
I don’t see myself contouring my face on a regular basis as I just don’t feel it’s a step that I need (or want to do!) on a daily basis. I can see how much of an impact it can make though! I’m really happy that the Real Techniques Sculpting Brush made this a relatively simple job to do. And I mean that, I don’t think contouring my face took more than 3-5 minutes, which is pretty good for a total rookie.
So how do you guys contour? Or do you not bother with it?
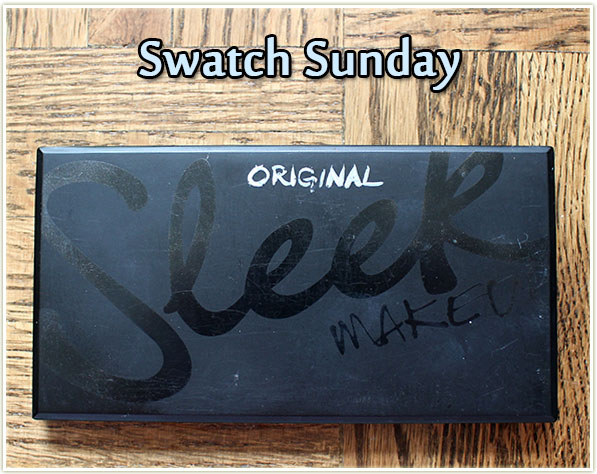
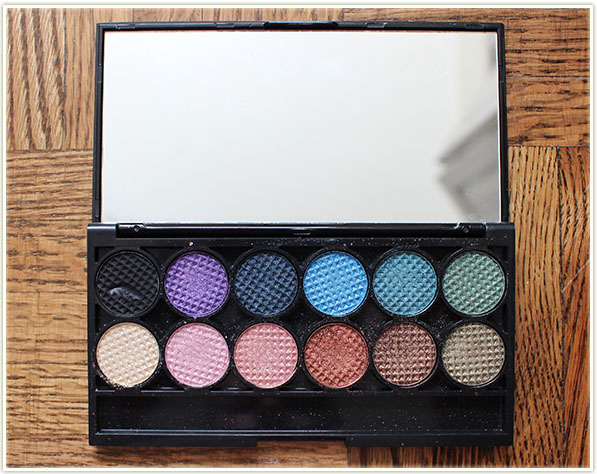
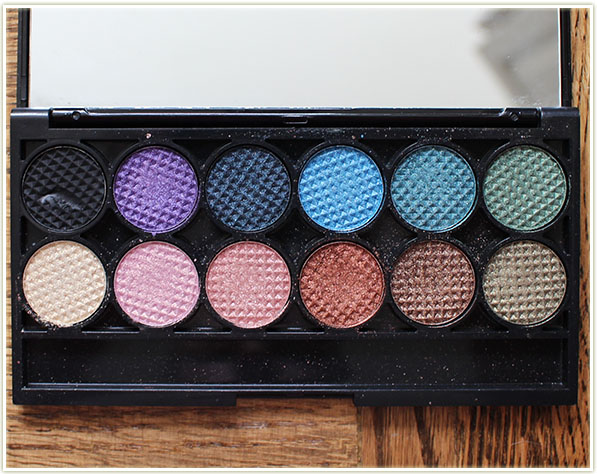
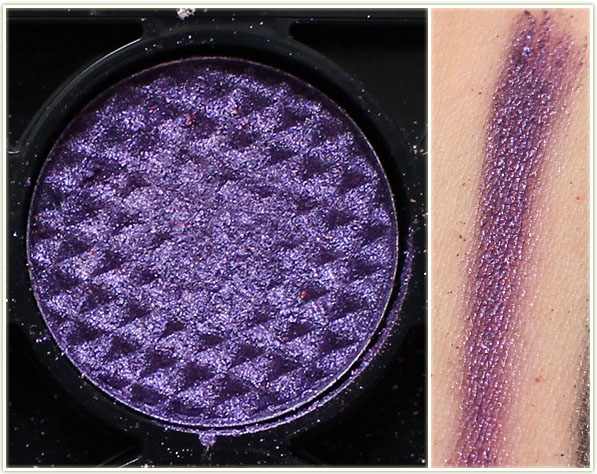
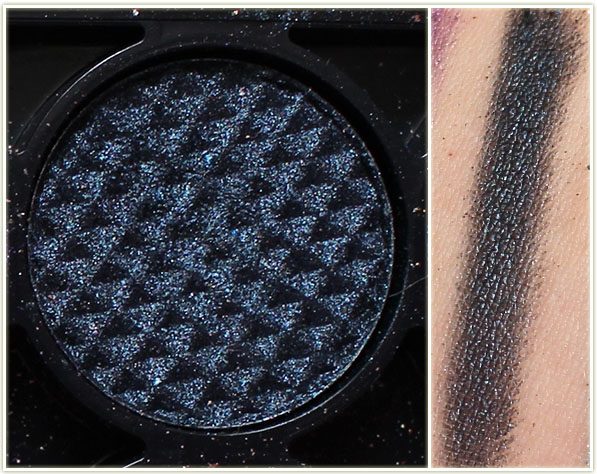
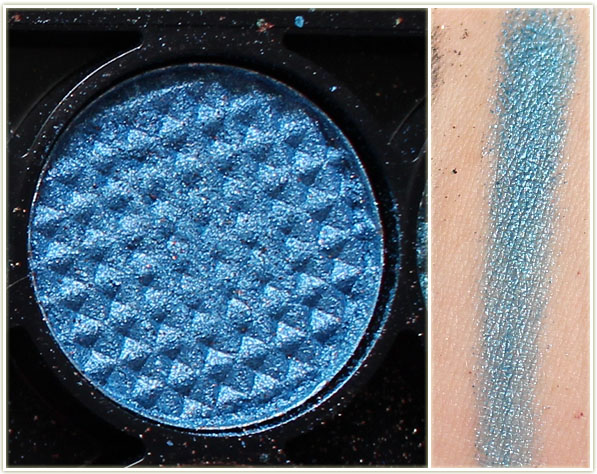
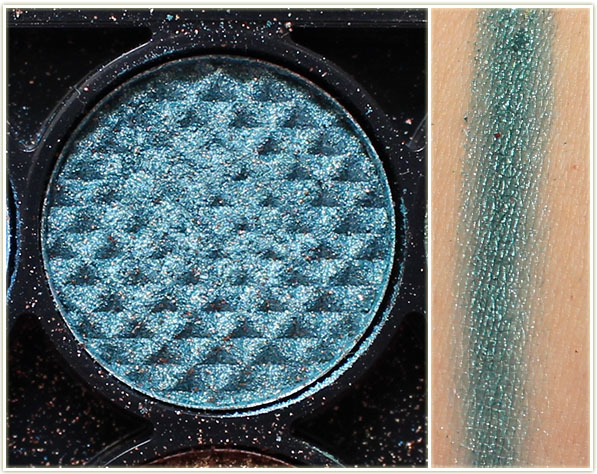
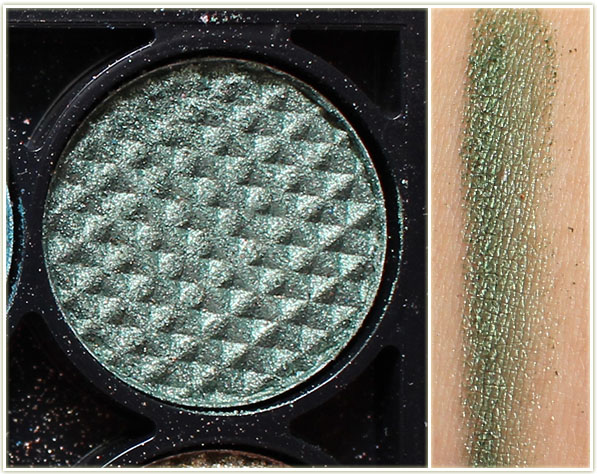
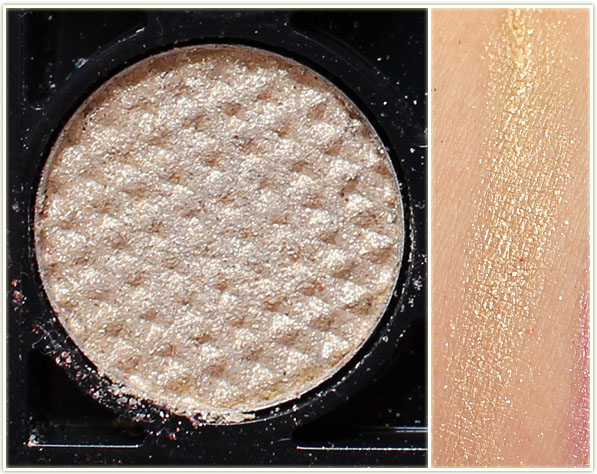
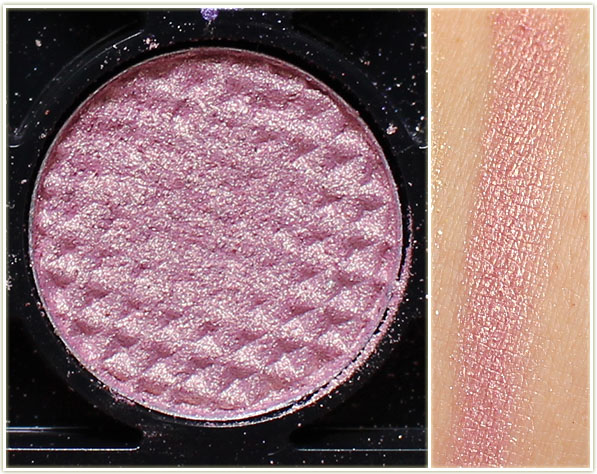
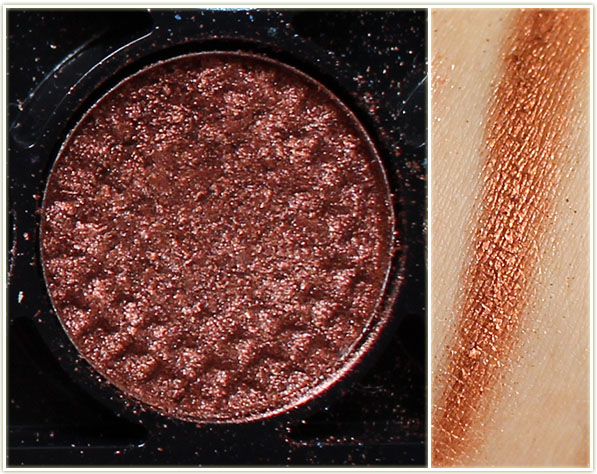
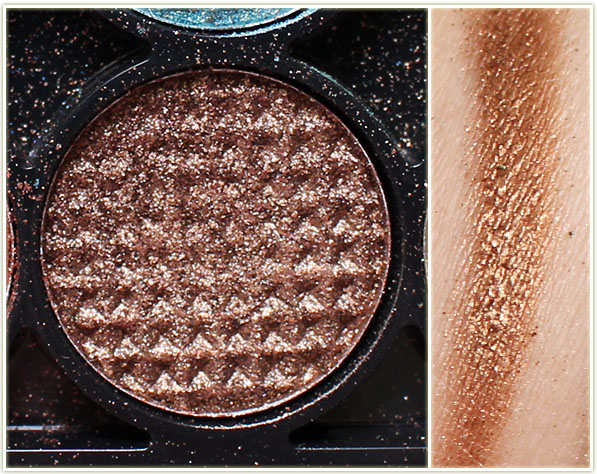
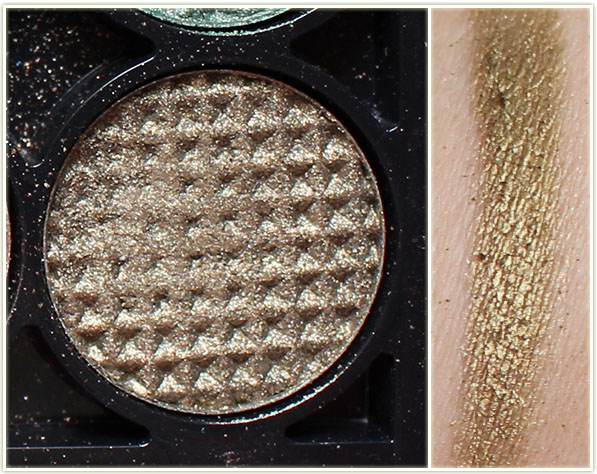
The OriginalSleek palette. I can see why this company got off on such a good foot, and developed such an amazing reputation, if it all started out with this palette! As this was amongst the original palettes, none of the shades have names and I have the old waffle-cut version – I believe they now come pressed flat.
Take a look at the swatches, it’s really hard to not be impressed by them!
Sleek Original paletteSleek Original paletteSleek Original paletteSleek Original paletteSleek Original paletteSleek Original paletteSleek Original paletteSleek Original paletteSleek Original paletteSleek Original paletteSleek Original paletteSleek Original paletteSleek Original paletteSleek Original palette