Guest Post: Zoë Goes Green

Zoë’s fulfilling her duties and hijacking my blog for today to share her take on the Canadian Beauty Bloggers theme of the month which just so happens to be my personal favourite colour; GREEN. Take it away Zoë!

Green Makeup Look 2Okay so there was a lot of pressure when I found out I was guest posting on Chelle’s blog this month! Back in December she did a gorgeous colourful makeup look over on my own little internet space, Writing Whimsy, so I really wanted to do something awesome for her despite the fact that I have a bad habit of continually resorting to the same pretty neutrals. However, I decided to do a little digging in my stash and came up with this look that used a little green, while still being everyday wearable for me. See Chelle–maybe you are rubbing off!

Green Makeup Look 4I started off with a green primer because it’s green. The MAKE UP FOR EVER HD Microperfecting Primer in #1 Green* also helps cancel out redness, and provides a
nice base for my favourite foundation at the moment, L’Oreal Magic Nude Liquid Powder*. A little MUA Blush Perfection Cream Blusher in Yummy which I love although the packaging is basically destroyed, along with a sadly LE Essence Cream Highlighter in Light Up!* which I just hit pan on, help give my cheeks a natural glow.

I’m wearing Benefit Gimme Brow on my brows, and this was actually my first time wearing MAC Cosmo lipstick, but I think I’m in love. Then I added a light dusting of Guerlain Meteorites Compact in Clair 02* all over for some radiance (there’s some green in there too!), before I moved on to the eyes.

Green Makeup Look 3
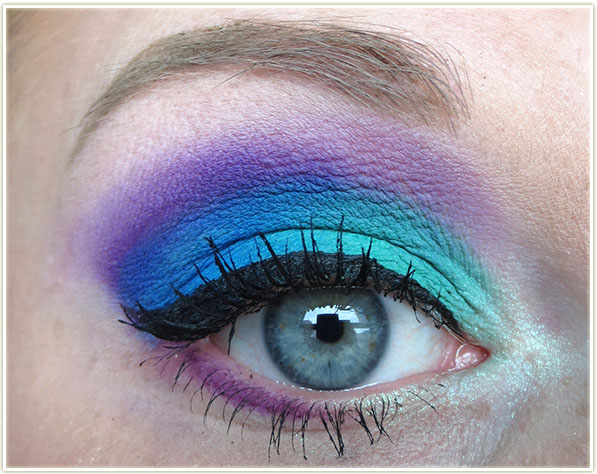
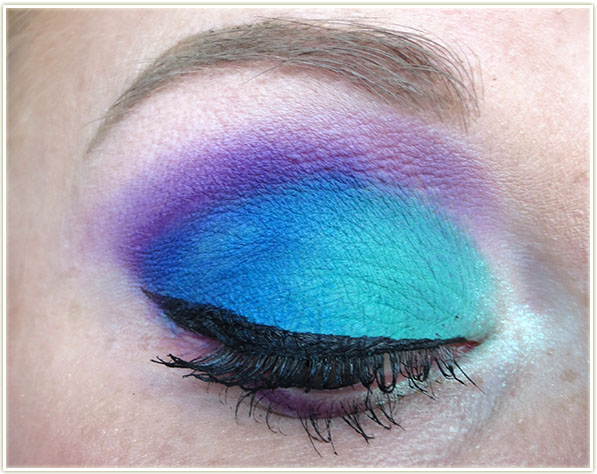
I started off by applying Rimmel Scandaleyes in Gossip Green* all over the lid, which is a really pretty cream base. I love these Rimmel crayons and I used a mix of the shade Bulletproof Beige and the MAKE UP FOR EVER Aqua Shadow in 28E for my inner corner and lower lash line. My only complaint is that all of these jumbo eye crayons require sharpening. I also used a Maybelline Color Show Kohl Liner in Barely Beige*
to brighten up my waterline.

I used my MAC Lucky Green Eyeshadow (which I actually picked up the same time as
Cosmo
!) which is a gorgeous golden lime shade that I swatched in store and fell in love with, even though I rarely use it–hopefully that’ll change now! I blended the L’Oreal Infallible in Bronze Divine, which is pushing the green definition but has a definite green tinge to it, into my crease. I finished off with a coat of a favourite mascara, Smashbox Photo Op Eye Brightening Mascara*. I even put on a green sweater for the photos!

Green Makeup LookWhen it comes to eye makeup I don’t own that much in the green category but it was
fun to go outside the bronze and brown shades I usually reach for. I really need to find ways to wear Lucky Green more often! I think the next step is finally pick up the gorgeous Make Up Geek shadow in Jester I’ve been lusting over ever since Chelle first shared it. Do you have any favourite green shades?

Chelle’s Aside: 

Fun fact: Cosmo lipstick was actually one of the very first shades of I owned from MAC… back in the late 90s. I may just have to go and repurchase that shade as my old tube (thankfully) is lonnnnng gone and it looks wonderful on you!

Moving on… I’m super happy that Zoë busted out a green look for my blog today. I think it works beautifully with her eye colour and seems to just liven up her face. (hint hint, do it more often Zoë!) Thank you for taking the plunge and trying something new! I expected to see Lucky Green on you all the time now! 😉

Swatch Sunday: Makeup Geek Vegas Lights Palette

201503_makeupgeek_vegaslights1

Vegas Lights is a limited edition (but still available!) palette from Makeup Geek that was released in 2014. If you need inspiration on how to wear these shades, I’ve done a Challenge Week with five different options. Enjoy!

Makeup Geek – Vegas Lights palette
Makeup Geek – Casino
Makeup Geek – Sin City
Makeup Geek – Roulette
Makeup Geek – Mirage
Makeup Geek – Desert Sands
Makeup Geek – Bada Bing

Make Up For Ever Spring 2015 Preview

Last weekend, when the snow was still coating the ground, I had the the downright pleasure of attending the Make Up For Ever 2015 spring product preview in downtown Toronto.

Checking out MUFE 2015 spring products at the deanery

Held in the revamped deanery attached to St. James Cathedral, MUFE showcased a handful of bloggers their new offerings for spring 2015.

Getting informed on the new primers and sculpting duos

The focus was primarily on their newly redone primers which now come in a variety of colours depending on your specific needs (radiants primers to help enhance your skin tone as well as mattifyers, hydrators, and colour correctors). They indicated that they knew their previous green colour corrector was far too green, and they’ve taken steps to tone down the colouring to better correct redness. Huge props to a brand that realizes they need to change one of their products!

10 brand new primers to choose from!

We were given the choice to pick out two primers that would work for us. I went with the hydrating one (since hitting my thirties, I seem to need more and more moisture on my face), as well as the pink-toned radiant base which will work especially well in the summer (we think the blue would’ve bee a bit too ashy on me as we enter the summer months). Unfortunately they ran out of the pink primer, so a review will be forthcoming on the primers once I have both in my hands.

I like that they offered such a wide range of bases as it seemed anyone hovering around nw/nc15 right up to nw/nc50 should have plenty of options to choose from. The idea with the new system is to choose a primer that targets the texture of your skin (oily, dry, etc.) and then follow it up with a second primer that focuses on improving the tone of your skin.

Two new sculpting duos

Also brand new from MUFE is their Pro Sculpting Duo in two shades. Duo #1 is a pink beige (light with cool undertones) and Duo #2  is golden (tan with warm undertones). The compacts are simply stunning – they come with a huge mirror and two beautifully pressed products within. At first glance, I’d venture to say the sculpting shade looks more like a bronzer, but I’ll try it out both ways and see how it works on me.

Two new lipstick shades and a brand new mascara

There’s also two brand new shades of the Rouge Artist Intense lipstick (54, a pearly golden pink and 53, a pearly pink copper) and the new Smoky Stretch mascara. I loved their Smoky Extravagant mascara so I’m looking forward to trying this one out too, especially since it appears to have a better sized brush for my own lashes.

Swag bag!
Swag bag!

The swag bag was not only generous, but it was also targeted to products that would work well for each of us individually. I received the Hydrating Primer, the Pink-toned radiant primer (forthcoming as they ran out at the venue), the Smoky Stretch mascara, theSculpting Duo (#1) and the Rouge Artiste Intense in 53.  Reviews on all of the items I received are forthcoming – anything you’d be interested in seeing first?

Review + Giveaway: Jealous Body Scrub

201503_jealousbodyscrub5

As I’ve mentioned before, I’m not a person that is big into skincare. My general requirements are that my fairly good skin remains in that condition (or better!) and that the product I’m using smells good. Aside from that, I really don’t care what I use, or how often I use it.

And yet… I’m always curious. There’s always something new to try and see if it gives me that “lightbulb over the head” moment when I use it.

Jealous Body Scrub likes to get you into the shower asap

And I may just have found something.

Jealous Body sent me their scrub to try out and I was intrigued, but not like… super excited about it. I mean it’s a scrub, there’s only so much excitement you can pack into a scrub right? When I researched the company, I found that Jealous Body‘s advertising is adorable and sexy all at the same time. They treat the scrub as though it’s a real person, ready and waiting to strip you naked, get you into the shower and lather you in their goodness. It’s an incredibly cute marketing technique – their Instagram is full of pictures of hot women (although they’re all of a rather limited body type) either basking in the sun, lounging in tropical areas, or getting frisky with their scrub. It’s an alluring image and definitely one that works well to entice a customer.

Using the Jealous Body Scrub

So I did as the scrub instructed me to: got naked, jumped in the shower, and covered myself in the coconut-oil infused ground coffee. The scent was intoxicating. Fresh roasted coffee mixed with coconut, what isn’t there to love?

I covered myself in the scrub, rubbed it in and let it sit for the ten or so minutes they want you to wait. It definitely created an absolute disaster at the bottom of my shower (think toddler with several mud patties), but it easily washed down the drain after I rinsed off.

Covered in coffee grinds and coconut oil… be still my heart.

I continued to smell of coffee after I’d toweled off and it lasted for several hours afterwards (which is a good thing in my books). The coconut oil left my skin feeling soft and supple for hours afterwards – so much so that I didn’t need to use a body moisturizer at all that day.

Jealous Body claims that their scrub can reduce the appearance of cellulite and stretch marks, amongst a host of other things. Despite having both of those, I can’t speak to that efficacy of the product in that regard as I’ve not had the opportunity to use it for several months. What I can say is that this scrub is incredible. I smelled and felt absolutely wonderful after my shower and that feeling lasted for hours.

The scrub contains 100% natural ingredients (ground coffee, cold pressed coconut oil, sea salt, raw brown sugar, vitamin E and minerals) and are made in Vancouver, Canada. There is no added fragrance and should be fine for sensitive skin. One bag of product will run you $17.95 CAD, but there’s free shipping within Canada and the US (HUGE BONUS!). If you live external to those two countries, you’re looking at a shipping cost of $3.95 CAD.

And now, the fun part!

Giveaway

I loved this scrub so much that I asked Jealous Body if they would be willing to sponsor a giveaway. They said yes! One lucky winner will be sent a package of Jealous Body’s amazing coconut and coffee scrub.

Details

  • Open internationally!
  • Giveaway runs for two weeks starting on March 11, 2015.
  • Winner will receive one package of Jealous Body scrub valued at $17.95 CAD.
  • Please be aware that all entries will be double checked to ensure fairness.

a Rafflecopter giveaway

Review: Morphe 35B Palette

201503_morphe35bpalette

This is an awkward post to create; primarily because I’m doing it for one very specific reason: I’ve never heard anyone ever say anything bad about Morphe‘s products. I feel like since I’ve had such a completely different experience to everyone else that I needed to get my viewpoint out there and share it.

Morphe
Morphe

So to get right to the point… I do not feel that Morphe makes quality eyeshadows. I know everyone is bonkers for the Jaclyn Hill palette, but I can only speak to my own experience using the 35B.

Morphe – 35B palette

I picked up the 35B Morphe palette at IMATS in 2014. It was $20 CAD,  how could I resist? Vibrant, beautiful colours that range from shimmery to matte. I was especially drawn to the bright matte shades because those are the kinds of colours I like to play with the most.

Morphe – 35B palette

Unfortunately, the quality just isn’t there. Mattes, by their general nature, can be quite difficult to work with. Tough to blend, sometimes hard as a rock, etc. But never in my life have I encountered an eyeshadow that applied as if was made using blackboard chalk.

I first ran into issues when I decided to create a look for Zoe when she was going on vacation and needed some guest posters. She had suggested I do something vibrant, and I knew just want to use, my new Morphe palette! I pulled it out and got to work. I applied my usual Urban Decay eyeshadow primer and then started applying the colours.  I immediately ran into issues. The colour would just not adhere to my lid despite the primer. I tried to pack it on to get more impact, but whenever I’d try to blend the edges, the shadow would just literally fall off my lid. I’ve never seen anything like it. There was just no adhesion to my lid whatsoever.

I tried a few different shades, to see if any of them would stick, but  had no luck. Irritated, I wiped everything off my face and started again. (A smarter person would’ve chosen a different palette, but I’m too damn stubborn.)

Makeup look created for Writing Whimsy

This time I used two primers and NYX‘s Jumbo Eyeshadow pencil in Milk to get a sticky base going. From there, I was able to pack on the colour enough to an intensity that was suitable, but blending became the perfect nightmare. I mean, how exactly do you blend chalk? Or a product that treats your eyelid as though it’s made out of teflon?

Makeup look created for Writing Whimsy

I know what you’re thinking (or maybe not)… you’ll likely think this looks quite blended and perhaps quite pretty. And I’ll admit, it does. But if you look closely, you can see the patchiness. Nothing is so much blended as it is layered. There are jagged edges that reflect where each colour starts and ends. Hell, there’s even a bald spot in the middle of the bright blue.

And maybe that’s good enough for some people. But I think it’s unbelievable that I had to use three bases to get this. There are brands out there that can do vibrant mattes far better than this and they DON’T require that you spend twenty to thirty minutes on each eye lid. (I’m looking at you Sleek – you and your brights – you’re awesome!)

Even though the price point ($20) of these palettes makes them a very cheap buy, this isn’t the sort of eyeshadows that a beginner should be using. Even if you have a ton of experience, you probably don’t want the hassle of these either. There’s nothing fun about using products that don’t want to be there in the first place.

Makeup look created for Up The Rollercoaster

Well, I had another guest post coming up (this time for Jodi) and I was like “okay, let’s give this another go. There has to be something worthwhile in this palette!” So I tried completely different shades, anxious to make this work.

Makeup look created for Up The Rollercoaster

Once again I had to pack on the bases to get the shadows to stick. While blending the shades together, more and more of the colours kept lifting off my lid. If you look at the shot above, this is a far better example of the pain I had with blending. This isn’t even blended  – this is mashed together in an attempt to make it look like I was able to blend anything.

I want to love this palette so much. The colours are gorgeous in the pan, but they are just not worth the effort. It’s an arduous task to blend out the shades and that’s only if you can even get them to stick to your lids in the first place. I don’t consider myself a total rookie when it comes to makeup, I mean, I was able to get something decent out of these colours after all, but I can’t really recommend this particular palette to anyone. It’s not even helpful if you want to dabble in colour because you’d probably get so irritated with the application you’d be totally turned off of vibrant shades.

If you’ve tried out this palette, or others from Morphe, let me know what your thoughts are. Maybe the shimmers are better?