Tag Archives: INGLOT

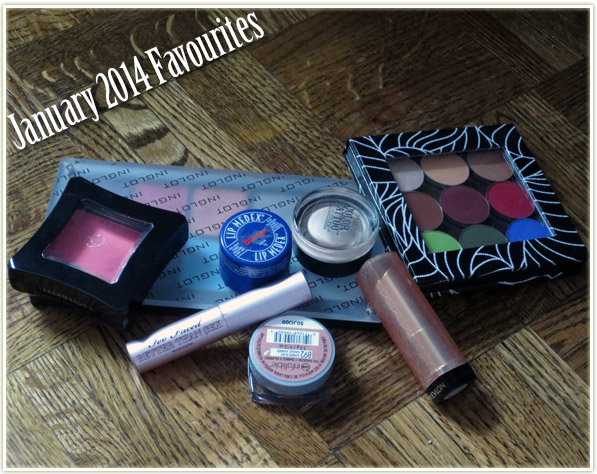
January 2014 Favourites

201401_favourites

Wow, January. You were a very cold and very bitter month. It was so cold in Toronto that it was pretty much on parr with Ottawa winters, which is not something I’ve encountered in the 12 years I’ve been living in this city. It was so cold that my walks to work induced windburn tears and pretty much dissolved my eyelid makeup most days. I got into the habit of packing my makeup and bringing it in to work to do it there instead of risking complete destruction on the walk in!
Blistex – Lip Medex
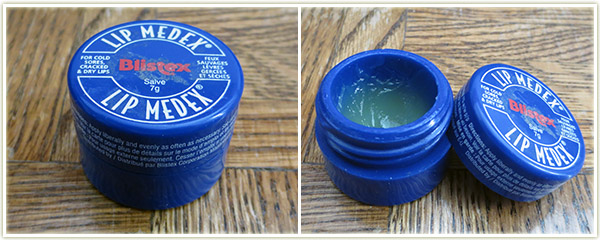
Blistex – Lip Medex

The first item in my favourites has been an absolute necessity for me this winter. Blistex‘s Lip Medex is the lip balm type product I reach for when I need a fast acting, thick balm to heal my lips. The consistency is thick and very much feels, tastes and smells like medicated vaseline. I’ve worn this a lot while walking to and from work through the exceptionally cold January we’ve had this past year. There were even one or two days where I was walking in -39C (with windchill)! This balm kept my lips completely protected.
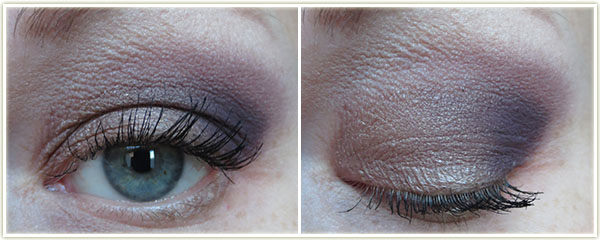
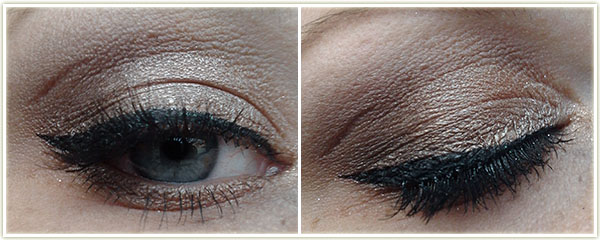
201401_favourite_eyelooks

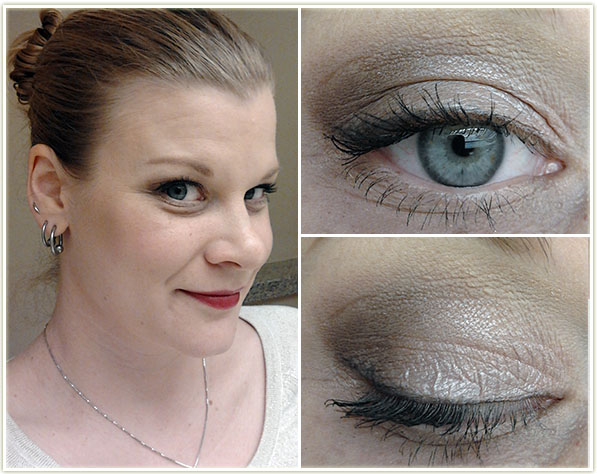
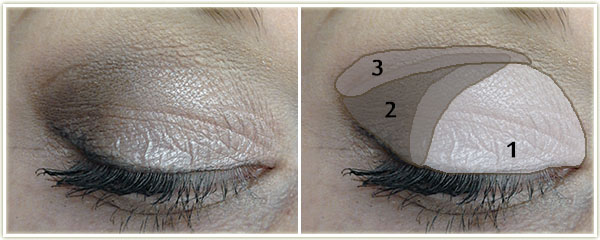
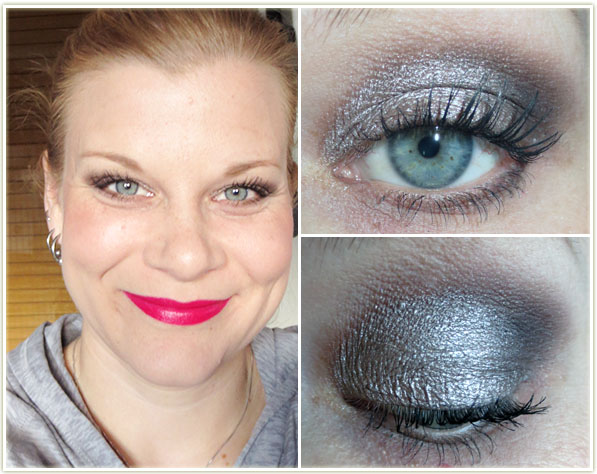
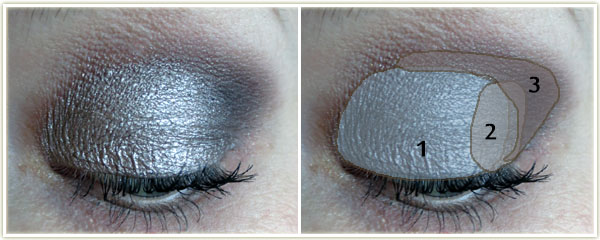
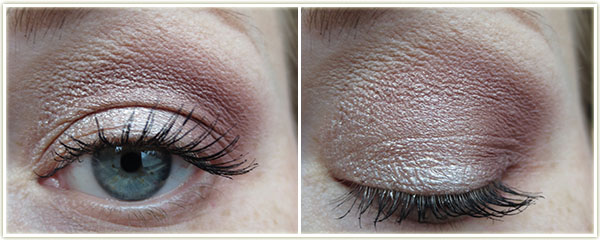
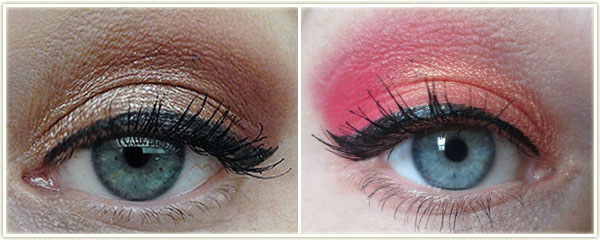
I’ve had a lot of eyeshadow favourites this past month and the above two eye looks (left side tutorialright side tutorial) I loved so much that I ended up wearing them several days in a row which is really unusual for me. So the shadows that make up these combos are what made my favourites this month:
L’Oreal Infallible – Amber Rush

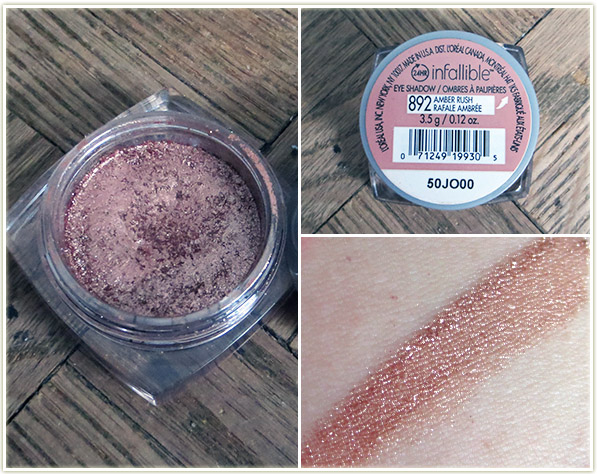
I wish my photography skills could do this shadow justice, but they don’t. L’Oreal‘s Infallible Eye Shadow in Amber Rush is the epitome of rose-gold. Not only is the colour beautiful, but the Infallible eye shadow texture has always been fantastic and this one is no exception.
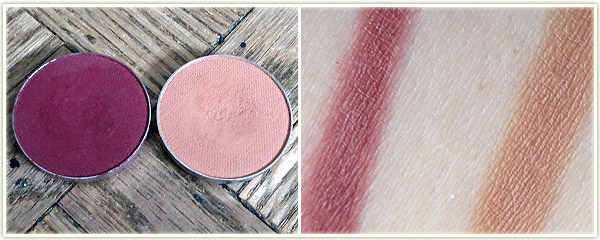
Makeup Geek – Bitten & Creme Brulee

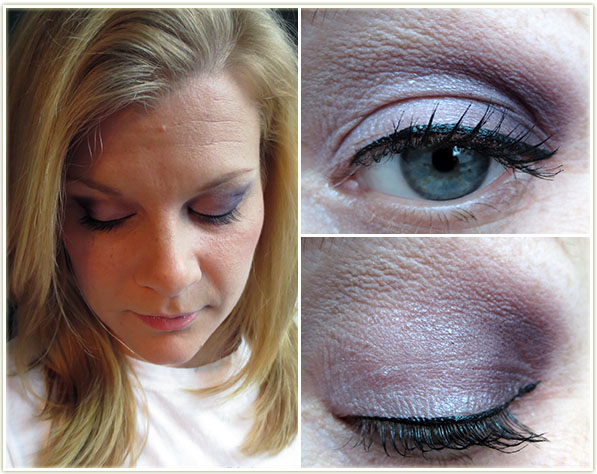
These two Makeup Geek eyeshadows have become absolute staples in my collection. Bitten is a deep brown-maroon shade. I love this in conjunction with L’Oreal‘s Amber Rush. The other shade, Creme Brulee, has done for me what no other mid-tone brown has ever done. I love using this shade to blend out my lid and crease colours and help fade line between those colours and my browbone highlight. I’ve tried various others shades to do the same thing (Urban Decay‘s Naked and Buck, to name some common ones) but none of them were just the right shade and tone. Both of these Makeup Geek shades are must haves in my book and I’m so glad I finally got around to ordering from the line.
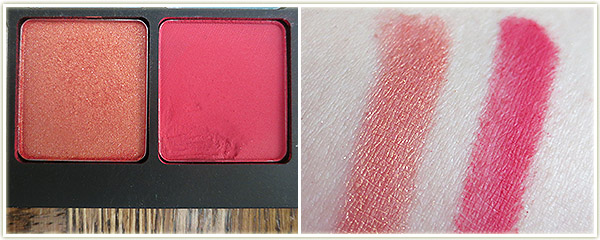
Inglot AMC Shine 15 & Matte 382

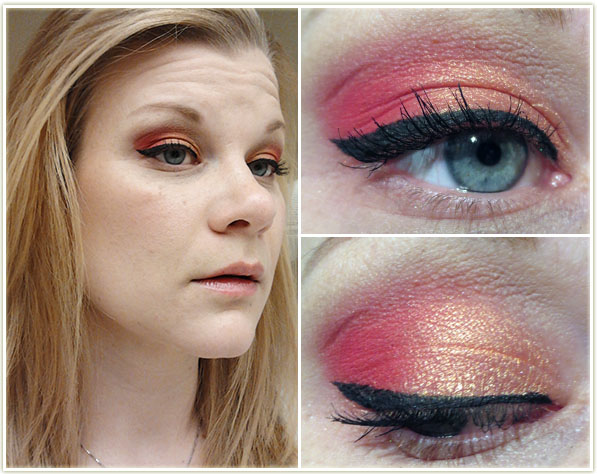
The orange (Inglot AMC Shine 15) and red (Inglot Matte 382) eye look above certainly isn’t for everyone, but it’s my absolute favourite eye look on myself. It’s incredibly vibrant and the orange tones do wonders to bring out the blue in my eyes. It’s just so bright, vivid and happy! A few months ago I tried these two colours out on a whim (I mean really, you wouldn’t normally think to wear luminescent orange and matte red to work) but I quickly fell in love with the combination.
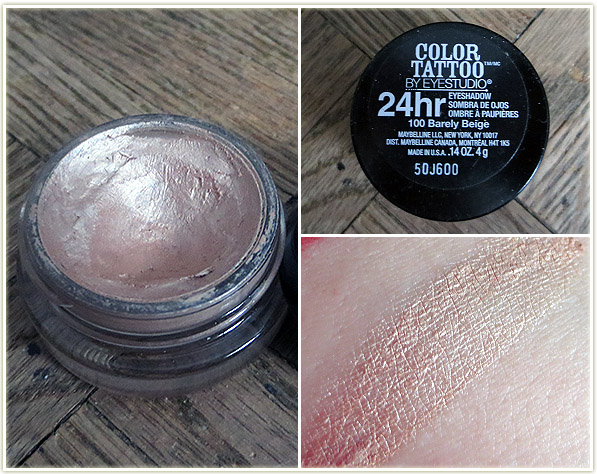
Maybelline – Barely Beige

Despite loving my eye looks above and wearing them several times throughout the month, I also had a few days where I was like “mehhhhhh” and didn’t want to really have to do anything extensive with my eyes. These were usually the days I hit the snooze button too many times and was left rushing to get ready. That’s where Maybelline‘s Color Tattoo in Barely Beigecomes in. This pale champagne shade is a cream shadow that makes for a very easy eye look when I’m need to get out the door as quickly as possible. I’ll smooth Barely Beige all over my lids and then blend in any brown shade into the crease (MAC‘s HauxCork, etc.) for a quick and easy look. I’ve done it so often that it’s a completely brainless operation for me now.Barely Beige was part of a limited edition collection a year or so ago, but there is a permanent shade called Barely Branded that is near identical if you’re looking to pick this up.
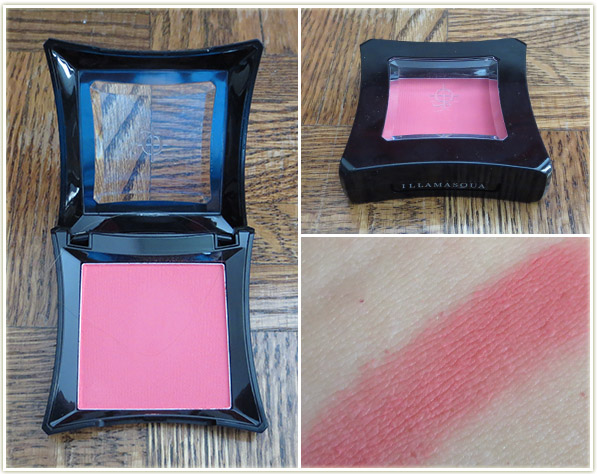
Illamasqua – Hussy
Illamasqua – Hussy

Illamasqua‘s Hussy blush wasn’t one I was expecting to love so much. I bought it at roughly the same time as Tweak (deeper, slightly red) and I loved the look of Tweak… but I just don’t find myself reaching for it like I do with HussyHussy is one of those colours that just happens to match most of my eye looks. It’s very easy to wear and brings just the right amount of colour to my cheeks (go easy on it though, these blushes are incredibly pigmented).
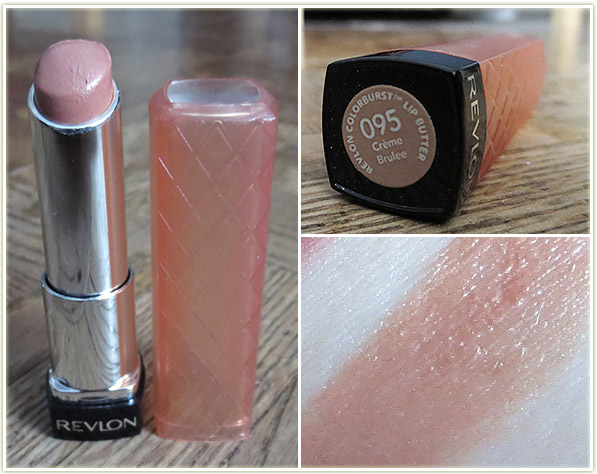
Revlon – Creme Brulee

Revlon‘s lip butter in Creme Brulee has always been a favourite of mine, but I’d forgotten about it over the past few months. This is my second tube and it’s almost close to done as well. This is my perfect glossy shade of nude. It doesn’t make me look weird like Creamsicle does, and as such it’s a completely effortless shade. I love wearing this with very dark eye makeup looks.
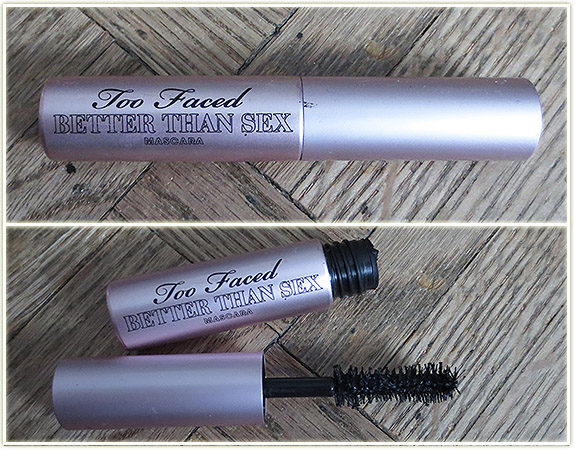
Too Faced – Better Than Sex

This one is a bit of a weird favourite. I wore this deluxe sample size of Too Faced‘s Better Than Sex mascara a lot this past month (it came in my Too Faced “A Few of my Favorite Things” holiday set and was easy to pop in my makeup bag on those days where I was doing my makeup in the bathroom at work). I love the formula, I love the effect it gives to my lashes, but I haaaate the brush. The brush has an hourglass shape that can be very frustrating to work with. The end of the brush ends up severely coated in mascara, so much so that it requires a lot of wiping off before you use the wand. And something about this wand causes me to get a lot of mascara on my lid (moreso than usual anyway). So while I love the mascara itself, the wand drives me bonkers! And I definitely wouldn’t be able to justify paying full price for that mascara – I love my drugstore ones far too much. As a note, it has a very wet formula, which is what I’m partial to, but I know most people aren’t a big fan of very wet mascaras.


And that’s January done! I’m not usually one to say this as I quite like winter, snow and cooler temperatures, but I’m about done with this particular winter. It’s been too frigid and too windy and I’m looking forward to spring.
What’s On My Face – Volume 9

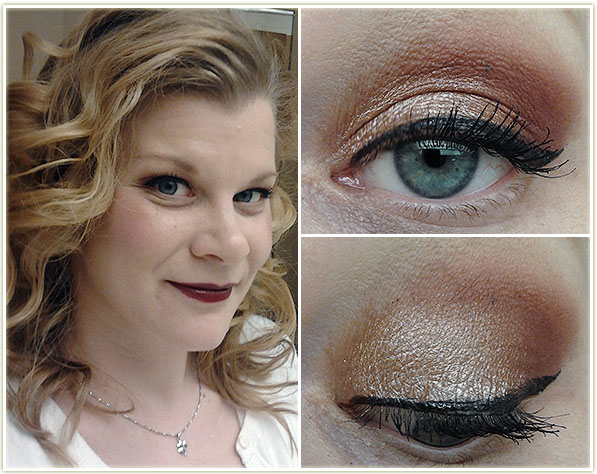
New year, new looks! And I’ve got plenty of new goodies to play with that I’ve accumulated over the holiday season!20140124_look1.1

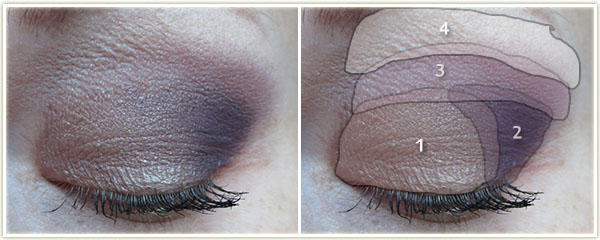
I love this one so much. Everyone has gone insane over rose-gold everything and I think I’m starting to see why. This was a makeup combination that just made me feel like I looked especially pretty. I’m also having a love affair with Makeup Geek’s Bitten and I’m more than happy to use it constantly on my eyes!

20140124_look1.2

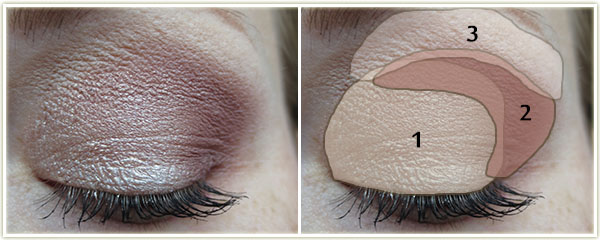
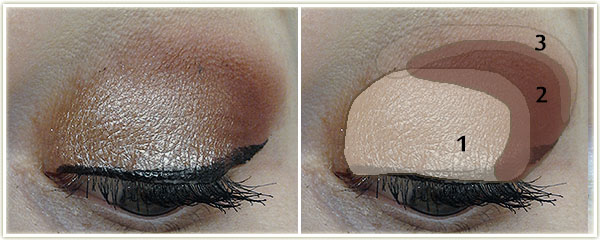
Eyes: 

  1. L’Oreal Amber Rush all over the lid.
  2. Makeup Geek Bitten in the outer corner and crease.
  3. Makeup Geek Creme Brulee at the top of the crease to blend the two lid shades together.

MAC Brule was used to highlight my brow. I used Make Up For Ever Aqua Liner in 13 Black to create the wing and applied L’Oreal Voluminous Carbon Black mascara to my top lashes. For brows, I used MAC Omega.

Rest of the Face

  • Foundation: Bourjois Healthy Mix Serum foundation in 51 Light Vanilla
  • Bronzer: Physicians Formula Bronzer Booster in Light/Medium
  • Blush: Cargo Mendocino
  • Highlighter: Dior Amber Diamond
  • Lips: MAC Dark Side

20140124_look2.1

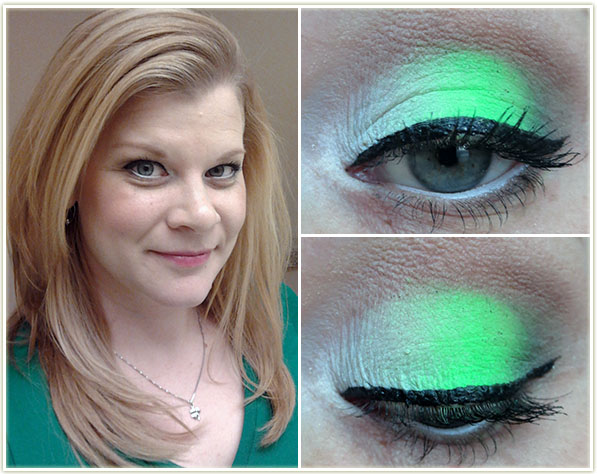
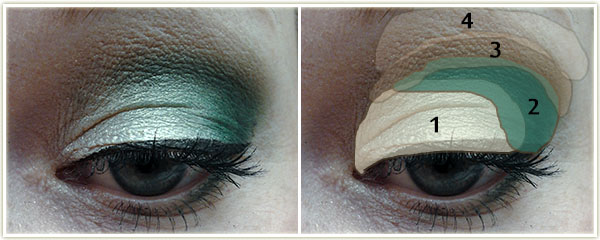
Good grief do I ever love this one too! I can’t claim ownership though, I relied on Shaanxo’s video for inspiration. Anything with neon (not to mention neon AND green) and I’m a total sucker for it.

20140124_look2.2

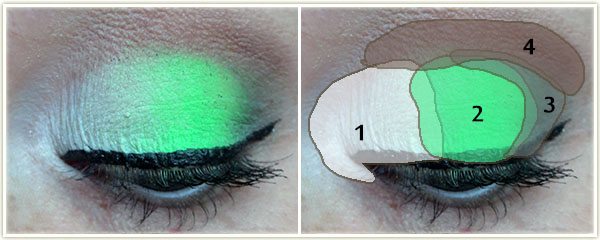
Eyes: I first applied NYX‘s Jumbo Eyeshadow Pencil in Milk all over the lid and blended it out with my finger. I also brought it down below the inner tearduct as well.

  1. Using the white from Sleek‘s Acid palette, I applied that all over the inner third of the eyelid, bringing it down around my inner tearduct.
  2. With the same Sleek palette, I used the neon green shade and patted that on the center of my lid. (This took a lot of layers in order to get it to be so vibrant!)
  3. Using MAC‘s Greensmoke, I placed it in the outer corner of my lid and tried to blend it as best as I could with the neon shade (wasn’t that easy and I don’t think I was overly successful).
  4. I then used MAC‘s Cork through the crease.

Brule was used to highlight the brow and MAC Omega was used on my brows. I used Make Up For Ever‘s Aqua Liner in 13 Black to do my winged liner and applied L’OrealVoluminous Carbon Black mascara to my upper and lower lashes. For the lower lash line, I used a bit of Greensmoke on the outer corner, then lined my inner waterline with NYX‘s Milk(which actually had decent longevity!).

Rest of the Face

  • Foundation: Bourjois Healthy Mix Serum in shade 51 Light Vanilla
  • Bronzer: Physicians Formula Bronze Booster in Light/Medium
  • Blush: Joe Fresh cream blush in Apricot
  • Highlighter: Hard Candy Tiki
  • Lips: NYX‘s Butter Gloss in Vanilla Cream Pie

20140124_look3.1

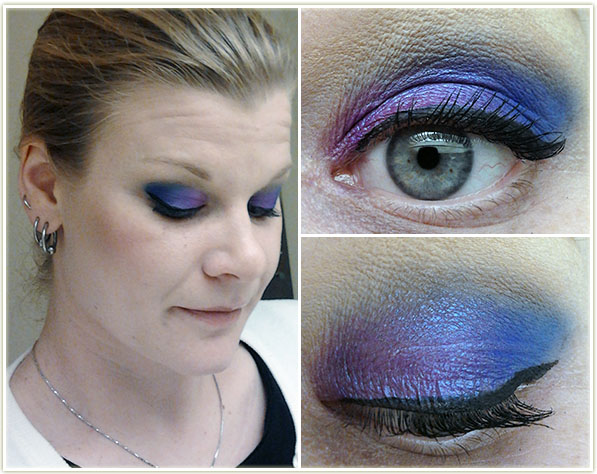
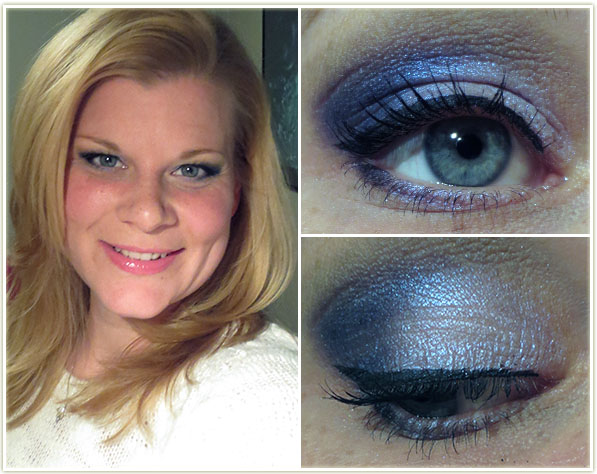
This look came about as I was trying to use products that I had bought, but hadn’t used yet. The primary inspiration came from MUA‘s Shade 9 which is one of the most beautiful duochromes I’ve ever owned. Unfortunately, I’m not keen on how the blue turned out, as it applied rather chalkily.

20140124_look3.2

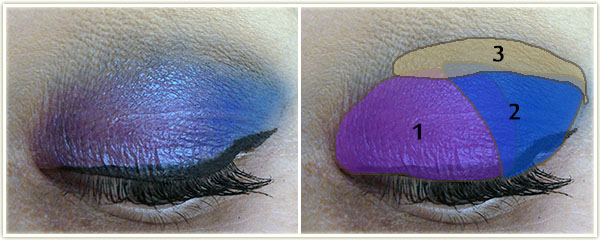
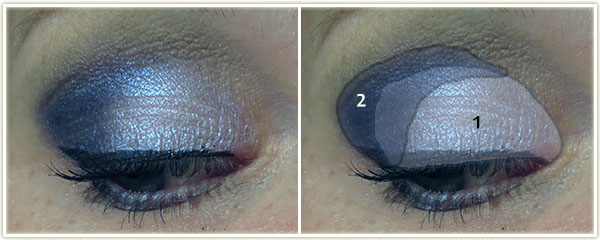
Eyes: I used Urban Decay‘s Eden primer this time as opposed to my usual Original one. In retrospect, that was a stupid idea considering I was using a very shimmery shadow and Eden is a very flat, very matte primer.

  1. MUA Shade 9 Pearl on the inner half of the lid.
  2. Makeup Geek Neptune on the outer half of the lid.
  3. Makeup Geek Creme Brulee in the crease.

MAC Brule was used to highlight my brow with MAC Omega through my brows. L’Oreal Voluminous Carbon Black on my upper lashes with MAC‘s Blacktrack fluidline to create the winged liner.

Rest of the Face

  • Foundation: MUA BB Cream in Light
  • Bronzer: Physicians Formula Bronze Booster in Light/Medium
  • Blush: Tarte Exposed
  • Highlighter/Powder: Hourglass Ambient Lightning Powder in Ethereal
  • Lips: Revlon Lip Butter in Creme Brulee

20140124_look4.1

Heh, I’m not even sure what to say about this one. *I* think it’s rather bland, but looks like this tend to be when I get the most compliments. I wanted to use the Naked 3 palette and dip into a few products on to my “To Use Up” list. I don’t find the end result very inspirational, so when I use the Naked 3 again, I’ll definitely try out different combinations.

20140124_look4.2

Eyes: Urban Decay Primer Potion in Eden all over the lid. All shadows are from the Urban Decay Naked 3 palette:

  1. Burnout on the inner two-thirds of the lid.
  2. Factory on the outer third of the lid.
  3. Limit through the crease

I used Strange as a brow highlight and applied Blackheart as a very thin line along my upper lash line with a faint flick at the outer edge. L’Oreal Voluminous Carbon Black mascara on my upper and lower lashes.

Rest of the Face

  • Foundation: Yaby Foundation in Buff
  • Bronzer: Physicians Formula Bronze Booster in Light/Medium
  • Blush:  Tarte – Dollface and Dazzled mixed together
  • Highlighter:  Hard Candy Tiki
  • Lips: Revlon Lip Butter in Red Velvet with Creamsicle layered on top.

20140124_look5.1

I had to laugh at this one… I didn’t intend for this to come out nearly as dark as it did, or nearly as ridiculously bright on the lips… for a weekend brunch. While I was also wearing workout clothes. Hah. Ah well.

20140124_look5.2

Eyes: Maybelline‘s Color Tattoo in Bad to the Bronze was applied all over the lid, keeping it below the crease. On top of that I layered:

  1. Inglot 152 Shine over the entire eyelid.
  2. Laura Mercier Bamboo on the outer corner of the lid.
  3. Laura Mercier Espresso was used to blend out the crease and pull the shadows out at the corner of my eye into a slight V shape.

MAC Brule to highlight the brow with MAC Omega through the brows. Bamboo and Espresso were mixed together to line the lower lashline. L’Oreal Voluminous Carbon Black mascara were applied to upper and lower lashes.

Rest of the Face

  • Foundation: CoverGirl CC Cream in 110 Classic Ivory
  • Bronzer: Revlon Photoready in Bronzed & Chic
  • Blush: Tarte Exposed
  • Lips: Revlon Cherries in the Snow

What’s On My Face – Volume 7

Lately I found I had been wearing far too many neutral looks and I was boring myself with my makeup in the morning. Neutral colours are so easy and safe to play with… but they just don’t get me excited. When I wear something more vibrant on my eyes, I actually feel better. I can’t explain it any better than that really. Colour makes me happy!


20131217_inglot1

I *love* this one. It’s not particularly hard to achieve, I just think it’s the colour combination that I love so much. Excuse the derp face – I find if I smile in pictures, my eyes crinkle up too much to actually show what the shadows look like on a full face shot!

20131217_inglot2

Eyes:

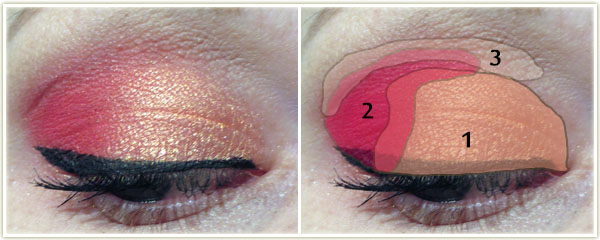
  1. Inglot AMC Shine 15 (shimmery orange) all over the inner two-thirds of the lid.
  2. Inglot Matte 382 (matte red) on the outer third of the lid and blended slightly into the crease.
  3. Urban Decay Naked in the crease to blend all the colours together.

MAC Brule was used to highlight my brow. And, of course, I used MAC Blacktrack fluidline to create the wing and applied L’Oreal Voluminous Carbon Black mascara to my top lashes. For brows, I used MAC Omega.

Rest of the Face: Bourjois Healthy Mix Serum foundation in 52 Vanilla with Revlon‘sBronzed & Chic bronzer on the high points of my face. I used Tarte Charisma on my cheeks and since that blush has enough shimmer to it, I didn’t bother with a highlighter. On my lips is Benefit Ultra Plush Gloss in Coralista.


20131217_mac1

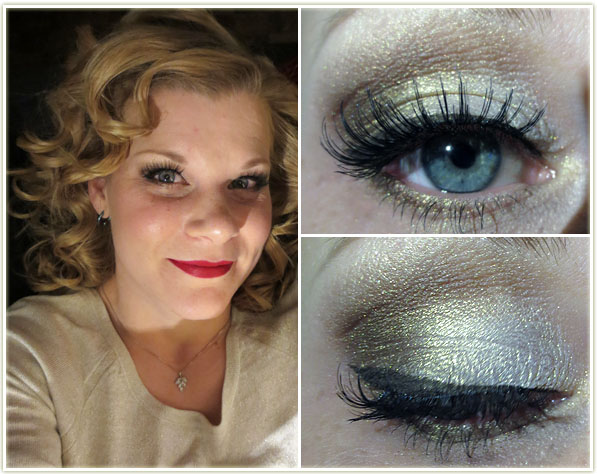
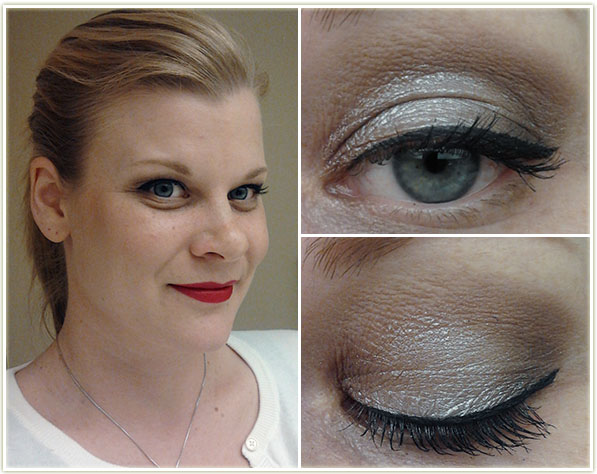
I wore this one out to a (friend of a) friend’s Christmas party. Red, gold, false lashes. All the staples of holiday season makeup!

20131217_mac2

Eyes: To make the white-gold eyeshadow show up better, I have to lay down a white base. For that I use NYX‘s Jumbo Eyeshadow Pencil in Milk. Make sure to keep the white base below the crease and also blend it out so you don’t have any harsh lines.

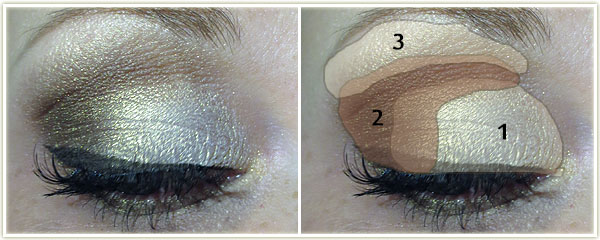
  1. On the inner two-thirds of the lid, pack on the white-gold shade in MAC‘s Illusionary: Burning Ambition duo (limited edition from several years ago). And when I say pack it on, I mean, PACK it on. This stuff is fallout city and gets everywhere, but it’s really way too pretty to ignore.
  2. Using the brown side of that same duo, apply it to the outer third of the lid and sweep it through the crease.
  3. Using the white-gold shade again, use it to highlight your brow and to blend out the brown shade in the crease. This is a LOT of shimmer and it may even be overkill for some people. You’ll notice that the brow ends up being more gold, while the lid colour is has more of a white-cast due to the base that we put down.

I used MAC Dipdown fluidline to create the wing and applied L’Oreal Voluminous Carbon Black mascara to my lashes. False eyelashes are Ardell Demis applied with Duo adhesive.

Lips: Since the eyes are so shimmery, I stuck with a matte red. I used MAC Brick lipliner to line and fill in my lips, then followed it up with MAC Russian Red lipstick.

Rest of the Face: Foundation is Bourjois Healthy Mix Serum in 52 Vanilla. I used Joe FreshSand bronzer to contour since it’s matte.  On my cheeks is Tarte Exposed.


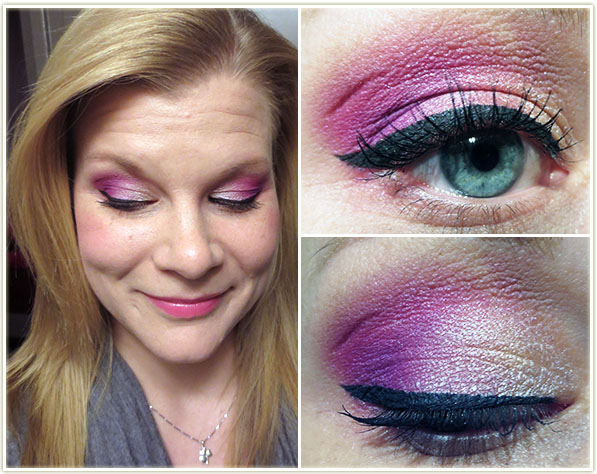
20131217_sleek1

With this one I just knew I wanted it to be bright! I also tend to get stuck in ruts and keep re-using the same colour combinations because I generally know they’ll work. While trying to break out of that rut, I ended up going with a fail-safe colour palette anyway. Whoops!

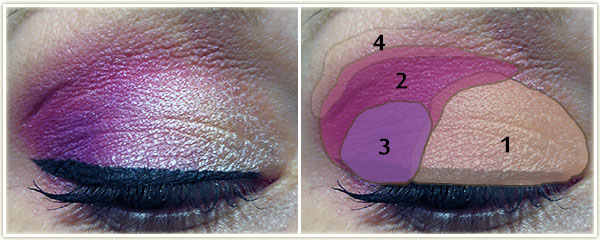
20131217_sleek2

Eyes:

  1. From the MUA Pretty Pastels palette, I applied the second shade from the left on the bottom row all on the inner half of my lid. The shade looks rather peach in the pan, but as you can see, it came out almost white.
  2. Using the Sleek Acid palette, I applied the first shade on the top row (a fuchsia pink) to the outer half of my lid and pulled it through the crease.  Then, using the same palette;
  3. I took the bright purple colour directly below the fuchsia and dabbed it right in the outer corner of my eye, on top of the fuchsia. You’ll need to blend some of the edges otherwise it’ll be pretty stark.
  4. I then used Urban Decay Naked to very lightly blend out the bright fuchsia.

As per usual, I used MAC Brule to highlight my brow. Followed it up with MAC Blacktrack as my liner and L’Oreal Voluminous Carbon Black mascara. MAC Omega was used to fill in my brows.

Lips: NYX Strawberry Parfait

Cheeks: Wet n Wild Heather Silk

Rest of the Face: My foundation is MUA‘s Matte Foundation in Shade 1 Soft Sand withRevlon‘s Photoready bronzer in Bronzed & Chic.


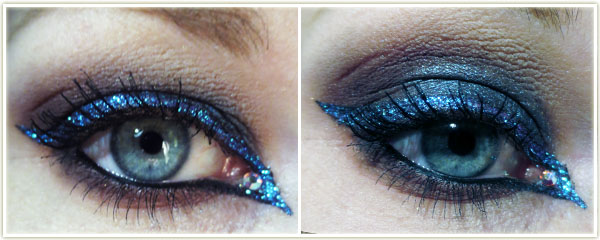
20131217_transparentteal1

No full face for this one because I was only messing around. I wanted to play around with my Too Faced A Few of my Favorite Things palette and then it kind of developed into this glitter bomb.

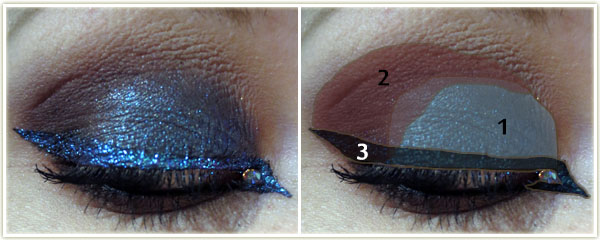
20131217_transparentteal2

I first used NYX‘s Jumbo Eyeshadow pencil in Black Bean and applied it all over the lid as a base. I then;

  1. applied Too Faced Party Time on the inner half of my lid (this really needs some kind of coloured based or it’ll apply very, very sheer). I really packed this one on.
  2. Too Faced Soiree was applied to the outer half of the lid and through the crease. I didn’t use a blending shade to fade this colour out, instead I very slowly blended it up through the crease. I also used this shade on my lower lashline.
  3. I don’t usually number my liner in my diagrams, but there were a few steps involved with this one. I first created an inner and outer wing with Maybelline‘s black gel liner. With the inner half of the wing, I made sure to do it far out enough so that I could leave a gap near my inner tearduct and drew the line right back to my lower waterline, creating a small triangle. After the gel liner had set, I use Too Faced Glitter Glue and went over top of the liner. Once that became tacky, I used MAC Reflects Glitter in Transparent Teal and placed it on top of the liner.

I used MAC Feline Kohl Power pencil to line my upper and lower waterlines. I appliedL’Oreal Voluminous Carbon Black mascara heavily to my upper and lower lashes. The small crystal was from some set that I got at Michael’s a few years ago and I stuck it to inner corner of my eye with some Duo clear lash adhesive.

What’s On My Face – Vol. 6

Hey everyone! I’m going to try something new and insert diagrams for  the eyeshadow portion of my looks – let me know if you find them useful (or not!).

20131206_look4.1

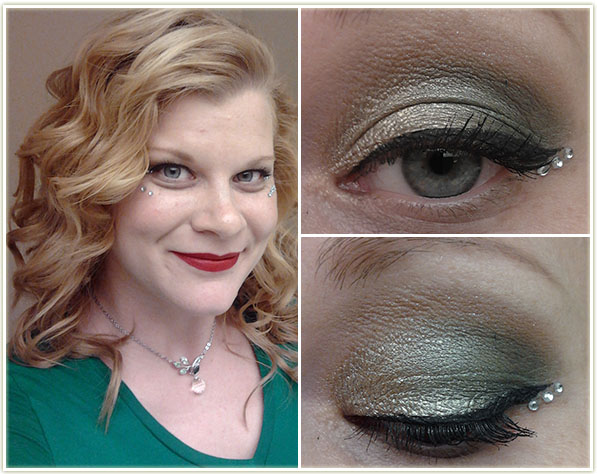
I did this look in an attempt to look Christmas-y themed for an event we were having mid-day at work without going too over the top. I did get a few looks regarding the crystals, but once people clocked on that it was for the event, it didn’t seem quite as odd to them! Having recently bought the Too Faced “A Few of my Favorite Things” palette, I wanted to make use of it right away!

20131206_look4.2

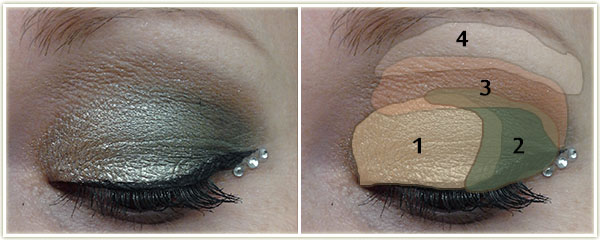
Eyes: (All Too Faced)

  1. Tinsel was applied to the inner two-thirds of the lid.
  2. Evergreen was applied to outer third and swept slightly into the crease.
  3. Chocolate Milk was blended into the crease.
  4. Cream Colored Ponies was used to highlight the brow with MAC‘s Silver Dusk layered on top.

I then used MAC‘s Blacktrack fluidline to create a winged liner and applied L’OrealVoluminous Carbon Black to my lashes. The rhinestones were from a craft store and I usedDuo lash adhesive to get them to stick to my skin.

Lips: MAC Brick lipliner with Russian Red lipstick on top.

Cheeks: Too Faced Melt Into Spring with Dior Amber Diamonds to highlight.

Face: Bourjois Healthy Mix Serum foundation in 52 Vanilla


20131206_look1.1

I loved this look! I wanted to wear something a bit more glitzy to go see Catching Fire (although really, I should’ve gone for an oranger/red theme@) and this is what I came up with.

20131206_look1.2

Eyes:

  1. Inglot AMC Shine 28 over the lid and on the inner two-thirds of the lower lid.
  2. Sleek Ink on the outer third of the lid and blended into the crease. I also applied it to the outer corner of my lower lid.

MAC Brule was used to highlight the brow. I then used MAC‘s Blacktrack fluidline to create a winged liner and applied L’Oreal Voluminous Carbon Black to my lashes.

Lips: NYX Vanilla Cream Pie

Cheeks: Tarte Dollface with MAC Silver Dusk to highlight.

Face: No foundation.


20131206_look2.1

More messing about with Laura Mercier‘s Artist (2013 edition) palette.

20131206_look2.2

(All Laura Mercier)

  1. Bamboo all over the lid.
  2. Violet Ink in the outer corner.
  3. Plum Smoke throughout the entire crease.
  4. Vanilla Nuts to highlight the brow.

As per usual, L’Oreal Voluminous Carbon Black mascara on my lashes.


20131206_look3.1

A replication of a Makeup Geek look using the Naked 2 palette.

20131206_look3.2

Eyes: (All Urban Decay)

  1. Verve on the very center of the lid.
  2. YDK on the outer and inner corners of the lid (honestly, I don’t even think you can really tell).
  3. Busted throughout the crease and to blend the shadows below it.
  4. Foxy to highlight the brow.

For the winged liner I use MAC‘s Blacktrack fluidline and applied L’Oreal Voluminous Carbon Black to my lashes.

Lips: MAC Brick lipliner with Russian Red lipstick on top.

Cheeks: Tarte Exposed

Face: Bourjois Healthy Mix Serum in 52 Vanilla, Revlon Bronzed & Chic bronzer.


20131206_look5.1

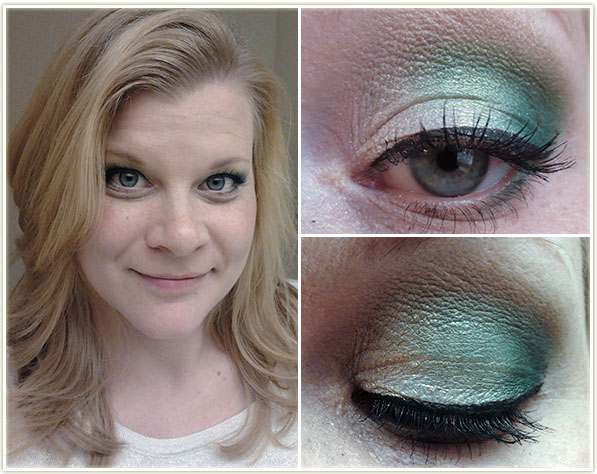
I love how the iridescence of the white-gold mineral eye shadow makes the matte green actually sparkle. Beautiful colours.

20131206_look5.2

Eyes: I first applied NYX‘s Jumbo Eyeshadow Pencil in Milk all over the lid because I feel I really need a sticky white base for the mineral shadow I’m about to apply next.

  1. Using the lighter, white-gold side of MAC‘s Burning: Illusionary Ambition duo, I applied that shade all over the lid.
  2. Sleek Fern was applied into the outer corner and blended into the crease. Fern was used to line the outer half of the lower lash line.
  3. I blended Urban Decay Naked into the upper crease to blend out the green shadow.
  4. MAC Brule on the brow bone.

MAC‘s Blacktrack fluidline to create a winged liner and applied L’Oreal Voluminous Carbon Black to my lashes.

Lips: Nothing

Cheeks: Physicians Formula Happy Booster Blush in Natural

Face: Bourjois Healthy Mix Serum in 52 Vanilla with Physicians Formula Bronze Booster in Light to Medium.


20131206_look6.1

This is one of two staple looks that I have (‘ll post the other one at a later time). This is the more rushed, “need to get out the door” look. This look was predominantly created so I could finally finish up Haux, my oldest MAC shadow.

20131206_look6.2

  1. Maybelline Color Tattoo in Barely Beige all over the lid.
  2. MAC Haux in the outer corner and blended into the crease.
  3. MAC Brule to highlight the brow and blend out the crease

Topped it off with L’Oreal Voluminous Carbon Black mascara.

What’s On My Face – Vol. 5

20131127pinkglitter

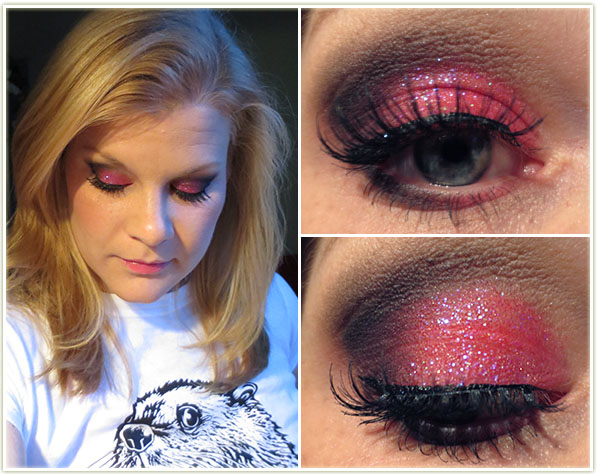
Wore this one out to a concert (Phildel was playing at the Drake  Hotel in Toronto – check her out). I’ve been hoarding this pink cosmetic glitter for what feels like eons now (seriously, a friend gave me some of this about ten years ago) and never really thought to wear it because I didn’t used to wear a lot of pink (I still don’t really). For whatever reason, it sprung into my head as I was getting ready for the show so I decided to give it a shot.

Eyes: I used Urban Decay Primer Potion in Original to prime the lid. I then applied SleekPout all over the lid (take a while to pack this on) and then used Urban Decay Blackout in the outer corner and into the crease. To blend out the black, I used Urban Decay Buck at the top of the crease to help blend it into my brow highlight which was MAC Brule. I also lined the lower lid with Pout (inner half) and Blackout (outer half).

To add the glitter, I first applied Too Faced Glitter Glue wherever the pink eyeshadow was, then dabbed the glitter over top. I wish I knew what the glitter was, but I don’t as it’s been decanted into an unlabeled bottle. It’s a very transparent pink glitter with a slight blue iridescence.

I then lined the upper lash line with Physicians Formula Ultra Black liquid liner and applied Ardell Demi lashes with some Duo adhesive. To finish off the look I appliedL’Oreal Voluminous Carbon Black mascara (waterproof).

Face: Bourjois Healthy Mix Foundation in 52 Vanilla with Revlon Bronzed & Chic as my bronzer.

Lips: NYX Butter Gloss in Strawberry Parfait

Cheeks: Tarte Blissful


20131127udnaked

Just a very plain, neutral look.

Eyeshadows: Urban Decay Primer Potion in Original all over the lid and up to the brow. Maybelline Color Tattoo in Bad to the Bronze layered on top of the primer (all over the lid, barely into the crease). I then applied Urban Decay Sidecar (be careful with this one, the glitter gets EVERYWHERE) to the inner two-thirds of the lid with Urban DecayHustle in the outer corner and slightly blended into the crease. MAC Brule was used to highlight the brow and blend Hustle in slightly.

Liner: Maybelline Gel Liner in Blackest Black

Lashes: Well, according to my notes on this look, I have single lashes glued in, so they would be by Ardell. Good thing I wrote it down, because I wouldn’t have picked up on them from these shots. I used CoverGirl Clump Crusher in Very Black as my mascara.


20131127lmartist2

Playing around with my Laura Mercier Artist palette.

Primer:  Urban Decay Primer Potion in Original

Eyeshadows: I used the light lavender shade from the MUA Pretty Pastels palette all over the lid with Laura Mercier Ink on the outer third of the lid. Laura Mercier Vanilla Nuts was used to highlight the brow.

Liner: Physicians Formula Eye Booster in Ultra Black

Mascara: L’Oreal Voluminous Carbon Black (waterproof)

Rest of the Face:

  • Cheeks – Tarte Dollface
  • Lips – NYX Butter Gloss in Maple Blondie
  • No foundation or bronzer

20131127minty

Just an easy one I did while getting ready for work in the morning.

Primer:  Urban Decay Primer Potion in Original

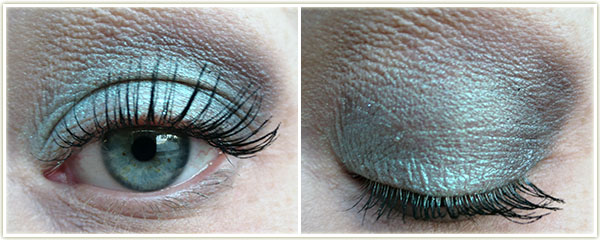
Eyeshadows: Inglot AMC Shine 24 over the entire lid with Urban Decay Gunmetal in the outer corner and blended into the crease. MAC Brule as my brow highlight.

Mascara: L’Oreal Voluminous Carbon Black (waterproof)


20131127lmartist

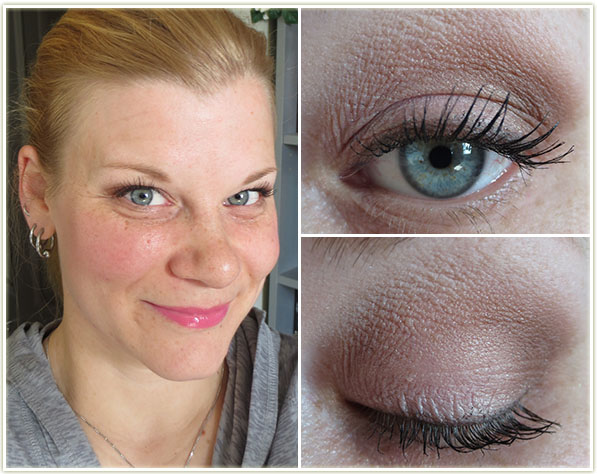
Jeez, this one just looks boring looking at in pictures! Although I’m sure there’s some neutral lovers out there that will prefer this to my more colourful looks.

Eyeshadows: UDPP in Original all over the lid. (All Laura Mercier) Guava all over the entire lid, Truffle blended into the outer corner and through the crease with Vanilla Nuts as a brow highlight. I then pressed Espresso into the lashline to create a  soft liner.

Mascara: L’Oreal Voluminous Carbon Black (waterproof)

Rest of the Face:

  • Cheeks – Tarte Dollface
  • Lips – NYX Butter Gloss in Peaches and Cream
  • No foundation or bronzer