Tag Archives: Make Up For Ever

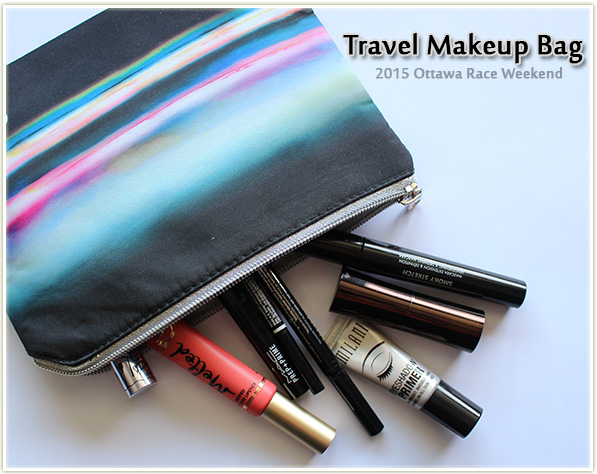
Travel Makeup Bag: 2015 Ottawa Race Weekend

201505_travelmakeupbag_ottawa1

I’m taking a(nother) long weekend this coming one to head to Ottawa for Race Weekend.Last year I did the 5k, and this year I’m going back for the half marathon which my father will also be running! And what’s a weekend away if not to bring along some makeup products I want to get better acquainted with?
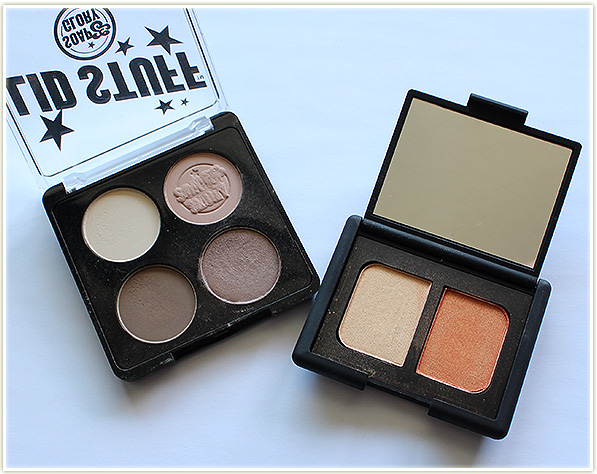
Soap & Glory Lid Stuff in What’s Nude and NARS dup in Mediteranee

I’m only bringing along two small eyeshadow palettes because I find I never reach for these on a day to day basis, often opting for my larger palettes. The more neutral toned palette is Soap & Glory‘s Lid Stuff in What’s Nude and the NARS duo is Mediteranee (and the orange in that duo is everything). It won’t make for especially enthralling makeup looks while on vacation, but it’ll be fun for me to play with these shadows a bit more.
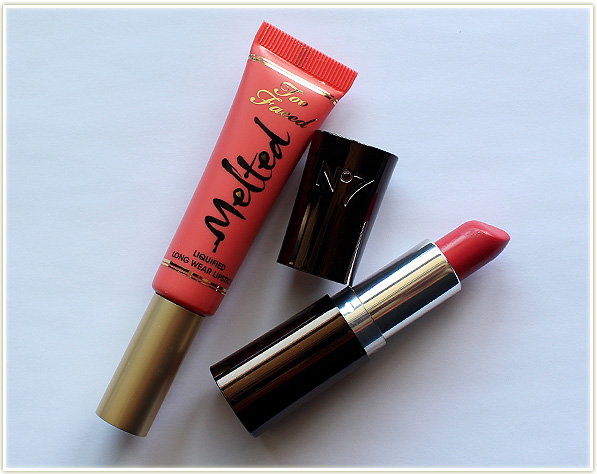
Too Faced Melted Coral and Boots No7 Sweet Copper

Two options for lips here, and I’m sure this is probably overkill for four days, but anyway…Too Faced Melted Coral (more orange than coral really) and Boots No7 Sweet Copper. They’re both on the orangey-side of things, but I’m okay with that.
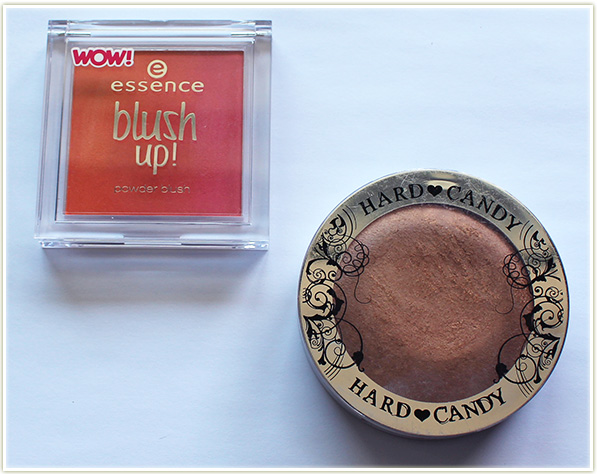
essence blush up! in Heat Wave and Hard Candy Hula Hula

I love that ombre blushes give me the option between two colours in one compact (and a third if you swirl them together), so I’m bringing along essence‘s Heat Wave. My bronzer of choice lately has been Hard Candy‘s Hula Hula. I just can’t get enough of how golden and bronzey this makes my face.
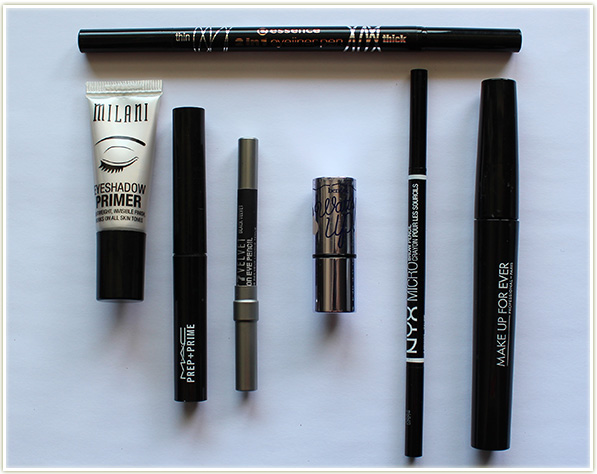
The usual (boring) suspects

And all the bits and bobs that finish my looks off:

  • I’m giving my Milani eyeshadow primer time to fully prove itself to me.
  • MAC‘s Prep + Prime for lips because I can’t live without it.
  • Urban Decay‘s Black Velvet liner predominantly for tightlining (if it even comes to that).
  • Benefit Watts Up because it’s tiny, compact and packs a punch for highlighting my cheekbones.
  • NYX Micro brow pencil in Taupe
  • Make Up For Ever Smoky Stretch mascara (the love affair continues!).
  • essence‘s 2-in-1 liner because I’ve got a review coming up and I want to make sure I put this to the test.

And in looking at this stuff… jeez is it ever boring. I think next time I go somewhere I need to bring stuff that’s wayyyy more interesting to post about! Anyyyyyway, wish me luck on my half! My fingers are crossed that it’ll be cool, even slightly rainy on Sunday!
What’s On My Face – Volume 37

Loads of Makeup Geek (no surprise there), MAC and some Colour Pop thrown into the mix this week!

20150513_womf37_look4-1

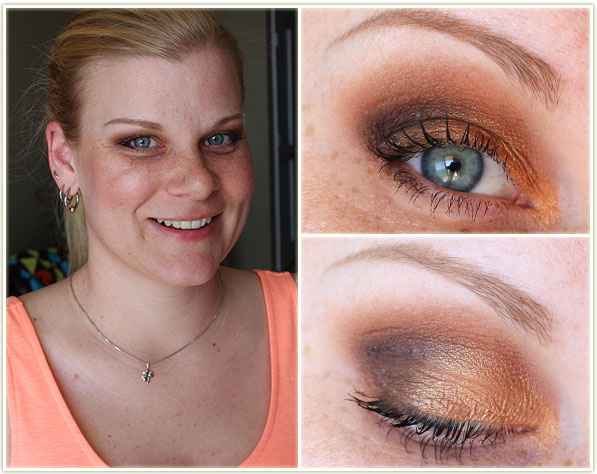
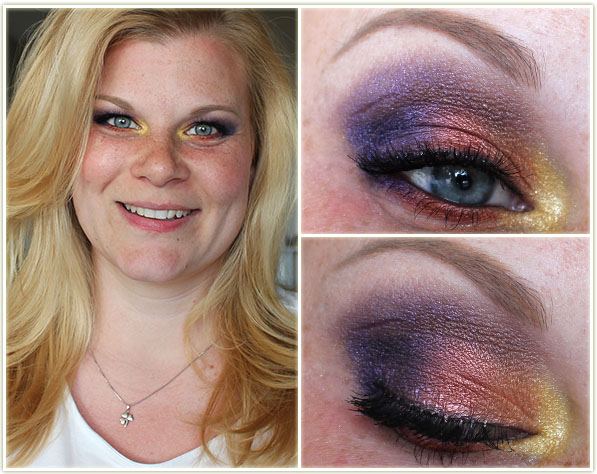
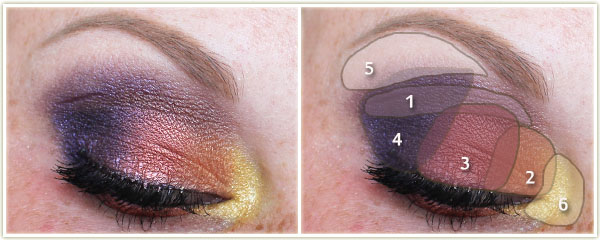
My absolute favourite YouTuber – Sharon Farrell – does some ridiculously stunning makeup tutorials. She often has neutral makeup, but she knows how to bust out a bright look too. I fell in love with her Desert Sunrise tutorial when she posted it in January, but never got around to trying it out. I finally did, and I loved the results!

20150513_womf37_look4-2

Eyes

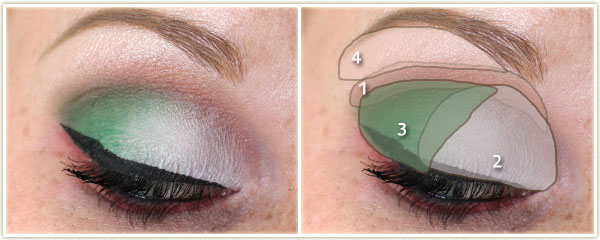
  1. Makeup Geek Mesmerized through the crease.
  2. Makeup Geek Sin City on the inner third of the lid.
  3. Makeup Geek Roulette on the middle of the lid and on the middle of the lower lash line.
  4. Makeup Geek Caitlin Rose on the outer corner and on the outer half of the lower lash line. The outer corner is also darkened up a bit with Makeup Geek Corrupt.
  5. Makeup Geek Vanilla Bean on the brow bone.
  6. Inglot Matte 370 on the inner corner with L’Oreal Infallible in Goldmine on top.

I tightlined my inner lash lines with Urban Decay‘s Black Velvet liner and used the same product to line my upper lash line. I applied Make Up For Ever Smoky Stretch mascara to my lashes and then added in some individual Ardell lashes.

Rest of the Face

  • Bronzer: Hard Candy Hula Hula
  • Blush: MAC Ripe Peach
  • Highlighter: Make Up For Ever Pro Sculpting Duo #1

20150513_womf37_look5-1

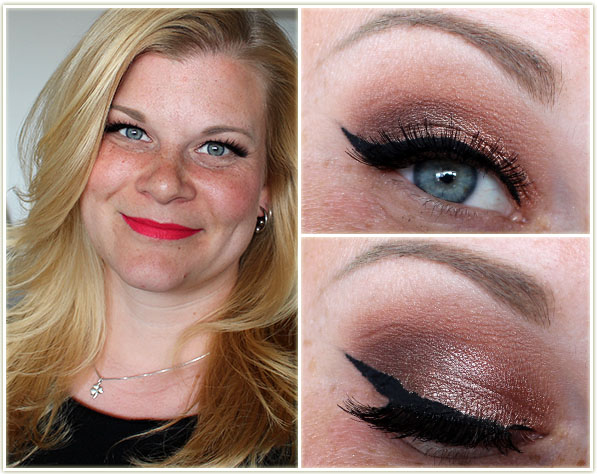
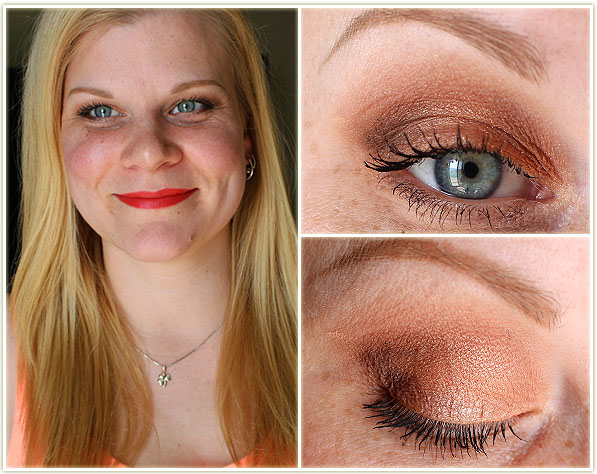
I pulled out this “traditional” look because I was headed to my cousin’s baby shower and wanted to wear something flattering (the eyeshadows) while still wearing a really bold colour on the lips.

20150513_womf37_look5-2

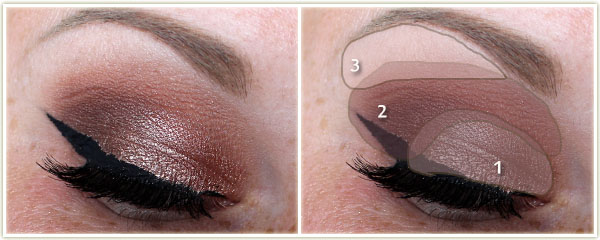
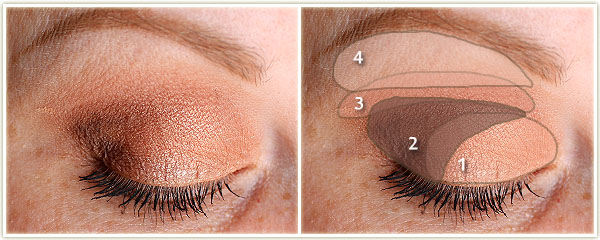
Eyes

  1. Makeup Geek Grandstand all over the lid.
  2. Makeup Geek Cocoa Bear on the outer corner and through the crease.
  3. Makeup Geek Vanilla Bean on the browbone.

I created the wing with Catrice‘s Dating Joe Black liner and applied Make Up For EverSmoky Stretch mascara to my lashes. I then added in some Bombshell lashes by House of Lashes (my first time wearing House of Lashes… and holy crap I’m in love!).

Rest of the Face

  • Bronzer: Hard Candy Hula Hula
  • Blush: I think it was Hourglass Diffused Heat, but I’m not positive.
  • Highlighter: MAC Soft & Gentle
  • Lips: MAC Relentlessly Red

20150513_womf37_look1-1

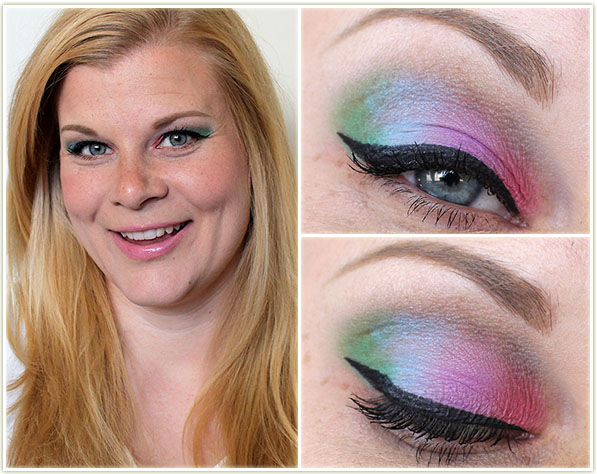
A quick re-post for posterity… I did this pastel rainbow look for Workaday Ramblings for April’s guest post.

201504_guestpost_chelle5

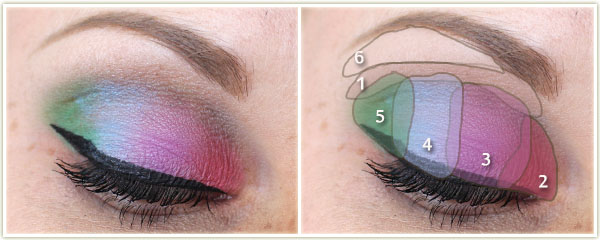
Eyes

  1. Too Faced Milk Chocolate through the crease.
  2. MAC Sushi Flower on the inner corner of the lid.
  3. Inglot Matte 334.
  4. MAC Fade.
  5. Sleek Cricket on the outer corner.
  6. MAC Dazzlelight to highlight the brow.

I used MAC‘s Blacktrack fluidline to create the wing and then tightlined my upper waterline with Urban Decay‘s Black Velvet liner. I coated my lashes with Make Up For Ever‘s Smoky Stretch mascara.

Rest of the Face

  • Foundation: Bourjois Healthy Mix Serum in 52 Vanilla
  • Bronzer: Hard Candy Hula Hula
  • Blush: essence Pinky Flow
  • Highlighter: Hard Candy Tiki
  • Lips: NYX Butter Gloss in Eclair

20150513_womf37_look2-1

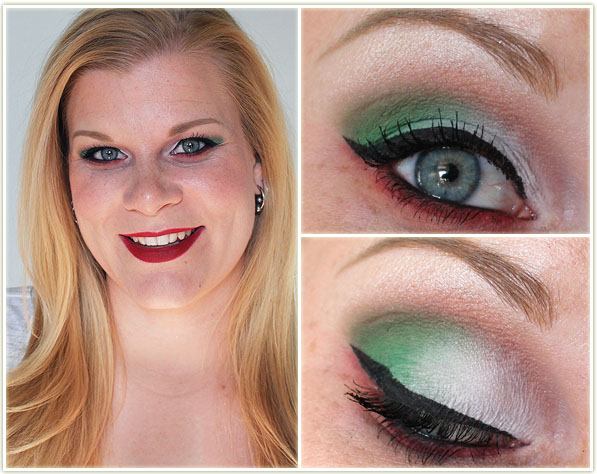
Jill of Beauty Vixen was headed off to Mexico, so I helped her out with this look that was inspired by the flag of Mexico.

201504_guestpost_bv_chelle6

Eyes

  • Makeup Geek Creme Brule through the crease.
  • Makeup Geek Whites Lies on the inner half of the lid.
  • MAC Landscape Green pigment on the outer half of the lid.
  • Makeup Geek Bling on the brow bone.

I created the wing with MAC‘s Blacktrack fluidline and then tightlined my upper and lower lash lines with Urban Decay‘s Black Velvet liner. On my lower lash line I applied MAC‘sStrike While Haute eyeshadow and blended it out the edges with Makeup Geek‘s Creme Brule. On my lashes is Make Up For Ever‘s Smoky Stretch mascara.

Rest of the Face

  • Foundation: Bourjois Healthy Mix Serum in shade 52 Vanilla
  • Bronzer: Hard Candy Hula Hula
  • Blush: essence Life’s a Cherry
  • Highlighter: MAC Whisper of Gilt
  • Lips: NARS Velvet Matte Lip Pencil in Cruella

20150513_womf37_look3-1

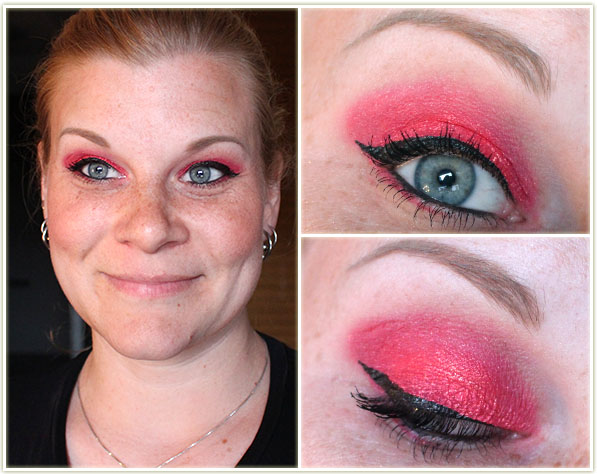
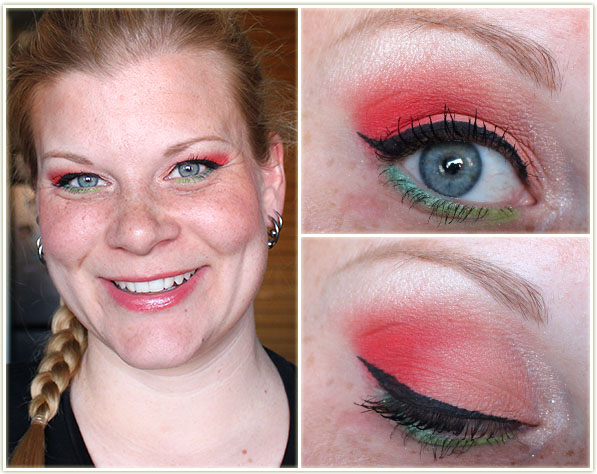
Stop the presses! I have been after a neon red eyeshadow for a very long time. A lot of shadows have come close, but have never really quite hit the mark. Then came alongColour Pop‘s Erotic, and suddenly my search is over! Technically it’s a pressed pigment, but that’s never scared me away from using a product on my eyes. Erotic is incredible – it’s a neon red that has tiny specs of orange and pink glitter.

Eyes

So the eye look is easy on this one – the only shadow I’m wearing is Colour Pop‘s Erotic! I then created the wing with Kat Von D‘s Tattoo Liner in Trooper and lined my inner rim withUrban Decay‘s Black Velvet liner. On my lashes is Make Up For Ever‘s Smoky Stretch.

Rest of the Face

  • Bronzer: Hard Candy Hula Hula
  • Blush: MAC Warm Soul with Milani‘s Coral Cove on top
  • Highlighter: MAC Whisper of Gilt


What’s On My Face – Volume 36

Another roundup of looks from the last few weeks. Enjoy!


201504_womf_vol36_look1-1

The last one I have from our trip to Florida. I will never get enough of Peanut Butter as a transition shade, so beautiful!

201504_womf_vol36_look1-2

Eyes
(all Too Faced Semi-Sweet Chocolate Bar palette)

  1. Caramel all over the lid.
  2. I screwed up the numbers! This area is still the same shade as #1 above.
  3. Truffled in the outer corner.
  4. Peanut Butter through the crease.
  5. Coconut Creme on the brow bone.

On my lashes is Make Up For Ever Smoky Stretch mascara.

Rest of the Face

  • Bronzer: Hard Candy Hula Hula
  • Blush: Astor Feeling Feline (lip product used as a blush)

201504_womf_vol36_look2-1

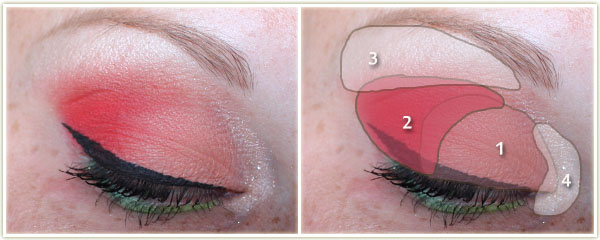
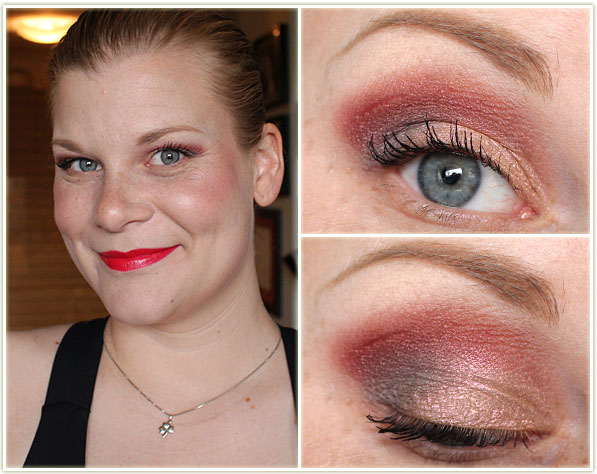
Holy crap. Wet n Wild‘s California Roll palette (limited edition from the Silverlake collection) turned out to be a stunner. I even managed to use every single shade from the palette in this look which is fairly awesome.

201504_womf_vol36_look2-2

Eyes
(all from the Wet n Wild California Roll palette, although the shades have no names)

  1. Peach colour all over the lid.
  2. Red shade on the outer corner of the lid.
  3. Pale beige shade on the lid.
  4. Shimmery beige on the inner corner.

On the lower lash line I applied the paler green shade on the inner half of the lid, and then the darker green on the outer half. To create the wing I used MAC‘s Blacktrackfluidline and applied Make Up For Ever Smoky Stretch mascara to my lashes.

Rest of the Face

  • Bronzer: Hard Candy Hula Hula
  • Blush: Milani Coral Cove
  • Highlighter: Hard Candy Tiki
  • Lips: Benefit Coralista gloss

201504_womf_vol36_look3-1

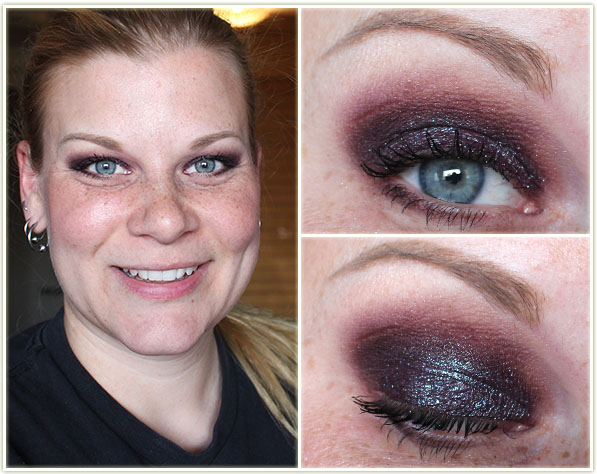
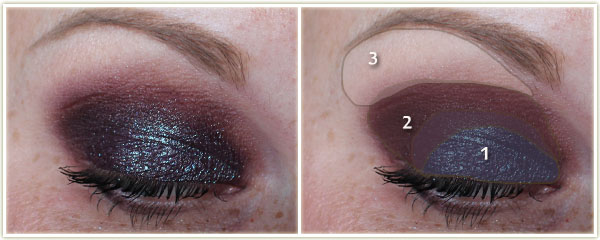
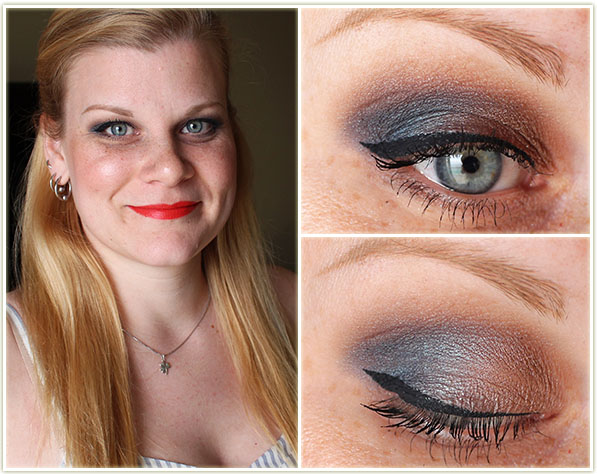
Oh wow. I was expecting Colour Pop‘s Bae to look something like MAC‘s Club, but it’s not at all the same. This is so much more intense with a high blue sheen. It’s really, really incredible.

201504_womf_vol36_look3-2

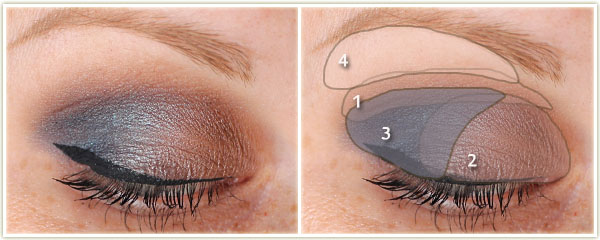
Eyes

  1. Colour Pop Bae all over the lid.
  2. MAC Sketch on the outer corner and through the crease. Sketch is also smudged along the lower lash line.
  3. Too Faced White Chocolate on the brow bone.

Make Up For Ever Smoky Stretch mascara is on my lashes.

Rest of the Face

  • Bronzer: Make Up For Ever Pro Sculpting Duo #1
  • Blush: Physicians Formula Happy Booster in Natural
  • Highlighter: Make Up For Ever Pro Sculpting Duo #1

201504_womf_vol36_look4-1

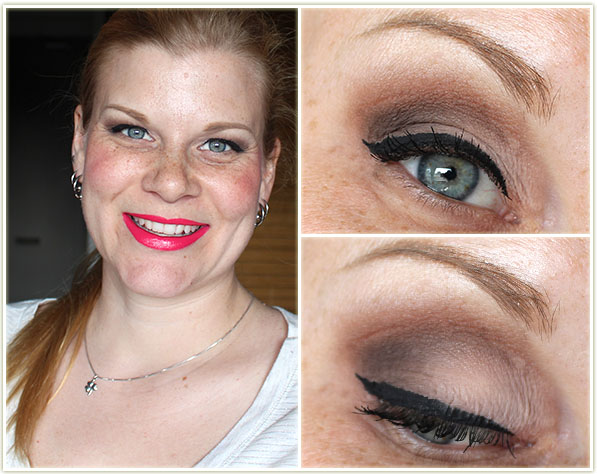
If it’s not already obvious, I often bust out neutral eyes just so I can wear bright lipstick. I feel like I know nothing about matching bright eyeshadows with bright lipstick, so I always default to a look like this when I want to neon on my lips.

201504_womf_vol36_look4-2

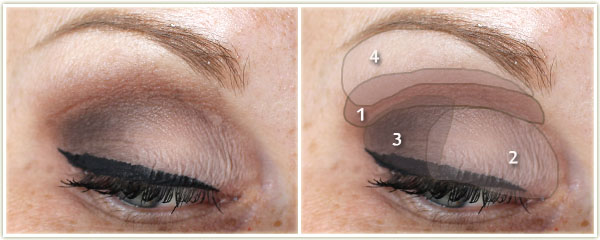
Eyes
(all from the Sonia Kashuk Eye on Neutral 02 palette)

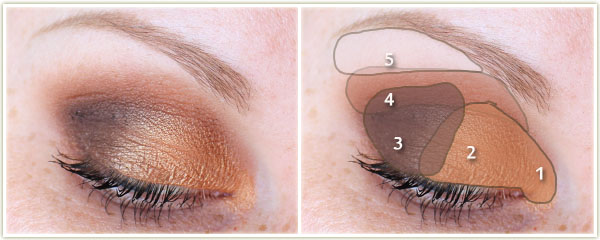
  1. Orangey-brown through the crease
  2. Light peach all over the lid.
  3. Dark brown and black on the outer corner.
  4. Palest shade on the brow bone.

To create the wing I used Make Up For Ever‘s Ink Liner and then applied Make Up For Ever Smoky Stretch to my lashes.

Rest of the Face

  • Bronzer: Hard Candy Hula Hula
  • Blush: Illamasqua Tweak
  • Highlighter: Too Faced Candlelight
  • Powder: Hourglass Ethereal Light
  • Lips: Too Faced Melted Candy

201504_womf_vol36_look5-1

Playing  around with some of my Colour Pop shades. The lid shade (Too Soon) is very similar to the Pink Sugar shade from the Too Faced Semi-Sweet Chocolate Bar palette, but actually applies to the lid the way the shade looks (as opposed to the glitter bomb that Pink Sugar is). So if you liked the look of Pink Sugar but hated how it applied, check out Colour Pop‘s Too Soon.

201504_womf_vol36_look5-2

Eyes
(all Colour Pop)

  1. Drift through the crease.
  2. Too Soon all over the lid.
  3. Adios in the outer corner.
  4. One & Done on the brow bone.

Make Up For Ever Smoky Stretch mascara is on my lashes.

Rest of the Face

  • Foundation: It Cosmetics CC Cream in Fair
  • Bronzer: Hard Candy Hula Hula
  • Blush: Tarte Natural Beauty
  • Highlighter: Highlighting shade from the Make Up For Ever Pro Sculpting Duo #1
  • Lips: Too Faced Melted Strawberry

Review: Make Up For Ever Pro Sculpting Duo

201504_makeupforever_prosculptionduo_1

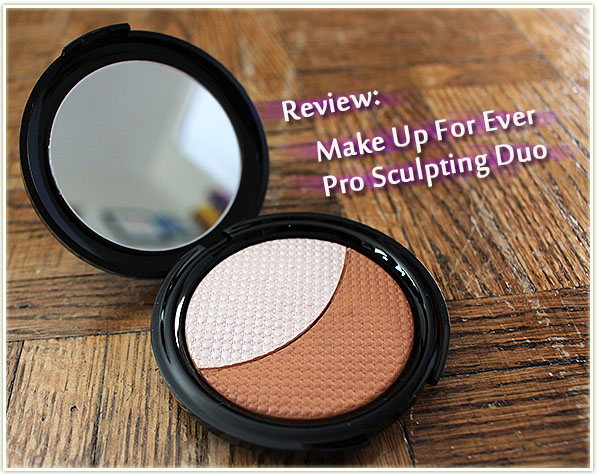
During the Make Up For Ever Spring 2015 product launch event I went to, we were kindly gifted one shade of the Pro Sculpting Duo. I chose Duo #1 which is described as a Pink Beige. The other option is Duo #2 which is more golden.

Make Up For Ever Pro Sculpting Duo

Encased in a solid compact with a handy mirror, the Pro Sculpting Duo is split roughly down the middle; one side has an orangey-brown sculpting shade and the other a pearlescent white-pink highlighter. The compact contains 8 grams of product, which is a little bit shy of the typical 10 grams average for a compact of this size. However, that may have something to do with the fact that this product comes from a gel-to-powder formula (I believe it goes on the terracotta plate as a gel and then is baked into a powder formula).  It’s also talc-free.

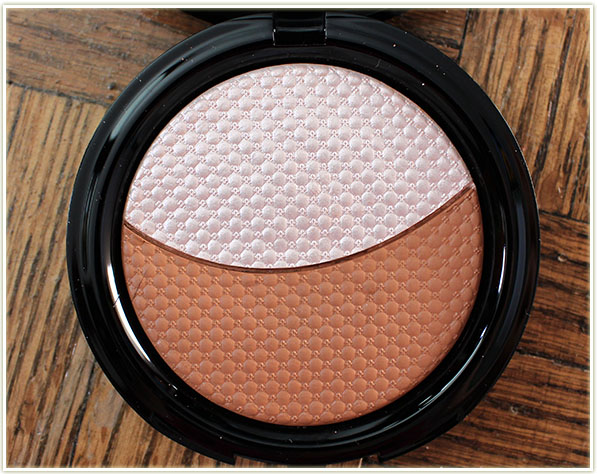
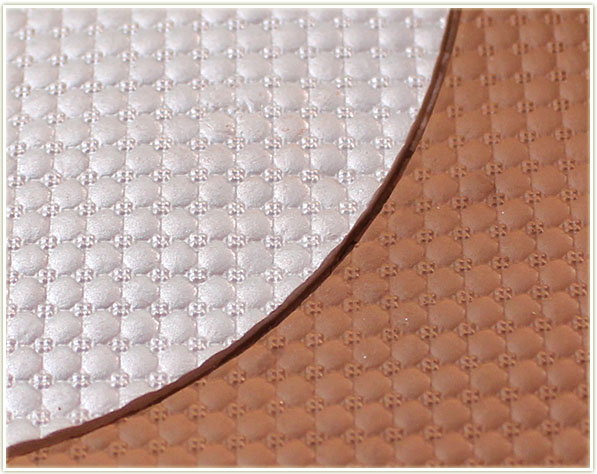
Make Up For Ever Pro Sculpting Duo #1

Of course, one can’t get over how gorgeous the product is. Give us beauty consumers a two-colour product with a print, and you’ve pretty much got us cornered!

Make Up For Ever Pro Sculpting Duo #1 – close up

Ugh I can’t. So gorgeous.

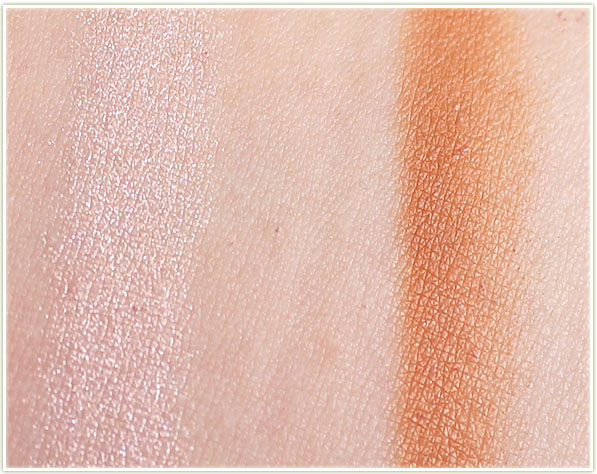
Make Up For Ever Pro Sculpting Duo #1 – swatches

So how does it play out on the skin?

Sculpting Shade

Well, the sculpting shade is just… too orange. I wouldn’t encourage anyone to sculpt their faces with an orange shade – it’s just not how contouring works. Even worse is that it has a sheen to it which does nothing to help sink your cheekbones in, or recede areas of your face. If you want to contour, you need to be using shades tinted grey as that’s what a natural shade creates on your face.

It does, however, work as a bronzer. While it is still rather orange for my tastes, you can blend this in, or use a light hand to get the shading you want. I focus on the high points of my face, the areas that get the most sun, such as the back of my cheekbones, my temples and forehead, and along my jawline and nose.

Highlighting Shade

This is where the duo really shines! The pink-beige shade is hard to describe, and the swatch really doesn’t do it justice because it is GORGEOUS. If you have any experience with MAC’s Vanilla pigment, this is rather similar, just without the yellow flecks. It’s creamy to the touch, smooth blending with a pinky-white sheen. It’s unlike anything I have in my collection, which surprised me, because highlighters don’t tend to be particularly unique on the whole. (I’ve heard Duo #2 is a dupe for MAC’s Whisper of Gilt, if you’re interested!) The pigmentation on this is very strong, so go easy if you’re not looking to be super highlighted, but if you love a solid glow to your skin, this one’s for you!

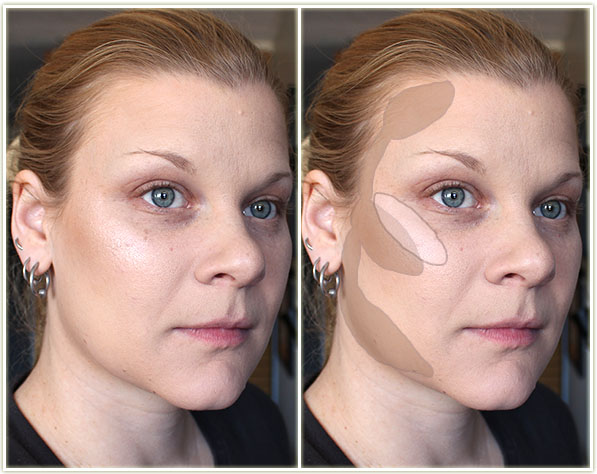
Make Up For Ever Pro Sculpting Duo #1 – applied to the face

Here’s what it looks like on my face. As I said, I won’t use that sculpting shade to contour my face, but I will use it as a bronzer. I stuck to the areas of my face that get the most sun, choosing to blend it down slightly on my upper cheekbones (it’s not directly UNDER my cheekbone though). The highlighting shade was applied directly to the tops of my cheekbones. It really stands out and adds a beautiful amount of luminosity to my cheekbones.

Final Thoughts

I’m confused by the sculpting shade, especially from a brand that definitely knows how to do makeup right. If you ignore the fact that you’re encouraged to contour your face with it, you can definitely use this as a glowing bronzer for the skin. I love how it looks on my face to make it seem like I’ve gotten way more sun that I actually have.

The highlighter is what really makes this compact for me though, it’s beyond gorgeous and looks stunning on my face. In fact, I keep swatching it on my finger just to keep looking at the different facets to it. I honestly think the whole compact is worth it just for the highlighter alone, but if you can use the bronzing shade, all the better!

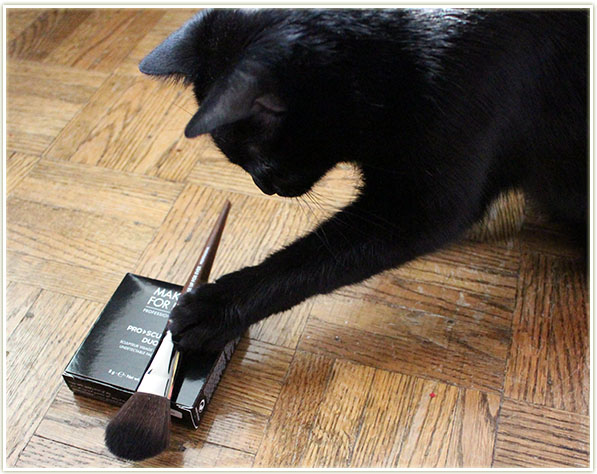
Kolme’s having fun playing around with the brush

What’s On My Face – Volume 35

A few randoms, some from my vacation in Florida and one from a guest post last month. Enjoy!


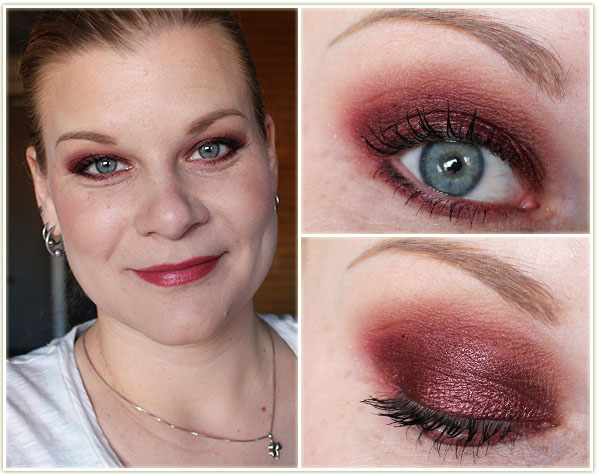
Red and burgundy eyeshadows… I’ll never quit you.

20150415_look2-2

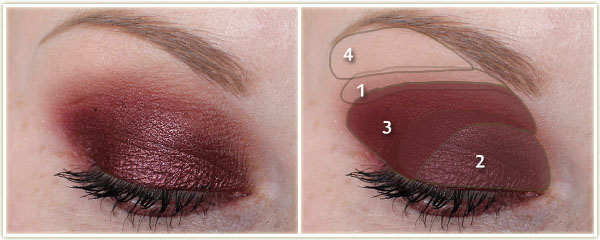
Eyes
(all Makeup Geek)

  1. Frappe through the crease.
  2. Showtime all over the lid.
  3. Bitten on the outer corner and through the crease.
  4. Vanilla Bean on the brow bone.

I then ran MAC Phone Number eye pencil on the outer corner of my bottom lash line and then ran MUG Bitten over the entire lower lash line. On my lashes is Make Up For Ever Smoky Stretch mascara.

Rest of the Face

  • Foundation: Bourjois Healthy Mix Serum in shades 51 Light Vanilla and 52 Vanilla mixed together
  • Bronzer: Joe Fresh Sand
  • Blush: MAC Sea Me, Hear Me
  • Highlighter: Too Faced Candlelight
  • Lips: MAC Mystical

20150415_look5-1

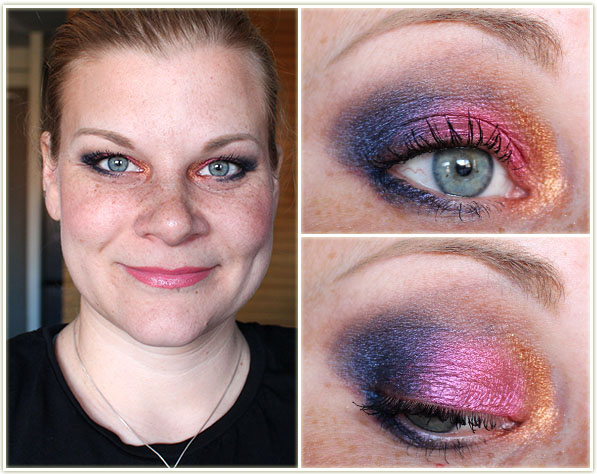
Playing around with my new Milani Bella shadows. “Rouge” is not nearly as red as I hoped it would be.

20150415_look5-2

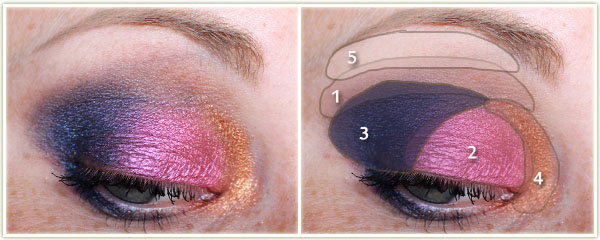
Eyes

  1. Urban Decay Naked through the crease.
  2. Milani Bella Rouge on the middle of the lid.
  3. Milani Bella Navy on the outer corner.
  4. Milani Bella Copper on the inner corner.
  5. Wet n Wild Brulee on the brow bone.

I then ran MAC‘s Phone Number eye pencil along my lower lash line and brushed Bella Navy on top of it. On my lashes is Make Up For Ever Smoky Stretch.

Rest of the Face

  • Bronzer: Hard Candy Hula Hula
  • Blush: Hourglass Luminous Flush
  • Highlighter: MAC Whisper of Gilt
  • Lips: Bite Fig

20150415_look3-1

I put this together while on vacation in Florida – it’s one of my favourite combinations from the Too Faced Semi-Sweet palette.

20150415_look3-2

Eyes
(all Too Faced Semi-Sweet Chocolate Bar palette)

  1. Bon Bon all over the lid.
  2. Peanut Butter through the crease.
  3. Truffled in the outer corner
  4. Coconut Creme on the brow bone.

On my lashes is Make Up For Ever Smoky Stretch.

Rest of the Face

  • Bronzer: Hard Candy Hula Hula
  • Highlighter: Benefit Watts Up
  • Blush: Astor Feeling Feline (this is a lip product, but I completely forgot to pack my blushes!)
  • Lips: MAC Barbecue

20150415_look4-1

Another vacation one!

20150415_look4-2

Eyes
(all Too Faced Semi-Sweet Chocolate Bar palette)

  1. Mousse through the crease.
  2. Rum Raisin all over the lid.
  3. Blueberry Swirl on the outer corner.
  4. Coconut Creme on the brow bone.

I used Catrice‘s liquid liner in Dating Joe Black to create the wing and applied Make Up For Ever Smoky Stretch mascara to my lashes.

Rest of the Face

  • Bronzer: Hard Candy Hula Hula
  • Blush: MAC Barbecue lipstick (once again… I had no blush with me!)
  • Highlighter: Benefit Watts Up
  • Lips: MAC Barbecue 

20150415_look1-1

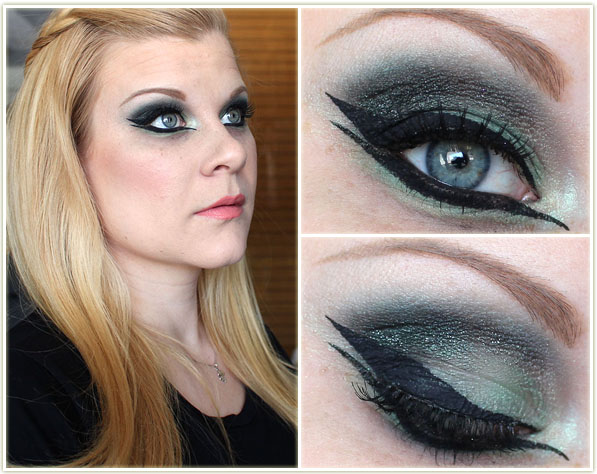
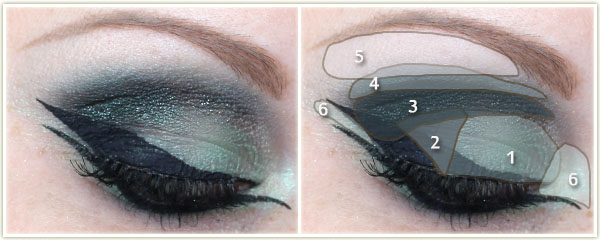
I can’t believe how well this look came out! I did this one for Prairie Beauty Love as a guest post for the month of March. Cross posting it here for my own archives!

20150415_look1-2

Eyes

  1. Makeup Geek Appletini on the inner two thirds of the lid.
  2. Makeup Geek Shark Bait on the outer third of the lid.
  3. Makeup Geek Envy through the crease and right through to the eyebrow.
  4. Shark Bait was then patted and blended along the upper edge of where Envy was blended through the crease.
  5. On the brow bone is Makeup Geek Vanilla Bean.
  6. On the inner tearduct and on the very outer edge of the eye, I applied Naked Cosmetics‘ pale green from the Ivory stack.

To get the dramatic winged liner, I used Catrice‘s Dating Joe Black liquid liner. Go slowly with this! I then lined my upper and lower water line with Urban Decay‘s Black Velvet liner. I applied CoverGirl‘s Clump Crusher mascara to my lashes and threw on a pair of J. Cat lashes in EL13. To amp up the crease, I patted on some Too FacedGlitter Glue and layered on some (super ancient) Tony + Tina silver glitter.

Rest of the Face

  • Foundation: Bourjois Healthy Mix Serum in shades 51 Light Vanilla and 52 Vanilla mixed together
  • Bronzer: Joe Fresh Sand
  • Blush: Physicians Formula Happy Booster in Natural
  • Lips: Wet n Wild 903C Just Peachy with NYX‘s Butter Gloss in Tiramisu on top