Tag Archives: Maybelline

What’s On My Face – Volume 19

Time for round 19 of makeup gunk I’ve splashed on my face!
201407_look2.1

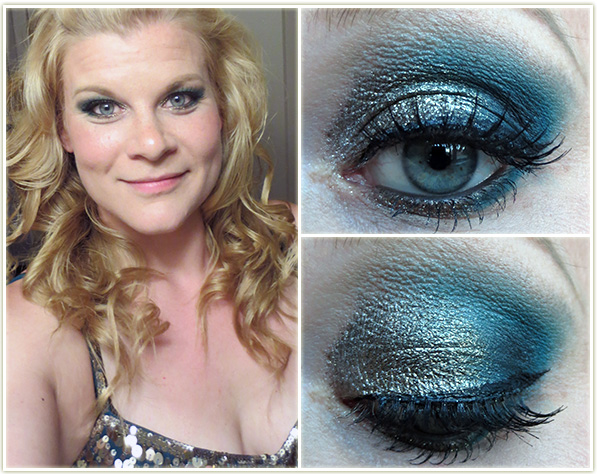
I wore this one during Toronto’s Pride Week and really liked how this came out. You can really never go wrong with Makeup Geek‘s Utopia, such a beautiful blackened gold that seems to work with every colour imaginable.
201407_look2.2

Eyes

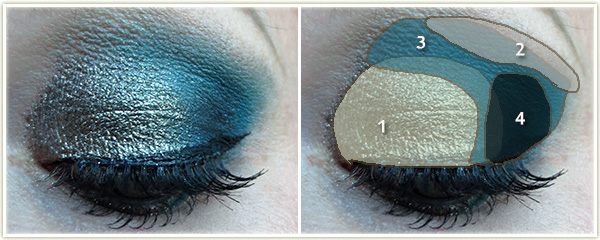
  1. Inglot‘s Shine 132 (silver) all over the lid. Then apply Too Faced‘s Glitter Glue on top of the silver and tap on Makeup Geek‘s Utopia pigment on top. Utopia is also applied on the inner half of the lower lash line.
  2. Makeup Geek Creme Brulee through the top of the crease.
  3. Inglot‘s Matte 338 (turquoise) in outer corner and through the crease and blend it in to Utopia338 is also applied on the outer half of the lower lash line.
  4. Urban Decay‘s Blackout in the very corner to darker up the turquoise.

MAC Shroom to highlight the browbone, Tarte‘s gel liner in Black to create the wing with Urban Decay‘s Black Velvet pencil liner on my inner rim. Make Up For Ever Smoky Lash Extravagant on both sets of lashes with a pair of J. Cat false lashes in EL13 glued on. Instead of my usual MAC Omega on my brows, I’ve switched to Anastasia‘s Dipbrow Pomade inBlonde.

Rest of the Face

  • Foundation: Revlon Colorstay (Dry/Normal) in 220 Natural Beige
  • Bronze: NYC Fire Island Tan
  • Highlighter: MAC Whisper of Gilt with MAC Silver Dusk on top
  • Blush: Illamasqua Hussy
  • Lipstick: (not pictured) Too Faced Coral Fire
201407_look3.1

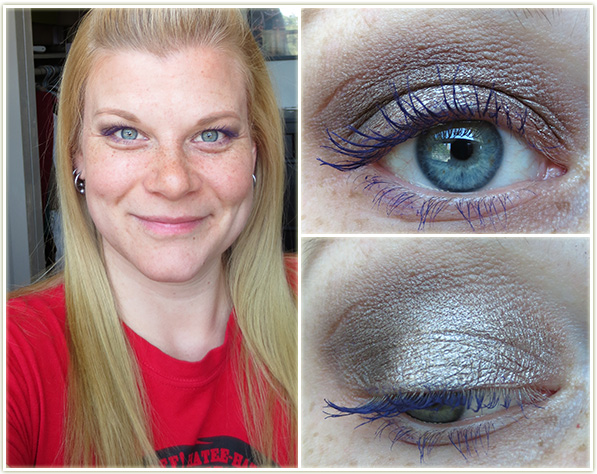
Quick and easy, no-fuss look for a weekend brunch.
201407_look3.2

Eyes

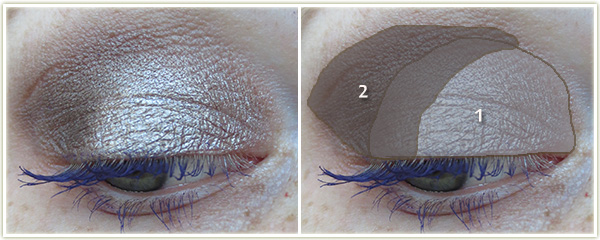
  1. Maybelline Bad to Bronze all over the lid.
  2. Sleek Bark on the outer half of the lid.

MAC Shroom to highlight the brow bone and Sephora‘s Full Action Extreme Effect mascara in Purple on my lashes. Anastasia‘s Dipbrow Pomade in Blonde through my brows.

Rest of the Face

  • Bronzer: (also used as a blush) NYC Fire Island Tan
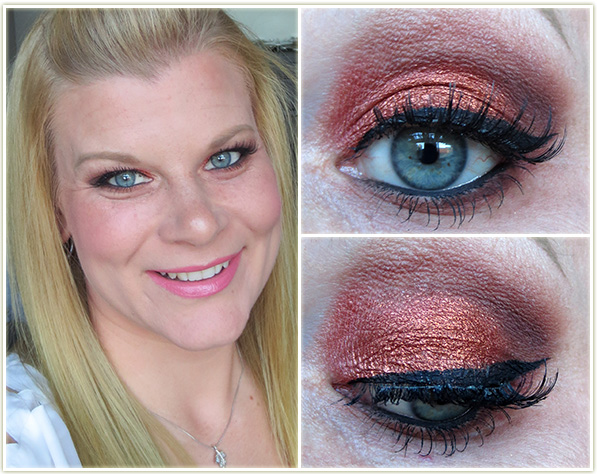
201407_look1.1

One of Nikki Tutorials’ recent recreations was a look that was inspired by Cheryl Cole. I took Nikki’s tutorial and tried to replicate it as much as possible which was, thankfully, relatively easy given that I had almost all of the exact same products she used. So here’s my take on her tutorial!
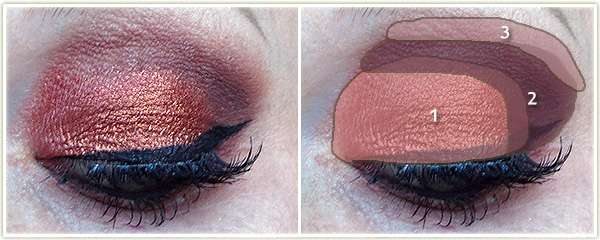
201407_look1.2

Eyes

  1. MAC Coppering all over the lid as a base layer. Then apply Too Faced Glitter Glue on top of Coppering, and tap on Makeup Geek‘s Vegas Lights pigment.
  2. Combine Makeup Geek Cocoa BearToo Faced Semi-Sweet and Too Faced Cherry Cordial and blend that in the outer corner and through the crease. I also ran this combination all along the lower lash line.
  3. Makeup Geek Creme Brulee through the top of the crease.

MAC Shroom on my brow bone, Tarte‘s gel liner in Black to create the wing and Urban Decay‘s Black Velvet liner on my inner lower rim. Make Up For Ever Smoky Lash Extravagant on my lashes with Ardell 102 Demi false lashes. Anastasia Dipbrow Pomade in Blonde through my brows.

Rest of the Face

  • Foundation: Revlon Colorstay (Dry/Normal) in 220 Natural Beige
  • Bronzer: NYC Fire Island Tan
  • Blush: Tarte Dollface
  • Highlighter: Hard Candy Tiki
  • Lips: Starlooks Naked lip liner with NYX Butter Gloss in Maple Blondie on top
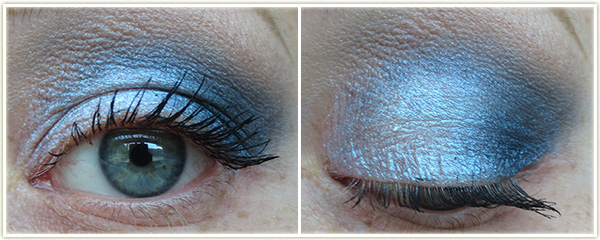
201407_look4.1

This look came about as I was doing my “Four or More: Eyes Edition” post and remembered just how much I love the sheen/duochromeness of the Color Tattoo in Waves of White.
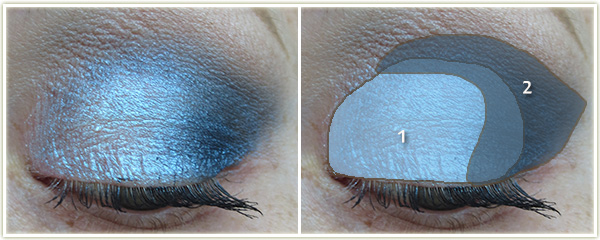
201407_look4.2

Eyes

  1. Maybelline Color Tattoo in Waves of White all over the lid.
  2. From Sleek‘s Acid palette, use the darker blue shade in the outer corner and through the crease.

Makeup Geek Creme Brulee blended through the top of my crease with MAC Shroom on the browbone. Make Up For Ever‘s Smoky Lash Extravagant on my lashes.
201407_look5.1

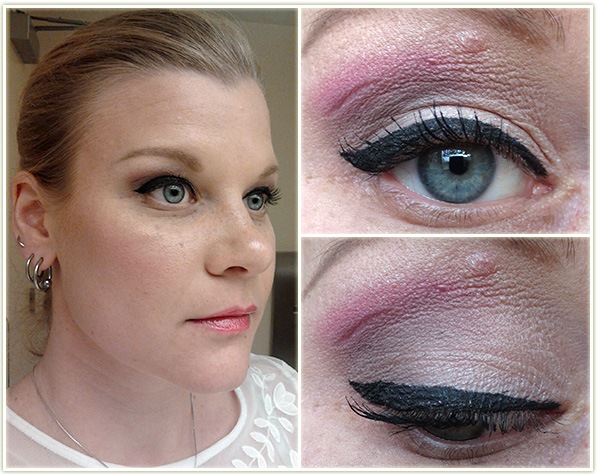
Judging by what foundation I used, I think this look is from a month or more ago. I was going through a pink crease phase and this was one of the looks I came up with.
201407_look5.2

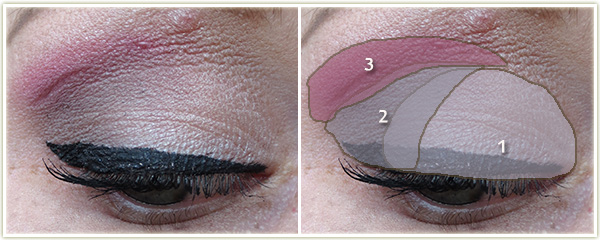
Eyes

  1. MAC Shroom all over the lid.
  2. MAC Copperplate on the outer half of the lid.
  3. Makeup Geek Simply Marlena through the crease.

MAC Shroom to highlight my brow bone. Tarte‘s gel liner in Black to create the wing and L’Oreal Voluminous Carbon Black mascara on my lashes.

Rest of the Face

  • Foundation: CoverGirl CC Cream in 110 Classic Ivory mixed with Bourjois Healthy Mix Serum in 51 Light Vanilla
  • Bronzer: Joe Fresh Sand Bronzer
  • Blush: Joe Fresh Apricot cream blush with Be A Bombshell‘s Beach Please powder blush on top
  • Highlighter: Too Faced Candlelight
  • Lips: Inglot Lipgloss in AMC 544
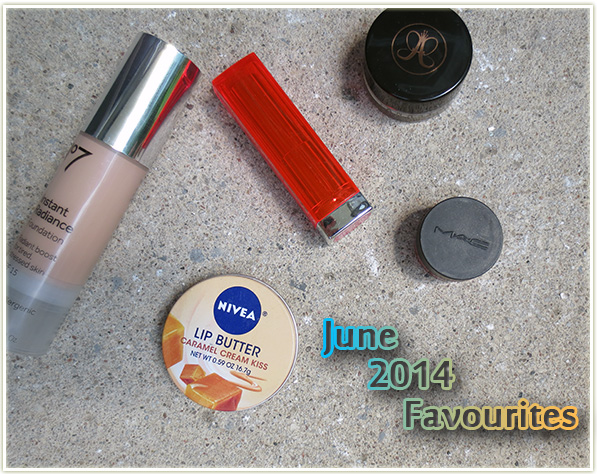
June 2014 Favourites

201406_favourites

I don’t even remember what spring is anymore. Every year in Toronto it feels like we go from serious sub-zero temperatures and then all of a sudden it’s freaking scorching outside! As a nod to the ever increasing temperatures and my ever increasing desire to wear less makeup as I stay up later and wake up later (and have less and less time to get ready for work every morning), I ended up leaning more heavily towards lip products this month since my eye makeup was looking pretty bare a lot of the time.

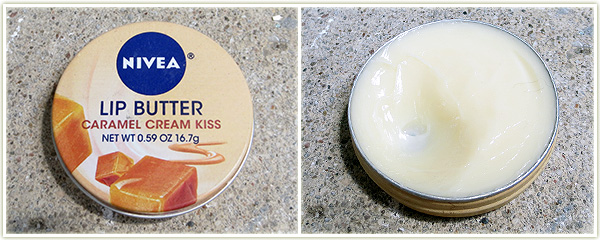
Nivea Lip Butter in Caramel Cream Kiss

First up is Nivea‘s Lip Butter in Caramel Cream Kiss. This has become my nightly lip balm. I’ve put a rather large dent in this from using it every night before I go to bed. It’s thick enough that it’ll last all night and I’ll often wake up the next morning with a thin layer still on my lips. It doesn’t smell quite like caramel to me, but it’s still buttery, sugary goodness!

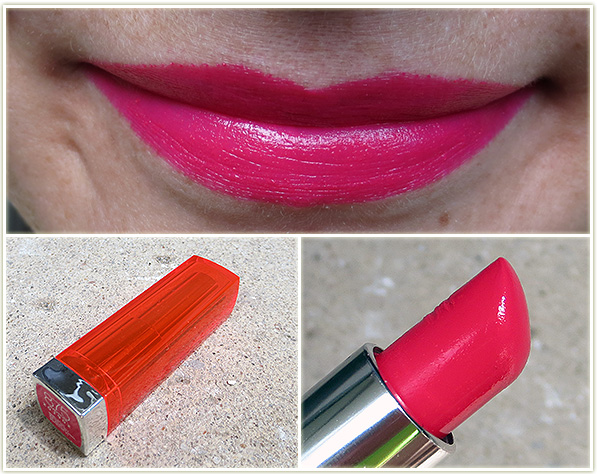
Maybelline – Vivid Rose

If I had to define happiness in a shade of lipstick, Maybelline‘s Vivid Rose would be it. I bought this last summer and fell in love with it immediately. This is a bright, hot, deep neon pink that smells like creamy frosting and lasts a surprisingly long time on the lips given how rich it is. Seriously, this stuff stays surprisingly creamy on the lips for many hours after it’s been applied. If you pick up one thing from Maybelline‘s Vivids line, let Vivid Rose be the one!

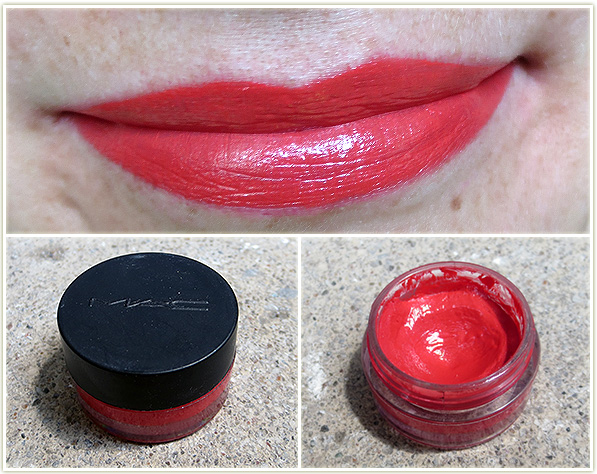
MAC – Hibiscus
MAC – Hibiscus

This sad pot of lipstick is MAC‘s Hibiscus lipstick. Unfortunately, the bullet broke a long while ago and the only way to salvage the lipstick was to depot the whole thing into a small sample jar I had from MAC. This lipstick was from the Surf Baby collection in 2011 and because it’s de-tubed, I keep forgetting about it! It’s a cremesheen, which I don’t have the best of experiences with, but there’s no denying that colour! A bright, shiny coral, this one is loads of fun to wear. Unfortunately, MAC hasn’t re-released it in the past few years since its initial release, but if you ever spot this at a CCO or on a blog sale, definitely snatch it up!

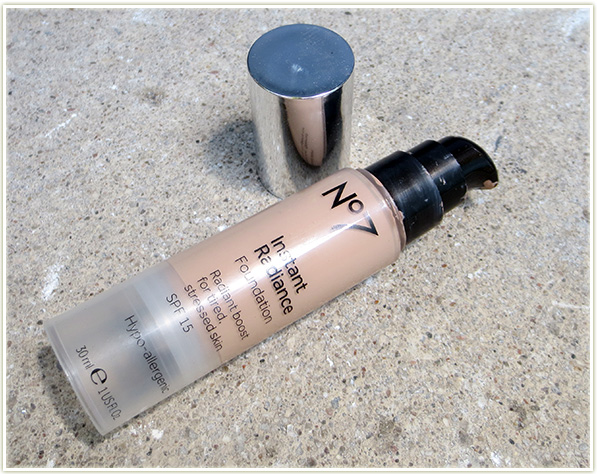
Boots No7 Instant Radiance Foundation in Cool Vanilla

Boots No7‘s Instant Radiance foundation in Cool Vanilla was too dark for me throughout the winter months, so I’ve only been able to recently bust it out and start using it again. And I, as per usual, had forgotten just how much I love this stuff. It blends in beautifully and it really does give a radiance to the skin that I never really expect from foundation, even when it’s called Instant Radiance! Love the pump too. I picked this up last year when I was in England, but I think Boots No7 brand is now sold at Target in Canada.

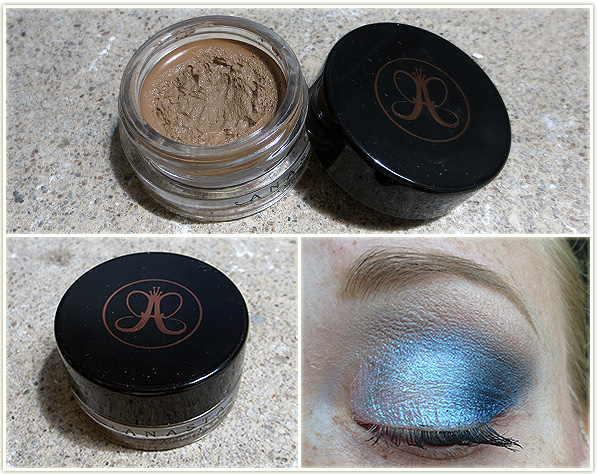
Anastasia Dipbrow Pomade in Blonde

I’d just like to take this moment to give myself a massive pat on the back for finally figuring out how to use this properly! When I finally ran out of my MAC Omega shadow, and had this waiting in the wings, I knew I had to buckle down and figure out how to use this product. Sweeping powder through your eyebrows is one thing, trying to actually put some kind of gel product there can be maddening! This has become my go-to brow look now. It’s a lot more in your face than I’m used to, and I’m not entirely sure the colour is quite pale enough for me, but I like the end result so I’ll keep going with this until they come out with a lighter shade than Blonde.


And just like that, there goes June! Tell me what you were loving this month

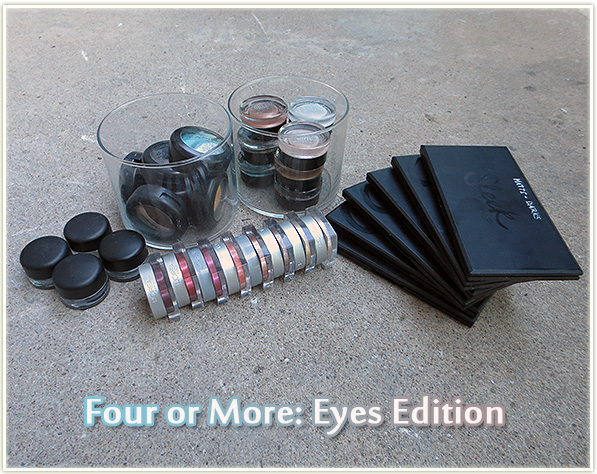
Four or More: Eyes Edition

201406_4ormore-eyes

Last month I did a “Four or More: Lips Edition” post, and this month I thought I’d bring you the Eyes version of that. So here are quick reviews on eye products that I happen to own four or more products!

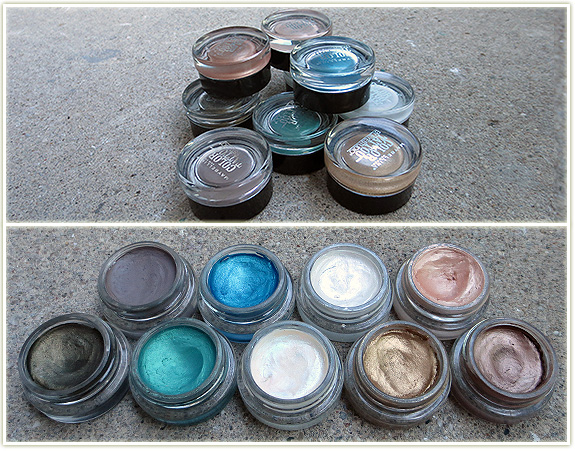
Maybelline Color Tattoos – (starting on the top row l-r): Tough as Taupe, Tenacious Teal, Too Cool, Barely Beige, (bottom row:) Mossy Green, Edgy Emerald, Waves of White, Bold Gold, Bad to the Bronze

These Maybelline Color Tattoos are beloved by almost every beauty blogger, beauty YouTuber and many a person I know IRL. And while I own a lot of them, I just never really fell in love with them like everyone else did. I really did try to – clearly I did, I kept on buying them – but on me they seem to make my lids really “crackly-looking”. I know that’s an odd description, but it’s the best way I can think to describe it.  They also don’t blend out as well as I want them to. And they definitely do dry up over time, even though I store them top-down. They do have insane lasting power however: I wore Edgy Emerald and Tenacious Teal while swimming in the ocean by accident once while on vacation in Florida and they did NOT budge. I will say that I bust these out if I need a really quick eye colour that I don’t want to fuss with, but I’ve put myself on a Color Tattoo no-buy because despite the pretty colours, I just don’t use them as much as I should given how many of them I own.

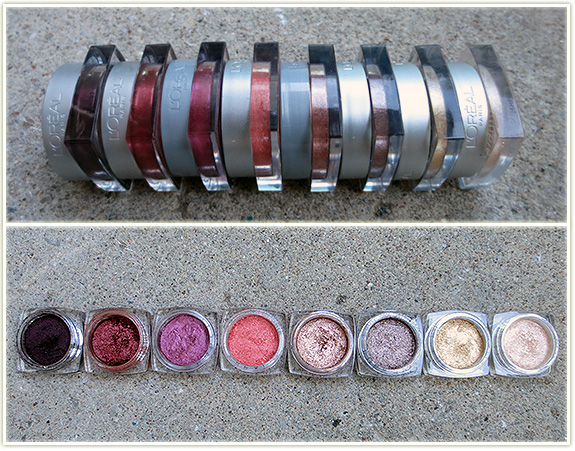
L’Oreal Infallible Eyeshadows (l-r): Burning Black, Golden Mahogany, Glistening Garnet, Pepsy Coral, Amber Rush, Tender Caramel, Goldmine, Hourglass Beige

I love these so, so much. L’Oreal‘s Infallible Eyeshadows are amazing. Very smooth and incredibly pigmented. They’re essentially loose pigments pressed down by a stopper to keep them from sloshing about. You get the benefit of the pigmentation of a pigment, without the horrific powdery mess that inevitably ends up EVERYWHERE. My absolute must haves from the line are Amber Rush and Hourglass Beige 

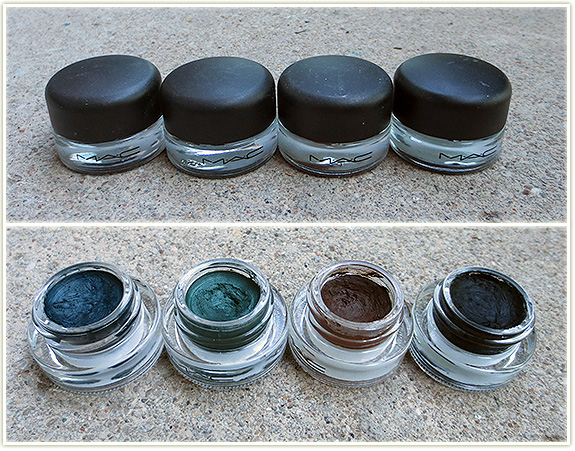
MAC Fluidlines (l-r): Midnight Blues, Dark Envy, Dipdown, Blacktrack

(called Iced Latte in the US – I think you guys got the better name on that one!). But the best one out of the lot is that amazing darkened, shimmery red second from the left. It’s called  Golden Mahogany and was only available in Canada for a limited time. I happened to find a complete ratchet one at Walmart about a year ago and snagged it up because that particular shade is completely gone from the line now. Regardless of your colour preference, these are worth picking up just to test out and see how you like it.

Fluidlines are MAC‘s term for a gel liner and a product I always come back to. I’ve been through a few pots of Blacktrack, and continue to repurchase it when I run out. These stay surprisingly creamy for a very long time. That brown shade, Dipdown, is roughly four years old and is still as creamy as when I first received it. There’s something about MAC‘s fluidlines that just make them go on the lashline a lot smoother than any other gel liners I’ve tried. Other liners can tend to skip on me, but these flow on like BUTTAH. The brown and black shades are in their permanent line, but the dark blue (Midnight Blues) and green (Dark Envy) were from their MAC Me Over collection from 2011. Highly, highly recommended – though I will point out that they are not waterproof.

Sleek palettes
Sleek palettes

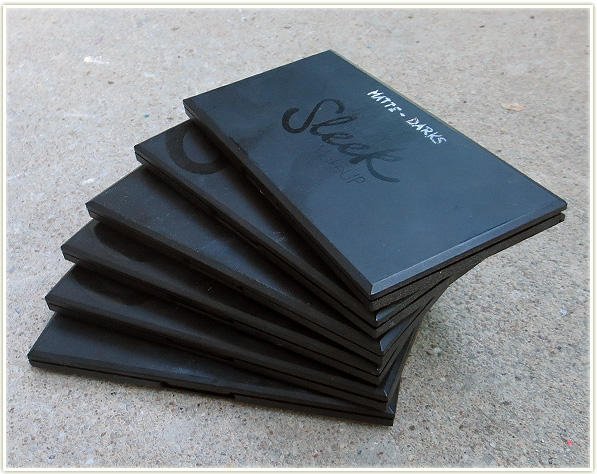
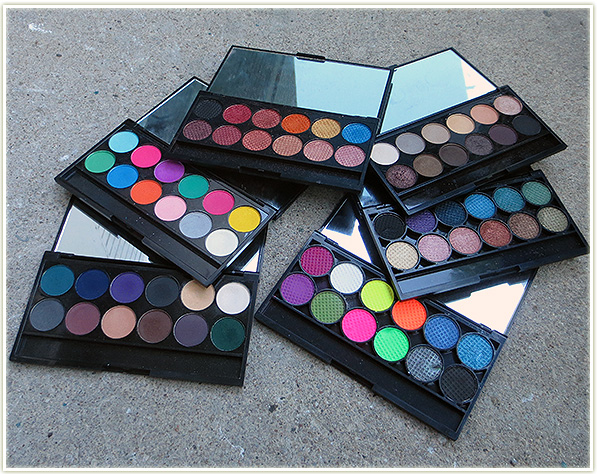
Oh baby do I ever love Sleek and their 12 pan eyeshadow palettes. So much so that I’ve picked up six of them over the years whenever I’m in the UK.

Sleek palette (clockwise starting from the bottom left): Mattes V2, Mattes V1, Sunset, Au Naturel, Original, Acid

The pigmentation on these is incredible for a drugstore brand that is relatively inexpensive. My favourites are the two matte palettes – the bright one and the dark one. It can be hard to find mattes at the drugstore in a variety of colours, never mind actually finding bright vivid ones as well! Hands down Sleek has the best drugstore palettes that exist. If only they’d come to Canada! (That being said, the shipping from the UK to Canada is incredibly cheap, so it’s worth ordering some palettes online if you would like to check them out.)

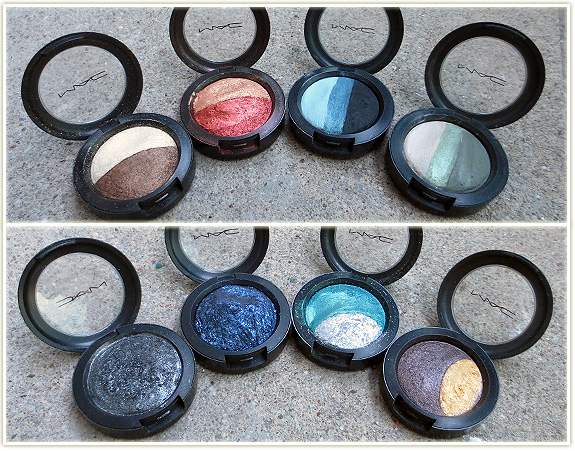
MAC Mineralize Eyeshadows. Top row (l-r): Illusionary/Burning Ambition, Heat Element, Blue My Mind, Calm, Cool & Collected (bottom row (l-r): Cinderfella, Blue Flame, Blue Sorcery, Midnight Madness

I went through a phase of loving MAC‘s Mineralize Eyeshadows, but have stopped collecting them in more recent years. On me, these are best applied wet in order to bring out the pigmentation and shimmer (water works just as fine as MAC‘s Fix+ does). While the duos are easy enough to get your brush into, I will say that the trio get to be a nightmare when you wear down the middle strips. You end up needing smaller and smaller brushes to get just that single pigment and it can be tedious to do so. My favourite of the lot? Of course it’s the red-tinged one: Heat Element.

That’s my round up for Four or More: Eyes Edition. The only thing not mentioned were my MAC eyeshadows/palettes as I’ve already done a few posts on those. You can check them out here:

What’s On My Face – Volume 18: Pride Edition

This year, Toronto is the host city for World Pride. I have loved Pride ever since I moved to Toronto and into the Village. I know Pride gives everyone a different feeling, but to me it’s a time to celebrate freedom, be happy, and wear a metric ton of bright colours and glitter.

I’ve been saving these looks for a lonnnng time. Even before I had a blog I was all “I need to photgraph these because some day… I’ll use them for… something.” Since these are all taken over a year ago (during last year’s Pride Week) the quality may be a little bit different and I definitely don’t have any closed eye shots so I could map out what colours go where. But I’ll do my best to describe!

20140611_look3.1

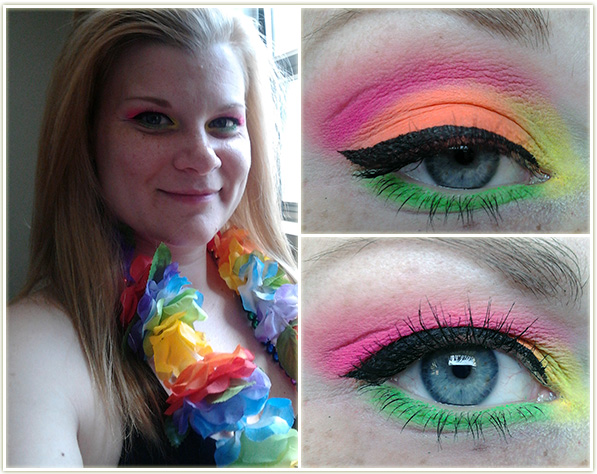
If you’re looking to shock people with a neon look, then this one is a darn good place to start. Although the up close picture shots make it look really cool,  just be aware that this is not an especially flattering look.

I wore this during my soccer league’s Pride Parade float last year and it held up through the heat and the inevitable water bomb attacks that happened throughout the parade.

Eyes

  • Urban Decay Primer Potion in Original all over the upper and lower lids.
  • NYX Jumbo Eyeshadow Pencil in Milk all over the upper lid – smooth out with your finger.
  • Then using the Sleek Acid Palette: Neon orange on the lid, neon pink through the crease, neon yellow in the inner corner and the neon green to line the lower lash line.
  • A touch of Urban Decay’Buck to blend out the crease and make the pink a touch less harsh.
  • Physicians Formula Eye Booster in Ultra Black to create the wing.
  • L’Oreal Voluminous Carbon Black mascara on my lashes

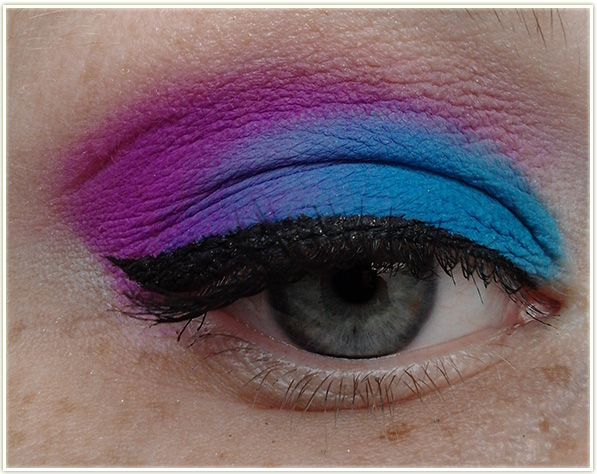
20140611_look2.1

This is a quick vibrant one that can be done using any two really pigmented colours. The week of Pride, I tend to mix colours based on the rainbow’s gradient and go from there. For example, on Monday I’d wear red/orange, Tuesday yellow/green, Wednesday blue/purple, etc. If you stick to the rainbow gradient, it’s very hard to mismatch colours.

For the above look, I used:

  • Urban Decay Primer Potion in Original to prime my lid
  • NYX Jumbo Eyeshadow pencil in Milk as a solid base – be sure to blend it out
  • Then using Sleek’Ultra Mattes V1 palette: Sugarlite all over the lid, with Bolt in the outer corner and through the crease. A little bit of Pow! to highlight the brow with a touch of Urban Decay‘s Naked eyeshadow in the crease to blend out the shades through the crease.
  • Maybelline Gel Liner in Blackest Black to create the winged liner
  • And finally, CoverGirl Clump Crusher mascara on my lashes

20140611_look1.1

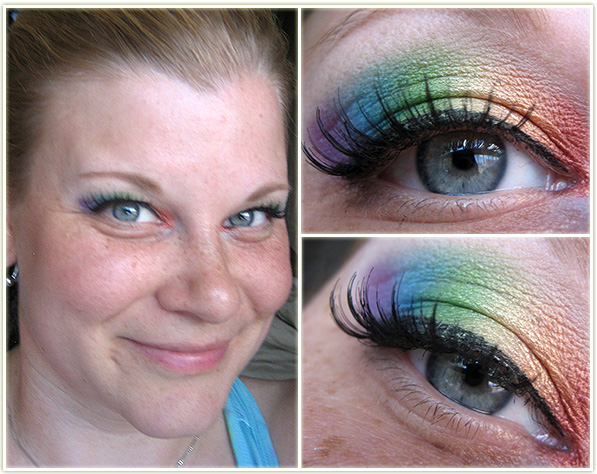
And my favourite one! This came out so much better than I ever thought it would.  Every Pride I end up wearing this to work at least one of the days of the week. I think it’s really vibrant and beautiful. And it’ll definitely get you noticed!

  • Urban Decay Primer Potion in Original to prime my lid
  • NYX Jumbo Eyeshadow Pencil in Milk to create the base
  • Starting from the inner corner, using all MAC shadows, apply small stripes of shadow, then blend them into the next colour. I used (from inner corner to outer): Coppering, Amber Lights, Goldmine, Bio Green, Freshwater and Parfait Amour.
  • MAC Blacktrack Fluidline for my liner
  • L’Oreal Voluminous Carbon Black mascara on my lashes with Ardell 102 false lashes on top.

I hope this gives you some ideas for Pride. Keep in mind that pretty much anything goes throughout Pride so you can feel free to wear whatever you like.

Thirty Days of Lips

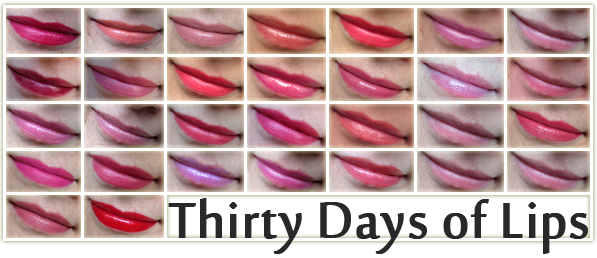
When I came back from vacation in March (and bought that hoard of makeup), I realized I’d picked up something crazy like 26 lip products. So I dropped them all in a bucket and determined that I’d work my way through the whole lot of them. That didn’t end up exactly happening since I ended up using other products I loved as well, but I thought I’d record my progress in pictures as I went along. The result of that process is the following picture: A full month record of what I wore on my lips throughout April.thirtydaysoflips

Week 1 (top row)
  • Too Faced – Jelly Bean
  • Rimmel – Luna
  • Milani – Nude Creme
  • Revlon – Sunset Peach (gloss)
  • Too Faced – Bon Bon
  • NYX – Merengue (gloss)
  • Nothing
Week 2 (second row)
  • Revlon – Twilight
  • Bite Beauty – Fig
  • Revlon – Snow Peach
  • Inglot – 544 (gloss)
  • bareMinerals – Get Ready
  • Nivea – Berry Swirl
  • Nothing
Week 3 (third row)
  • NYX – Vanilla Cream Pie (gloss)
  • Nivea – Berry Swirl
  • Too Faced – Coral Fire
  • NYX – Fizzies
  • Wet n Wild – 903C with NYX – Tiramisu on top
  • Nothing
  • Milani – Flamingo Pose with Maybelline – Sahara on top
Week 4 (fourth row)
  • Milani – Hot Pink Rage
  • NYX – Fizzies
  • Inglot – 541 (gloss)
  • NYX – Strawberry Parfait (gloss)
  • Revlon – Papaya (gloss)
  • Nothing
  • Nothing
Week 5 (bottom row)
  • Milani – Naturally Chic
  • Rimmel – Big Bang